SignManiac
New Member
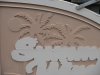
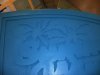
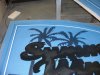
Just finished three of these yesterday. The first pic is my design proposal for the client. The second shows the 2" thick HDU after the stencil is cut and the background was hogged out and then the outer profile cut to shape.
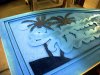
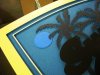
After that we sandblasted the background to bring out the natural texture of the HDU. We lightly sanded smooth the palm trees and moon in the background only. The palm fronds were left rough and textured.
Then we laid down three coats of the background color, a twilight blue. Then came the midnight blue for the palms and sailboat silhouette design. Once that was done we painted the shadow portion of the name black.
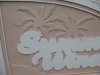
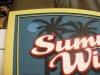
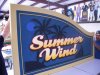
I then cut from 1/4" PVC a background for the red outline portion of the name Summer Wind. Once that was down, I cut out the name in 1/2" thick PVC with a nice soft round over on the edges. I painted the letters white and then came in from the bottom of the letters with a soft blended gold color. These were then stud mounted and glued all the way into the HDU material.
That's all there really is to it. So easy, a cave man can do it!
After that we sandblasted the background to bring out the natural texture of the HDU. We lightly sanded smooth the palm trees and moon in the background only. The palm fronds were left rough and textured.
Then we laid down three coats of the background color, a twilight blue. Then came the midnight blue for the palms and sailboat silhouette design. Once that was done we painted the shadow portion of the name black.
I then cut from 1/4" PVC a background for the red outline portion of the name Summer Wind. Once that was down, I cut out the name in 1/2" thick PVC with a nice soft round over on the edges. I painted the letters white and then came in from the bottom of the letters with a soft blended gold color. These were then stud mounted and glued all the way into the HDU material.
That's all there really is to it. So easy, a cave man can do it!
Attachments
-
 00-Summer Wind design proposal.jpg70.1 KB · Views: 137
 -
 01- rough CNC router hog out.jpg190 KB · Views: 102
 -
 02-three stage sand blasted background.jpg220.2 KB · Views: 105
 -
 03-first coat of twilight blue background paint.jpg218.9 KB · Views: 107
 -
 04-second color for palm trees.jpg317.3 KB · Views: 94
 -
 05-third color black for lettering shadow.jpg255.1 KB · Views: 93
 -
 06-forth color gold for outside border and inset strip.jpg281.6 KB · Views: 108
 -
 07-new layer pvc for red outline of lettering.jpg263.8 KB · Views: 93
 -
 08-finished with half inch thick two color blended lettering.jpg276.6 KB · Views: 91

