• I want to thank all the members that have upgraded your accounts. I truly appreciate your support of the site monetarily. Supporting the site keeps this site up and running as a lot of work daily goes on behind the scenes. Click to Support Signs101 ...

HP Latex 110, Paper Media Puckering/Buckling Results in Crease

RandyDe

New Member
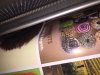
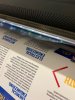
We’ve been troubled with this for a while now. On many media’s when we print as the paper exits the machine after being printed it puckers/buckles and that results in a crease in the finished and printed product. I will attach photos that will hopefully better show the issue. The photos are from printing onto HP Everyday Photo Satin and both were using the 12p6c110 media preset as downloaded from HP Media OS. While running a larger print job we experimented with lowering heat from the default 85C to 80C, 75C and 70C. The lower temperatures resulted in a few not fully cured areas in the solids so we increased the interpass delay to 200ms and that helped.

We also have similar issues with other print medias such as Drytac Vinyl and PETs from Sihl to name a couple. It always seems that there is this varying crease in the output which causes this. It creases in the same location most of the time, approximately 20 inches from the right side of the printer (looking at the printer).

In the past we had technicians check and confirm that all the fans are indeed working and outputting the same temperature. They also ensured that all vents and holes were cleaned and not clogged.

We’re really stumped here and honestly suspect that there is something inherently defective with the printer straight from the factory. Thoughts?
 

Attachments

  • IMG_4654.JPG
    IMG_4654.JPG
    611.3 KB · Views: 1,375
  • IMG_5569.jpg
    IMG_5569.jpg
    442.2 KB · Views: 159
  • IMG_5570.jpg
    IMG_5570.jpg
    646.2 KB · Views: 154
  • IMG_5572.jpg
    IMG_5572.jpg
    260.2 KB · Views: 171

balstestrat

Problem Solver
That's normal, nothing wrong with the machine. Most materials do that as they heat expand/shrink.
Get take-up and fix it to that to keep some tension on it. Or make up some skid so the angle isn't so bad. Don't let the leading edge hit the floor, that's almost always going to make something like that happen.
 

RandyDe

New Member
That's normal, nothing wrong with the machine. Most materials do that as they heat expand/shrink.
Get take-up and fix it to that to keep some tension on it. Or make up some skid so the angle isn't so bad. Don't let the leading edge hit the floor, that's almost always going to make something like that happen.
balstestrat True the 110 didn't come with a take-up and that may be a solution for larger run jobs.

We always avoid having any of our prints hitting the floor. We place a large 8x4-ft, 34-inch tall table in front of the printer to receive the printed pieces. When doing this we have experimented with letting the print material hang in various lengths (loops) off the edge of the table between it and the printer exit. We have also tried having minimal print material hanging in that space between the table and printer exit and drape it directly onto the table managing it by hand so that it lays flat.

With your idea of a skid/surface to receive the printed output is there a particular angle and height that you think may work best?
 

balstestrat

Problem Solver
Some people just put a long piece of foamcore/coro or something that they attach under the heater. I don't have anything particular in my mind.
But now that you say it that table might just make things worse? It still has to push the material out so having the table there might make it push more than it should when it should actually be falling down or even pulling.
Anyway what do you think is the usual condition that it happens? Short or long jobs? Table or no? Both?

I haven't had anyone complain about creases like this so it's not very common.

You could also consider getting one of those china take-ups and bolt that to the leg. https://www.ebay.com/itm/174197202957
Easy way to find out if it would help is to attach some small weights like magnets to the leading edge and see if that flattens the spot and makes the material follow the platen more closely -> avoiding creases.
 

RandyDe

New Member
Some people just put a long piece of foamcore/coro or something that they attach under the heater. I don't have anything particular in my mind.
But now that you say it that table might just make things worse? It still has to push the material out so having the table there might make it push more than it should when it should actually be falling down or even pulling.
Anyway what do you think is the usual condition that it happens? Short or long jobs? Table or no? Both?

I haven't had anyone complain about creases like this so it's not very common.

You could also consider getting one of those china take-ups and bolt that to the leg. https://www.ebay.com/itm/174197202957
Easy way to find out if it would help is to attach some small weights like magnets to the leading edge and see if that flattens the spot and makes the material follow the platen more closely -> avoiding creases.
The job length doesn't seem to matter, for any job that would end up touching the floor we always use the table. I think we should look at experimenting with some sort of a skid/sled as you suggest attached under the heater and try this at different angles to see what happens. The China take-up could always be an option and likely much less expensive than trying to find a HP part from a reseller.

Thanks for these suggestions and ideas, we'll look at setting up the skid/sled idea to see if this helps. Thank you!
 

Brad Gallant

New Member
Paper often buckles in latex printers. Mainly due to the heat. Sometimes humidity changes can affect how badly the media buckles. To minimize buckling, create a profile from scratch and use a higher number of passes. Higher number of passes will allow you to use less heat. Adjust the curing temperature as low as you can that allows the ink to cure. Lowering the saturation can also help a bit. Attaching the material to a take-up before printing can help, but if you don't have a take-up, feed some material past the curing module, and attach a clothes-pin style clamp to the center of the media to act as a weight to help the paper lay flat through the curing zone. Also make sure all the vacuum holes on the platen are clean and not clogged with dried ink residue.
 

RandyDe

New Member
Paper often buckles in latex printers. Mainly due to the heat. Sometimes humidity changes can affect how badly the media buckles. To minimize buckling, create a profile from scratch and use a higher number of passes. Higher number of passes will allow you to use less heat. Adjust the curing temperature as low as you can that allows the ink to cure. Lowering the saturation can also help a bit. Attaching the material to a take-up before printing can help, but if you don't have a take-up, feed some material past the curing module, and attach a clothes-pin style clamp to the center of the media to act as a weight to help the paper lay flat through the curing zone. Also make sure all the vacuum holes on the platen are clean and not clogged with dried ink residue.
Brad Gallant All good tips. I have been in the process of moving most of our media profiles to higher passes to allow me to get the curing temps down. I also increase the interpass delay on some medias to help with the ink drying. I did run a test on Kernow Coatings, Ultimate 230STL (PET film). The initial profile downloaded from HP Media OS was 10-pass, 110ink limit at 92C. Still had buckling so ran a test at 12-pass, 100ink limit at 90C last night which still seemed to buckle. The next jump on the HP is 16 pass which I am considering (albeit I think would be overkill for a retractable display panel). Thoughts?
 
Top