First,
Trailing lamps are right dir_ L_Lamp checked, R_Lamp not checked, left dir L_Lamp not checked, R_Lamp checked
Leading lamps is the opposite right dir_ L_Lamp not checked, R_Lamp checked, left dir L_Lamp checked, R_Lamp not checked
Dual Lamps would have all four checked - but only use when laying a lot of ink down.
Second,
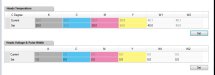
Yes, temperature and voltage are both set correctly for the Kyocera heads. You should not need to change this.
Third,
The fuzzyness is related to calibration of the colors - you need to run through a set of calibrations.
Best to run a full set of calibrations and do so in order so that any changes you make do not undo the ones you just made.
Test:
Nozzle test - do this to be sure your nozzles do not needs to be cleaned with flush
Head Vertical - not likely needed, but this is the test to see if you need to manually adjust the screws that angle the physical heads (do not mess with the heads if you do not need to until you have more experience).
Nozzle Alignment - Horizontal version of above calibration - like before check, but only adjust yourself once you are experienced. Also, not likely either this or Head Vertical needs adjustment.
Heads Offset - This is where most of your adjustments will be made. You run it for Left Directional and then Right Directional. it will print a series of bars for each color with values above. The center one is current setting, -1 thru -5 are values where you minus that amount from your Color Module Calibration to the corresponding row and column (Row is for which test you are running, right directional or left directional, columns are for each color and its two sections of the head - so Kl and K2 refer to two sections for black. use a magnifying glass or eye piece so you can best see which value has the middle lines and the top and bottom brackets most aligned for each color. Circle the best for each and then add, subtract or leave alone to match the value above each box. Once you have entered the values for all the Left Directional test run, run it again to make sure it is correct - adjust again. Example: If my K-l value was 5 in the software, but -1 looks best on the print, change the value in the software to 4 (5-1=4). Next do the same for the Right Directional, run test, circle best matches, adjust values, run test agin to confirm.
BiDirectional Offset - This is divided between small and medium dots size and large dot size and the value is based also up on which speed you run. You are picking one number where all alignments are closest. Do this for each speed you run. If you run large dot size (like for billboard
signs) do it for large as well at each speed you typical run the job.
Stepping calibration - this adjusts the amount the printer moves for each pass of printing. This is another pick one number, the best average for all colors.
The other alignments should not need to changed.
This should allow you to get the color fuzziness out and back to printing at your best.