• I want to thank all the members that have upgraded your accounts. I truly appreciate your support of the site monetarily. Supporting the site keeps this site up and running as a lot of work daily goes on behind the scenes. Click to Support Signs101 ...

Need Help Please Help! I need service manual for my Roland Soljet Pro II Sj-540

delriosigns

New Member
Hi Everyone. Hopefully someone can PLEASE help me out. I have been looking everywhere and I can’t find the SERVICE manual for my Roland SJ-540. I even found a couple websites that seemed like they had the pdf for sale, but after paying there is no link and can’t get a hold of their customer service. Most likely a scam I know, but I’m desperate. I had a couple nozzles/nipples break on a couple of my printhead manifolds. I just purchased new manifolds but want to make sure they are replaced correctly and don’t want to spend a fortune paying a tech. Please help!
 

Signturesigns

New Member
Hi Everyone. Hopefully someone can PLEASE help me out. I have been looking everywhere and I can’t find the SERVICE manual for my Roland SJ-540. I even found a couple websites that seemed like they had the pdf for sale, but after paying there is no link and can’t get a hold of their customer service. Most likely a scam I know, but I’m desperate. I had a couple nozzles/nipples break on a couple of my printhead manifolds. I just purchased new manifolds but want to make sure they are replaced correctly and don’t want to spend a fortune paying a tech. Please help!
hey im having the same problem did you resolve it? woud love to chat on a call whats your number? mine is 727 641 7115 lets knowledge share please!
 

Broome Signs

New Member
Hi Replacing the head cap is a very simple process

Turn the printer off and unplug it

Lower the docking station manually, there is a hole underneath the printer to access the worm screw

Remove the print ribbon cabal

Remove the spring from the top of the head carriage

Take out the 3x screws holding the head in

Pull the head towards you and up

Once out remove the manifolds x2 screws

Replace manifold and put the head back in the printer

Replace the damper

Turn on the printer and perform a couple of powerful cleans

Then print test print

(Try to line it up as is came out, you may have to adjust the bi directional settings if the print is out)
 

Sheila Case

New Member
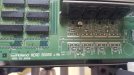
Having some issues getting this printer up and running. Roland Soljet Pro 2 SC-540 We bought it without the heads. It had been sitting, without heads for about a year before we purchased it. We replaced the heads, caps, dampers, all 3 pumps and lines from caps to pumps. I was able to draw ink into the dampers but none at all past that point. Tried drawing though waste tube coming out of the pump, nothing. Drew through lines between cap tops and pumps, nothing. Cap tops are still dry. Tested head board fuse and found that F2 and F4 are ok but F3 is blown. I did notice that the F2 & F3 are 72V 3.15A and F4 is 63V 3.15A , does that make a difference? It looks as if these may have been replaced prior to us buying the printer (see pic) I have ordered new fuses to (all SOC 72V T3.15A, which is what the service manual specifies). How would I also test the transistor and where on the head board will that be located? (I have also ordered new ones, just in case).

20190401_105106.jpg 20190401_105106.jpg

No errors after powering up (other than it's time for a wiper change, which I did but still get the "time for wiper change" error). I am able to do cleaning cycle, go through service menu, test print, everything but doesn't print anything on test print, just goes through the motions.


Service tech wants $400 min. to come to me to check it out (partly because of the area of Texas I am in), so I am determined to get this thing going myself if at all possible. Any suggestions would be most appreciated!
 

Attachments

  • 20190401_105004.jpg
    20190401_105004.jpg
    3 MB · Views: 332
  • 20190401_105129.jpg
    20190401_105129.jpg
    2 MB · Views: 311

Broome Signs

New Member
If you have any red led lights on the head board are read you will need a new one

If all the led lights are on the board are green
Power down the printer
take all the heads out

Put a small amount of tissue in a flat dish and pour some cleaning flush into the dish just too wet the tissue

Put the heads on top of the tissue

Add some more cleaning flush to the dish , just to the point where the silver cap on the head is coverd

Do not get any flush on the top board or into the print ribbon slot (very bad)

Cover the dish

When you see the flush level go down the heads will be drawing the flush into themselves 24 /48 hours

Take all the ink out and replace with flush cartridges

Reassemble the heads into the print carriage

Turn the printer on in service mode

Perform power fill

test print on paper

Once the heads are firering change the flush cartridges for new ink

Perform powerful clean until all the dampers are full of ink and then 2x more power clean

X1 med clean x2 normal clean

Now try the test print
 
Top