• I want to thank all the members that have upgraded your accounts. I truly appreciate your support of the site monetarily. Supporting the site keeps this site up and running as a lot of work daily goes on behind the scenes. Click to Support Signs101 ...

SP300. Perfect testprint+bidirectional setup but still unwanted magneta outlines?

zm71

New Member
Hi.

Ive setup my sp300 and ive got perfect testprints and ive also setup the bidirectional correction so it looks good (i think).

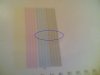
But! Im still getting magneta and cyan outlines/shadows, especially around black(dark) colors.

Using colorip 2.2. Generic PVC2 mode/hi quality. Oracol 316g printmedia.

My CMY colors are Eco-sol max and my K is another brand (Also eco-solvent ofcourse ).

Any suggestions? Thank you.


(i forgot, the magneta&black head is brand new. installed 2h ago.)
 

niksagkram

New Member
Check your encoder strip. I had this happen with my SC540 and changing the encoder strip cured it. Not saying this is the answer for sure, but it's a start.

Mark
 

J Hill Designs

New Member
little clear strip on top of the carriage that the head moves across - search here for clean encoder strip - theres plenty of threads about it - DO NOT USE SOLVENT CLEANING FLUID
 

zm71

New Member
little clear strip on top of the carriage that the head moves across - search here for clean encoder strip - theres plenty of threads about it - DO NOT USE SOLVENT CLEANING FLUID

ok, thanks a lot.

btw, the "feed correction" didnt look 100%, im on it! thanks again.
 

InkjetAuction

New Member
You say that both heads are new? Your first post mentioned that the Magenta and Black heads are new...

Sounds like the horizontal head adjustment to me. Either it slipped, was never done, or done poorly. (Horiz head adjust this is an electronic timing adjustment to compensate for the horizontal distance between the print heads).

Can you please post a clear, closeup picture of a nozzle test (test print)? It's not as good as a horiz alignment test print, but sometimes you can usually tell by the test print if the horiz alignment is way off.

~E
 

zm71

New Member
You say that both heads are new? Your first post mentioned that the Magenta and Black heads are new...

Sounds like the horizontal head adjustment to me. Either it slipped, was never done, or done poorly. (Horiz head adjust this is an electronic timing adjustment to compensate for the horizontal distance between the print heads).

Can you please post a clear, closeup picture of a nozzle test (test print)? It's not as good as a horiz alignment test print, but sometimes you can usually tell by the test print if the horiz alignment is way off.

~E

sorry. Only the Black(+blue) is new. The Testprint is looking good.

How do i setup the horizontal head adjustment? Couldnt find it in the service manual.

thanks!
 

zm71

New Member
i feel like an idiot right now.. :banghead:


as u can see its a bit off in the middle.

what else can i do beside going thru the bidirectional correction all over again?

thanks.
 

Attachments

  • printtest.jpg
    printtest.jpg
    211.6 KB · Views: 168

threads1

New Member
go to the roland forums here and search for a link to the roland service manual. There is a section in it explaining how to do what you need along with other calibrations.
 

zm71

New Member
Ok, im at 4-4 in the manual. Dont understand "Setup the PET film"

and it says "setup sheet" when im trying this:

BIAS ADJUSTMENT]
Select the [BIAS] > [TEST PRINT] menu under the [HEAD ADJUST] menu and press the [ENTER] key.

Do i really need to remove the carriage cover and the Damperplate when only test-printing?
 

Robert M

New Member
Pet film

The printer is asking you to use PET film. This is film that will give you the highest resolution print so you can look at the ink dots with a loup or magnifing glass. Use some glossy vinyl if that is all you have.
 

InkjetAuction

New Member
@zm

You can run your test prints without removing the covers.

Clearly from your test print you have a huge horizontal head adjustment to do. This is an electronic adjustment... not physical.

Before digging into the machine, you should ask "Why is this adjustment suddenly so off?" Head strike? Were the screws holding down the head never properly tightened?

There is a order to a head adjustment-- you need to do a Bias, then Vertical, Horizontal and finally Bi-Directional default.

Doing a head adjust is not rocket science but it will help to have had a little training and guidance. Be careful to not strip the soft screws holding down the heads. Also be careful with screwdrivers and screws while the machine is powered. It will be a pain, but turn off the main power while making adjustments between test prints. You can wingwalk after you've done it a few times.

Follow your manual. Don't skip steps. Be careful and consider asking an experienced person for onsite assistance.

Good luck.

~E
 

zm71

New Member
thanks every1 for helping me out. i found the service manual and did the horiz and vert head aligment. never done anything like it before, got my printer 2w ago or something like that, but it was kinda easy when u got the hang of it and now it is printing goooooooood. no outlines, no overspray no nothing :)


:thankyou:
 
Top