• I want to thank all the members that have upgraded your accounts. I truly appreciate your support of the site monetarily. Supporting the site keeps this site up and running as a lot of work daily goes on behind the scenes. Click to Support Signs101 ...

Swapping large flexface on a pylon sign, techniques for tensioning on site?

lukeshoots

New Member
We do mainly new fab jobs but in this instance we need to swap out an older flex face as part of a sign package for a customer. It's about a 25' Long by 6 ' tall face and it's a ways up. We'll be doing the job out of our boom truck.

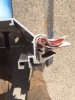
We've got the old faces down and in the shop and trimmed the new faces to match. I'm just wondering if we can do any prep work on the new faces such as installing some or all of the tension clips. I can't tell if it's going to make it easier or harder to add the clips before we are on site. At this moment the plan was to just to add all of the top tension clips so we are able to hang the sign once on site and add the bottom and side clips at that point.

Does anyone have any suggestions or tips?
 
T

TonyC

Guest
We measure the existing face at the location of the clips. We then lay the new faces flat and strike a straight line on all sides. This way we install all the clips in the shop. We also mark the top center and start the install there. Loosely attach all the remaining clips and start slowly applying tension to the top, then bottom, then sides starting in the middle to the top and bottom. You may have to do this slowly and visit each clip multiple times. Watch the creases as you tension and you can adjust them out if you go slow enough.
 

lukeshoots

New Member
They aren't Signcomp. They are, I believe, ABC Sign Products they look like this.

attachment.php
 

Attachments

  • flexclip1.JPG
    flexclip1.JPG
    54.3 KB · Views: 407

lukeshoots

New Member
Thanks a ton. I think the main thing I wanted to know is whether or not I should install the clips before we get on site. Which I will do.
 

lukeshoots

New Member
Just in the event that anyone looks at this thread with the same questions I had I can give a quick "What worked for us". We only installed the top row of clips in the shop. The reason for this was that we were basing our measurements off of the cabinet when we ordered the flexface print to replace. We didn't want to be stuck on site with all the clips set too far in or out to reach or get proper tension. Starting at the center we secured the top of the sign. Then went to both sides and put the clips in starting at the top keeping enough tension to remove the slack. We put maybe 3 clips (out of 6) on each side. Then went to the bottom and worked out from the center. At this point almost all of the slack was gone. We then went back to the sides and added in the few clips that were left, pulling nice and tight to remove any little bit of slack that was left. And Boom! A perfectly taught flexface.

Not sure if this is the correct way to do this but it worked very well for us.
 
Top