-
I want to thank all the members that have upgraded your accounts. I truly appreciate your support of the site monetarily. Supporting the site keeps this site up and running as a lot of work daily goes on behind the scenes. Click to Support Signs101 ...
You are using an out of date browser. It may not display this or other websites correctly.
You should upgrade or use an alternative browser.
You should upgrade or use an alternative browser.
Summa T160 ripping cuts
- Thread starter Mette
- Start date
Graphic Extremes
Knows To Little
That looks like a broken tip. New doesn't mean it a good blade.
Saturn
Aging Member
I'd lean towards broken tip as well. Real easy to check your blade tips (new, old, problematic) with a cheap battery powered scope. You can break them just by looking at them unfortunately. 
That serrated, chatter look can also happen when the Origin is way off. It's typically in the same ballpark from blade to blade though.
That serrated, chatter look can also happen when the Origin is way off. It's typically in the same ballpark from blade to blade though.
I have tried with 3 different blades.That looks like a broken tip. New doesn't mean it a good blade.
GaSouthpaw
Profane and profane accessories.
If I didn't read the description, I'd think that was a pounce tool.
Yes it kind of look like it. But it does cut.If I didn't read the description, I'd think that was a pounce tool.
Looking at the Test Cuts and the test pattern, I would assume that this is a S2 with the Tangential Head.
Looking at the rough edges... i think it might be the Origin of the blade that's not straight... that's why no matter what blade you use, it will be the same.
Knife Calibration has to be done everytime we change a knife... (every knife will have its tolerances so it will be better to do so).
The purpose of the knife calibration routine is to detect and, if need be, to correct problems related with the concentricity of the tangential knife blade.
You can find Calibrate Knife in the Settings menu.
The three knife parameters will appear on screen.
Select the parameter (your case would be Origin i think) to be changed.
Use + or - to change the parameter. Test and adjust accordingly.

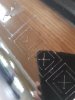
Rectangle 1 and 2 should weed out (remove) smoothly without sticking to the rest of the vinyl.
The fan shaped pattern 3 should have a clear cut line in the middle; the ones at the sides show burs.
The squares in 4 should be aligned and equal in size.
The 4 vertical cuts in 5 should be clear without any burs and straight all the way from top to bottom (not rounded near the horizontal lines).
It is possible that not all test patterns come out perfect (depends on the type of vinyl). Test pattern 1 and 4 are the most important test patterns. They should be as close to perfect as possible.
Start with the setting of the origin, then set the other parameters
Origin correction
If the clear cut line in test pattern 3 is to the right, then increase the value of the origin, begin in steps of 20, and lower the steps when nearing the correct origin setting.
It helps sometimes to gently feel the pattern to find out which side has the clear-cut line.
If the clear cut line in test pattern 3 is to the left, then decrease the value of the origin, begin in steps of 20, and lower the steps when nearing the correct origin setting.
Lateral correction
Weedout (remove) the rectangle in pattern 1 and in pattern 4, if the test pattern is like the one below, decrease the value of the lateral parameter to correct the closing lines cut.

However, if the test cut resembles the pattern below, increase the value of the lateral parameter to correct the closing lines cut.

Longitudinal correction
Weed (remove) out the rectangle and, if you obtained a pattern like the one below, decrease the value of the longitudinal parameter to correct the closing lines cut.

However, if the test cut resembles the pattern below, increase the value of the longitudinal parameter to correct the closing lines cut.

Each time a parameter is changed, press TEST to perform the internal knife calibration test.
I hope it works for you.
Looking at the rough edges... i think it might be the Origin of the blade that's not straight... that's why no matter what blade you use, it will be the same.
Knife Calibration has to be done everytime we change a knife... (every knife will have its tolerances so it will be better to do so).
The purpose of the knife calibration routine is to detect and, if need be, to correct problems related with the concentricity of the tangential knife blade.
You can find Calibrate Knife in the Settings menu.
The three knife parameters will appear on screen.
Select the parameter (your case would be Origin i think) to be changed.
Use + or - to change the parameter. Test and adjust accordingly.
Rectangle 1 and 2 should weed out (remove) smoothly without sticking to the rest of the vinyl.
The fan shaped pattern 3 should have a clear cut line in the middle; the ones at the sides show burs.
The squares in 4 should be aligned and equal in size.
The 4 vertical cuts in 5 should be clear without any burs and straight all the way from top to bottom (not rounded near the horizontal lines).
It is possible that not all test patterns come out perfect (depends on the type of vinyl). Test pattern 1 and 4 are the most important test patterns. They should be as close to perfect as possible.
Start with the setting of the origin, then set the other parameters
Origin correction
If the clear cut line in test pattern 3 is to the right, then increase the value of the origin, begin in steps of 20, and lower the steps when nearing the correct origin setting.
It helps sometimes to gently feel the pattern to find out which side has the clear-cut line.
If the clear cut line in test pattern 3 is to the left, then decrease the value of the origin, begin in steps of 20, and lower the steps when nearing the correct origin setting.
Lateral correction
Weedout (remove) the rectangle in pattern 1 and in pattern 4, if the test pattern is like the one below, decrease the value of the lateral parameter to correct the closing lines cut.
However, if the test cut resembles the pattern below, increase the value of the lateral parameter to correct the closing lines cut.
Longitudinal correction
Weed (remove) out the rectangle and, if you obtained a pattern like the one below, decrease the value of the longitudinal parameter to correct the closing lines cut.
However, if the test cut resembles the pattern below, increase the value of the longitudinal parameter to correct the closing lines cut.
Each time a parameter is changed, press TEST to perform the internal knife calibration test.
I hope it works for you.
Saturn
Aging Member
If anyone ever comes up with a better way to fine tune the Origin setting on tangentials, let me know. Despite going on and on how much I love my Summa, I still haven't found a bullet proof way to dial that in quickly.
I often end up tweaking it on big rectangle jobs, as it seems like straight edges are the easiest way to gauge adjustments. And mostly doing it by feel, rather than visually.
I often end up tweaking it on big rectangle jobs, as it seems like straight edges are the easiest way to gauge adjustments. And mostly doing it by feel, rather than visually.
The origin mostly doesn't need adjustment. (Except the timing belt jumped a tooth or so...) When you need to adjust, look at the angle of the small block with the tiny ball bearings. If it looks in line with the cutting direction, you should be ok.
I also check the starting points of the origin cut lines with a magnifier.
Or the width of the origin cut lines.
But you are right, on the test cut, it's hard to see.
I also check the starting points of the origin cut lines with a magnifier.
Or the width of the origin cut lines.
But you are right, on the test cut, it's hard to see.
Saturn
Aging Member
I agree that most of the time it's not a huge deal, but I'm surprised there's not a more precise way to get it accurately oriented so it draws perfectly straight. The other "corrections" all are pretty obvious, and the test cut is very effective helping to dial those in, but the Origin one is next to useless.The origin mostly doesn't need adjustment.
I often get a very slight burr or rough edge on one side of the cut that I feel is caused by the Origin being off a fraction of a degree, and wish I could use something other than trial and error to (try and ) fix it.