-
I want to thank all the members that have upgraded your accounts. I truly appreciate your support of the site monetarily. Supporting the site keeps this site up and running as a lot of work daily goes on behind the scenes. Click to Support Signs101 ...
You are using an out of date browser. It may not display this or other websites correctly.
You should upgrade or use an alternative browser.
You should upgrade or use an alternative browser.

tulsagraphics
New Member
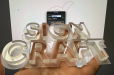
This was my first and only attempt at it. I grabbed some scrap 1/2" cast acrylic, routed the letters leaving about a 1/16" thick lip. Pressed that through some black ACM (routed ever so slightly larger than the letters -- but even so -- filing is required for a good fit). Taped some translucent behind it (3M 3630 -- which has the plastic liner) along with a bag of LEDs! (you don't need that many, obviously -- I was just throwin' stuff together to see how it worked)
I'm not familiar with all the kinds of LEDs out there -- I simply bought a bag of Principal from the distributor. Now if this was a "real" sign, I would glue those letters in and actually apply the translucent to the acrylic, before routing, instead of simply taping a piece of scrap film to the back.
And no, this isn't my company name. I expected some failures on this first attempt and didn't want to dox myself in the forums if I had to post these.")
I'm not familiar with all the kinds of LEDs out there -- I simply bought a bag of Principal from the distributor. Now if this was a "real" sign, I would glue those letters in and actually apply the translucent to the acrylic, before routing, instead of simply taping a piece of scrap film to the back.
And no, this isn't my company name. I expected some failures on this first attempt and didn't want to dox myself in the forums if I had to post these.
Attachments

Last edited:
jimmmi
New Member
This is one way to do it, but I’ve seen letters on standoffs that light up from all sides—front, sides, and back. That means the LEDs must be inside somehow, and that’s what I’m trying to figure out.This was my first and only attempt at it. I grabbed some scrap 1/2" cast acrylic, routed the letters leaving about a 1/16" thick lip. Pressed that through some black ACM (routed ever so slightly larger than the letters -- but even so -- filing is required for a good fit). Taped some translucent behind it (3M 3630 -- which has the plastic liner) along with a bag of LEDs! (you don't need that many, obviously -- I was just throwin' stuff together to see how it worked)
I'm not familiar with all the kinds of LEDs out there -- I simply bought a bag of Principal from the distributor. Now if this was a "real" sign, I would glue those letters in and actually apply the translucent to the acrylic, before routing, instead of simply taping a piece of scrap film to the back.
And no, this isn't my company name. I expected some failures on this first attempt and didn't want to dox myself in the forums if I had to post these.
tulsagraphics
New Member
In that case, you'd probably have to fabricate a reverse channel letter with stand offs. Not sure about the lighting. smooth halos are hard to achieve with individual LEDs. Could be something more along the lines of neon strip lights.This is one way to do it, but I’ve seen letters on standoffs that light up from all sides—front, sides, and back. That means the LEDs must be inside somehow, and that’s what I’m trying to figure out.
JBurton
Signtologist
We go .020" narrower on the acrylic vs the aluminum, and make sure to round every hard corner. At this size, the rounding is very noticeable. It should be rounded to just over your cutting bit's radius. So for me, that would be a 1/8" bit, so radius is usually .07". For larger stuff we go with a 1/4" bit as the difference is negligible once it's over 12" tall. Going this route, we basically never have to file the acrylic or the aluminum.(routed ever so slightly larger than the letters -- but even so -- filing is required for a good fit)

Personally, I leave 1/8"-1/4" of lip on the back side, this makes them far more resilient if they get dropped, and we start with 3/4" acrylic, so depending on metal thickness, you have about 3/8-1/2" of exposed letter edge. The lip's width can be as narrow as 1/8"-1/4", the 'smaller' it is, the more resilient it is. Further, instead of gluing the letters in, we span them with a piece of 3/16" lexan, that is bolted to welded studs. This helps minimized the number of studs, diffuses the light more evenly than clear acrylic, and takes all the force off the acrylic if the face gets hit. Apply vinyl before cutting the acrylic for the cleanest look.
We stock basically one module here, principal qwik mod 2 in 24v. It does channel letters and shallow push through cabinets really well with minimal guess work.
I hate this style. The white tends to darken toward all the corners, as the light has to go through that much more substrate, without beveling all of the corners, you'll never get a good even lit letter. The tip of the R in your example is particularly dim.Hello, anyone know a good way making illuminated embedded acrylic letters? With 20mm acrylic for example. What type of LEDs are used to get long life for example, and how are they installed to have edge and front light?
Usually it's a pocketed out front 'cover' in white acrylic, and a lipped back piece in clear. Line it with those crappy tape in modules, seal it all with a particular silicone (I forget if it's RTV, non vulcanizing, or what. The kind that doesn't leach ammonia as it cures, this is basically potting the electronics.), and you have a non-serviceable waterproof letter. Kinda like this:

I'd honestly order something like this rather than fab, as a replacement letter is a bunch of labor for a one off, and since my process are far from set in stone, I'd spend more time pouring over files to figure out what offset I actually used and everything just to make sure the new letter matched the old ones. We've ordered from everylite before, and while I hate the idea of ordering customer made stuff from overseas, their quality was top notch and the price was far below what I could match in house. The ordering process and shipping were not ideal, changes were made once a day since the main contact was in the phillipines, and some stuff got lost in translation that required even more emails to correct. At least the letters 'shipped' out of FL, but it was obvious they just used that as a US mailing address to avoid customs and tariffs. Here's their page for this particular style: https://everylite.com/products/alpha-letter/acrylica/
tulsagraphics
New Member
Ah, that makes sense. All very good points sir! Thanks JBurtonWe go .020" narrower on the acrylic vs the aluminum, and make sure to round every hard corner. At this size, the rounding is very noticeable. It should be rounded to just over your cutting bit's radius. So for me, that would be a 1/8" bit, so radius is usually .07". For larger stuff we go with a 1/4" bit as the difference is negligible once it's over 12" tall. Going this route, we basically never have to file the acrylic or the aluminum.
View attachment 181755
Personally, I leave 1/8"-1/4" of lip on the back side, this makes them far more resilient if they get dropped, and we start with 3/4" acrylic, so depending on metal thickness, you have about 3/8-1/2" of exposed letter edge. The lip's width can be as narrow as 1/8"-1/4", the 'smaller' it is, the more resilient it is. Further, instead of gluing the letters in, we span them with a piece of 3/16" lexan, that is bolted to welded studs. This helps minimized the number of studs, diffuses the light more evenly than clear acrylic, and takes all the force off the acrylic if the face gets hit. Apply vinyl before cutting the acrylic for the cleanest look.
We stock basically one module here, principal qwik mod 2 in 24v. It does channel letters and shallow push through cabinets really well with minimal guess work.
I hate this style. The white tends to darken toward all the corners, as the light has to go through that much more substrate, without beveling all of the corners, you'll never get a good even lit letter. The tip of the R in your example is particularly dim.
Usually it's a pocketed out front 'cover' in white acrylic, and a lipped back piece in clear. Line it with those crappy tape in modules, seal it all with a particular silicone (I forget if it's RTV, non vulcanizing, or what. The kind that doesn't leach ammonia as it cures, this is basically potting the electronics.), and you have a non-serviceable waterproof letter. Kinda like this:
View attachment 181759
I'd honestly order something like this rather than fab, as a replacement letter is a bunch of labor for a one off, and since my process are far from set in stone, I'd spend more time pouring over files to figure out what offset I actually used and everything just to make sure the new letter matched the old ones. We've ordered from everylite before, and while I hate the idea of ordering customer made stuff from overseas, their quality was top notch and the price was far below what I could match in house. The ordering process and shipping were not ideal, changes were made once a day since the main contact was in the phillipines, and some stuff got lost in translation that required even more emails to correct. At least the letters 'shipped' out of FL, but it was obvious they just used that as a US mailing address to avoid customs and tariffs. Here's their page for this particular style: https://everylite.com/products/alpha-letter/acrylica/