hazartilirot
New Member
Good day!
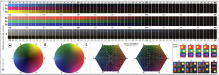
Is there any body who can explain step-by-step how to evaluate charts of advanced ink limit. Where should I begin? I've read a manual that Onyx support provided but I'm confused... I also tried to find video that shows a practical example, but I didn't succeed. They never explain the evaluation of advanced ink limit on a fresh-printed sample.
Should I begin evaluating my print from Bleed check chart first? How to decide which value would be close to ideal?
The result of my ink limits is always propellers....
Thank you.
")