• I want to thank all the members that have upgraded your accounts. I truly appreciate your support of the site monetarily. Supporting the site keeps this site up and running as a lot of work daily goes on behind the scenes. Click to Support Signs101 ...

Blurry print, can it be fixed

Aunt LuLu

Aunt LuLu
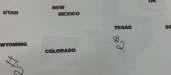
Good Morning~Afternoon, Attached you will find a picture of my tiny letters that printed blurry. The letters are tiny, the state of TEXAS lettering is 0.451(W) X 0.091 (H) -measurements in inches. Font Arial Black, Corel Draw 2017 version and Raster Link6. Printing with Mimaki CJV150-75 on Chemica HotMark 1798. My first thought would be the letter are too tiny not to print blurry.

But before I printed & cut out the graphics, I did some tests prints as my printing yesterday was blurry. I could see graininess it the prints, as in the picture with the "L".

Fooled around with Rasterlink6 and resolutions and using the highest settings (1720 X 1440 VD) when the states were printed (only printing black on white media) at the highest setting it is a 18 pass, over print 1.

Even tried to clean the "encoder strip" I have no idea what to do next, please guide me.

Thank you Laura - aka - Aunt LuLu
 

Attachments

  • print.jpg
    print.jpg
    336.2 KB · Views: 477
  • L.jpg
    L.jpg
    146 KB · Views: 224

DL Signs

Never go against the family
There's a lot of things that could cause it. I'll assume you do proper cleanings and maintenance... What do test prints look like, are they blurry too? Post some pics of those, they tell a lot. Did it just start doing this? Are you using the correct print profile for the material?

The encoder strip will usually cause a shifting in print, not just blurry prints. Have you had any head strikes? Have you done a media feed correction or dot feed adjustment? These should be done (or at least checked) periodically to make sure everything is in alignment, they solve a lot of quality issues, you can find how to do them in the manual.

First thing I usually recommend when everything is fuzzy is checking to see if the head is in the high position, it should be low for most media or you'll get over-spray and fuzzy prints. I've done that myself, put it to high for printing heavy material, forget to put it back to low, and everything looks like that. Another thing that sometimes helps with real fine details & small text, in Rasterlink set the scan speed from fast to normal, it'll slow the head down, another is using uni-directional rather than bi-directional printing. It's not a fix for anything wrong, prints take much longer, but sometimes one, the other, or both helps when you do really small detail stuff.
 

Aunt LuLu

Aunt LuLu
Thank you for getting back to me so quickly. I walked away from the machine for a few hours and came back pulled out the manual and did nozzle washes, test prints, cleanings a couple of times. the 2 pictures below are the test prints, the circles on the light blue are where the black ink is. The states & names are the Chemica Hotmark 1798 and the official print test is on a scrap of gloss sticker media (it worked so I grabbed it). Reading the manual, it states that if your ink cartridge's are low (I am taking that meaning expire notice appears for that ink) That the blurriness happens. Is that true? Had that happened to anyone?


I will say, even though I have had this machine almost 4 years, I am still a newbie. I am a one person shop creating embroidery, and printable items. I do not keep up with cleanings as there are days I will print something just so the machine prints.

Laura - aka - Aunt LuLu
 

Attachments

  • 2 test.jpg
    2 test.jpg
    337.9 KB · Views: 200
  • 2test print.jpg
    2test print.jpg
    467.6 KB · Views: 219

Aunt LuLu

Aunt LuLu
Great question! I am not, I have been using Mimaki profiles. The one for Matte finish. I will go and look for Chemica profiles....

Since I posted this, I did download and install profile for the media I am using. Just checked the head height and it is on low. Picture attached was with the proper profile.
 

Attachments

  • New print with Chemica ICC Profile.JPG
    New print with Chemica ICC Profile.JPG
    989.1 KB · Views: 191
Last edited:

DL Signs

Never go against the family
Test print doesn't look bad other than a little halo and that black getting into the cyan.

The overspray seems to be all going the same direction, that could just be static, you'll find a ton of posts about that here. What's the humidity in your print room?

The black getting into the cyan could have a couple different causes. One is the lines from the head cap to the pump/ waste tank is obstructed with dried ink, not letting it drain and is contaminating the other channel. Have you been keeping up on standard maintenance? Replacing head caps (should be done about every 6 months), and dampers (should be done once a year or so)? These could also cause ink flow issues and cross contamination. In many cases that's maintenance related and can be recovered. Worst case is if it can't be recovered, the head is delaminating, when that happens it's time for a new head. Hopefully it's not that.
 

Aunt LuLu

Aunt LuLu
Thank you, I will admit, I can do better at maintenance. Must make a rule "NO MORE EXCUSES" for me not to do that. Humidity in my shop - probably on the low side this time of year. Located in northeastern PA not really spring, so we still need heat from the furnace.

Also just changed 3 ink cartridges that were expired, but the printer did not tell me "I CAN!T PRINT" the screen on the machine actually tells me this, type exactly the way the machine displays it. The prints are a little better today. Still working on the little bit of black over on the light blue section. Doing test prints and cleanings.

What I know absolutely nothing about is head caps & dampers. Beside Signs101, where else should I look for correct information??

Laura - aka - Aunt LuLu
 

DL Signs

Never go against the family
Maintenance and cleaning is very important.
Dampers hold ink for the head, and have a tiny filter to keep contaminates out of the head. Not replacing them periodically is akin to not changing the oil filter in your car, eventually it'll either fail and not filter anything, or plug up. If you have some plugging, and some still free flowing, the free flowing ones will get all the ink and starve the others, so they should always be replaced at the same time. Head caps keep the head sealed when not in use so the heads don't dry out, and seal them so the pump can suck ink through the system, ink isn't pumped to the heads, it's sucked from below the capping station. That's why the lines below the capping station need to be free flowing too. The wiper does exactly what it says, it wipes the base of the head, and needs to be cleaned regularly, and replaced periodically. General maintenance parts are available from any Mimaki dealer, and a lot of on line vendors. Stick with genuine parts, aftermarket are cheaper, but many will give you issues, going through a dealer, some will sell aftermarket parts that won't let you down at lower costs. I get most of our maintenance supplies from Solventinkjet, they're a merchant member here.

Troubleshooting problems is also much easier if you keep the machine clean and properly maintained, a problem like yours could have several causes, now you have to do a lot more to narrow it down. If the black contaminating the cyan is because the head is delaminating, that's very costly, and you'll end up replacing all the dampers and cap top when it's changed anyway. I always go the lowest cost route first, if a full maintenance and alignment to see if it corrects it.

If you search the forum here, you'll find a lot of info, and Youtube is full of maintenance videos on replacing consumable parts. Even if you can't find your exact model, the systems and maintenance procedures are pretty much the same, or similar for most.
 

jfiscus

Rap Master
Honestly, it looks like your heads are either mis-aligned, or on their way out from all of the photos posted.
If you're running that high of a pass count your image should be crystal clear.
Only other thing would be to load in some premium material and see if the problem persists.
I have had poor quality prints, just because of cheaper materials with bad coatings, but this issue looks like head overspray.
 

rvolkers

New Member
is your head in the lowest position?
high to medium pass count? 12 to 16?
is your profile the highest resolution?
are you printing unidirectional?
are you printing normal speed?
what are your HEATER settings?

is this a vector print?

all things to check for a good clean hi-res printout!
 

Aunt LuLu

Aunt LuLu
Morning Folks! Want to thank everyone who chimed in with help. Hubby and I replaced the dampers, but the end result / fix was getting a tech in. The machine needed a new head- it delaminated, new cap top and the tech did some flushing on the yellow line, black ink was in it. We could see the black ink in the yellow in, right in the damper. Besides looking cool, and knowing it was not good....a double sword??? But the machine is up and running.

Besides getting a tech in at a significant cost, it was a "GREAT" teaching time for hubby and I. We asked many questions and they were answered thoroughly. Instruction for things we did not know about, were taught in detail. I feel that we had a private tutoring lesson. As a parents, we paid a significant amount for tutoring our son. And that was money well spent.
 

DL Signs

Never go against the family
Morning Folks! Want to thank everyone who chimed in with help. Hubby and I replaced the dampers, but the end result / fix was getting a tech in. The machine needed a new head- it delaminated, new cap top and the tech did some flushing on the yellow line, black ink was in it. We could see the black ink in the yellow in, right in the damper. Besides looking cool, and knowing it was not good....a double sword??? But the machine is up and running.

Besides getting a tech in at a significant cost, it was a "GREAT" teaching time for hubby and I. We asked many questions and they were answered thoroughly. Instruction for things we did not know about, were taught in detail. I feel that we had a private tutoring lesson. As a parents, we paid a significant amount for tutoring our son. And that was money well spent.
YAAAYY! Head delamination was one of the possibilities I was hoping it wouldn't be for you... Because it's the most costly. Glad you got it running, and learned a bit from the tech, that'll help you out in the long run :thumb:
 
Top