• I want to thank all the members that have upgraded your accounts. I truly appreciate your support of the site monetarily. Supporting the site keeps this site up and running as a lot of work daily goes on behind the scenes. Click to Support Signs101 ...

Question Help! Cold Laminator keeps wrinkling prints!

N Johnston

New Member
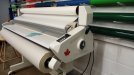
Hi people, I'm new here and also to the world of signmaking. Graphic designer turned to signmaking. Getting on well generally, but now having an issue with our Easymount Cold Laminator, just like this one:

https://officemachines.net/laminato...ign-EM-S1400C-Wide-Format-Cold-Sign-Laminator

Basically we are trying to over laminate floor stickers. We bought the laminator 2nd hand in great conditio and the person had only used it for mounting, not laminating so couldn't instruct us on laminating. After watching Youtube we started out not too bad when we got it, maybe beginners luck! lol. Then I can't remember what happened but maybe the tension/pressure was changed and now its went to wrinkling the print and laminate in the centre, so I adjusted pressure and tension again to try and fix that and now wrinkles at each side. Just can't seem to get it right so that it doesn't wrinkle anywhere. Does anyone have advice on how to fix this and is there a sweet spot as such? I've seen videos online of them putting a rigid board in first through the laminator but wasn't sure if that is required to fix this issue. Wasting alot of prints at the moment!!
 

pepford

New Member
We had the same issue with a laminator and the problem was the top roller was warped. The pressure on the center was much more than the sides. If possible have a tech check the pressure across the rollers. If it was used primarily for mounting that could have been the cause of the warping. Check the manual as you may be able to adjust the rollers yourself.
 

Jester1167

Premium Subscriber
Large format laminator rolls are supposed to be larger in the center. The correct term is crowned not warped. This helps push the air back and out. Here is the first article that I found talking about it.
 
Last edited:

Jester1167

Premium Subscriber
It's hard to tell what the problem is without seeing it in action, but how you load the laminator and start your print can be a large part of your problem. If the problem happens within the first few feet, it's more than likely something your doing. If it builds slowly over time, it's probably the laminator.

If it starts quickly, add a foot of leader to your print. Start it normally, then when you get enough of a tab behind the laminator to grab onto (reaching in behind the top roller and under the laminate), raise the top roller and pull the laminated print a couple of inches and close it back down while maintaining tension. Works better with 2 people, but you can equalize/normalize the tension across the roll and typically fix feed issues.
 

Lindsey

Not A New Member
Welcome to the group and to sign making!
Laminating can be tricky. Don't be too hard on yourself. I've been using a similar cold laminator for over 10 years, and still struggle from time to time.

Speed - go slow.

Tension - I adjust the tension each time I change the roll of laminate, and sometimes also during laminating. In general, I try to use the least amount of tension that I can get away with. When I'm changing rolls of laminate, before I web or attach the film, I release most of the tension, so that the laminate roll spins rather easily & freely. I then slowly increase the tension just until there is just a bit of resistance, and the roll can't free spin. Then I "web" or set-up the laminate. As a print goes through, if you see wrinkles forming in the laminate, especially wrinkles out on the sides/edges (in a "boat wake" pattern), increase the tension a little more. In most cases, wrinkles in the laminate indicate that some more tension is needed.

Getting started - Before I put a print through, I do something similar to what Jester1167 mentions above. I run a bit of lam through on its own (no print), until there is a few inches out the back for me to grab onto. I raise the roller, and tug/pull a few inches or even a foot of film out. You might have to put a bit of slack on the craft paper first if the roll is super heavy. This helps even the tension across the entire roller. I often do this in between prints to ensure a good start. It's handy if there is someone that can help lower the roller while you're pulling the laminate taut/tight.

Wrinkles and bubbles in the laminate is one thing, but if the print itself is wrinkling and creasing over onto itself...
- the issue might be with how you are sending the print in (perhaps to fast)
- this can also happen if the print hasn't had enough time to dry or has too heavy of an ink load (make sure it appears smooth & flat before laminating...no buckles or wavy areas)

The type of laminate you are using plays a role too. The thickness/thin-ness of the films will have an impact. Years ago, I started off with Avery laminates, and my results were hit & miss. I switched to Oraguard laminates for a few years and had good results. Now I mostly use 3M laminates and find that they are more forgiving and yield great results (but I still have trouble with the cast gloss [HASHTAG]#8518[/HASHTAG]).

Good luck and let us know how you make out!
 

N Johnston

New Member
Welcome to the group and to sign making!
Laminating can be tricky. Don't be too hard on yourself. I've been using a similar cold laminator for over 10 years, and still struggle from time to time.

Hi Lindsay, thanks so much for the info!

Speed - go slow.

Tension - I adjust the tension each time I change the roll of laminate, and sometimes also during laminating. In general, I try to use the least amount of tension that I can get away with. When I'm changing rolls of laminate, before I web or attach the film, I release most of the tension, so that the laminate roll spins rather easily & freely. I then slowly increase the tension just until there is just a bit of resistance, and the roll can't free spin. Then I "web" or set-up the laminate. As a print goes through, if you see wrinkles forming in the laminate, especially wrinkles out on the sides/edges (in a "boat wake" pattern), increase the tension a little more. In most cases, wrinkles in the laminate indicate that some more tension is needed.

Getting started - Before I put a print through, I do something similar to what Jester1167 mentions above. I run a bit of lam through on its own (no print), until there is a few inches out the back for me to grab onto. I raise the roller, and tug/pull a few inches or even a foot of film out. You might have to put a bit of slack on the craft paper first if the roll is super heavy. This helps even the tension across the entire roller. I often do this in between prints to ensure a good start. It's handy if there is someone that can help lower the roller while you're pulling the laminate taut/tight.

Wrinkles and bubbles in the laminate is one thing, but if the print itself is wrinkling and creasing over onto itself...
- the issue might be with how you are sending the print in (perhaps to fast)
- this can also happen if the print hasn't had enough time to dry or has too heavy of an ink load (make sure it appears smooth & flat before laminating...no buckles or wavy areas)

The type of laminate you are using plays a role too. The thickness/thin-ness of the films will have an impact. Years ago, I started off with Avery laminates, and my results were hit & miss. I switched to Oraguard laminates for a few years and had good results. Now I mostly use 3M laminates and find that they are more forgiving and yield great results (but I still have trouble with the cast gloss [HASHTAG]#8518[/HASHTAG]).

Good luck and let us know how you make out!

Welcome to the group and to sign making!
Laminating can be tricky. Don't be too hard on yourself. I've been using a similar cold laminator for over 10 years, and still struggle from time to time.

Speed - go slow.

Tension - I adjust the tension each time I change the roll of laminate, and sometimes also during laminating. In general, I try to use the least amount of tension that I can get away with. When I'm changing rolls of laminate, before I web or attach the film, I release most of the tension, so that the laminate roll spins rather easily & freely. I then slowly increase the tension just until there is just a bit of resistance, and the roll can't free spin. Then I "web" or set-up the laminate. As a print goes through, if you see wrinkles forming in the laminate, especially wrinkles out on the sides/edges (in a "boat wake" pattern), increase the tension a little more. In most cases, wrinkles in the laminate indicate that some more tension is needed.

Getting started - Before I put a print through, I do something similar to what Jester1167 mentions above. I run a bit of lam through on its own (no print), until there is a few inches out the back for me to grab onto. I raise the roller, and tug/pull a few inches or even a foot of film out. You might have to put a bit of slack on the craft paper first if the roll is super heavy. This helps even the tension across the entire roller. I often do this in between prints to ensure a good start. It's handy if there is someone that can help lower the roller while you're pulling the laminate taut/tight.

Wrinkles and bubbles in the laminate is one thing, but if the print itself is wrinkling and creasing over onto itself...
- the issue might be with how you are sending the print in (perhaps to fast)
- this can also happen if the print hasn't had enough time to dry or has too heavy of an ink load (make sure it appears smooth & flat before laminating...no buckles or wavy areas)

The type of laminate you are using plays a role too. The thickness/thin-ness of the films will have an impact. Years ago, I started off with Avery laminates, and my results were hit & miss. I switched to Oraguard laminates for a few years and had good results. Now I mostly use 3M laminates and find that they are more forgiving and yield great results (but I still have trouble with the cast gloss [HASHTAG]#8518[/HASHTAG]).

Good luck and let us know how you make out!

Hi Lindsay, thanks for the info! Well I took on board the less tension part and once I tried that it seems to be working better! Only had 1 thing to run through today so will know more later this week but defo better! I go about 2.5 speed so not fast :) And when you say you run abit of the lam through on its own, do you mean with the backing still on for testing tension? Sorry, I am a beginner! Lol. As I currently have the backing taped onto the front roller so it peels off when laminating, if I ran it through it would just stick to rollers s there is no backing as such. I know Im missing something here in what you're telling me! Lol Many thanks!
 

N Johnston

New Member
It's hard to tell what the problem is without seeing it in action, but how you load the laminator and start your print can be a large part of your problem. If the problem happens within the first few feet, it's more than likely something your doing. If it builds slowly over time, it's probably the laminator.

If it starts quickly, add a foot of leader to your print. Start it normally, then when you get enough of a tab behind the laminator to grab onto (reaching in behind the top roller and under the laminate), raise the top roller and pull the laminated print a couple of inches and close it back down while maintaining tension. Works better with 2 people, but you can equalize/normalize the tension across the roll and typically fix feed issues.

Thanks Jester! Yeh its typically within about 3ft it happens, but I've since lessened the tension as Lindsay said and it seems to be working better at the moment, will know the more I do! Thank you again
 

N Johnston

New Member
We had the same issue with a laminator and the problem was the top roller was warped. The pressure on the center was much more than the sides. If possible have a tech check the pressure across the rollers. If it was used primarily for mounting that could have been the cause of the warping. Check the manual as you may be able to adjust the rollers yourself.

Hi Pepford, I think the rollers are grand as I seemed to have it working not that long ago ok. Since lessened the tension and now working better, I didnt realise less is more with the tension lol. Many thanks!
 

N Johnston

New Member
Hi guys, just to let you know that today it all went abit ski wiff again! lol. I should mention that the last 2 weeks I have been using a slightly narrower roll of vinyl that I am overlaminating. Before I was using the same width of vinyl as the laminate. However both times I have had issues with wrinkling and also on both it has worked fine sometimes! So this time with the narrower vinyl and wider laminate roll, I have had to use a sheet underneath the laminate to make the vinyl wider going through so that the laminate doesn't stick to the rollers. I realise now that this is now the ideal scenario, just didn't realise it at the time when I ordered the new vinyl! Next time I will order a narrower laminate to match the vinyl. Narrower suits me as I have short arms people! Found it hard to load the wider media. So anyway...for the backing sheet on the vinyl to make it wider I just used the backing paper from the laminate roll, that really thin stuff. Is that a bad idea and will it not work well as a backing for this purpose, could that be causing wrinkling also? And can anyone advise what other material that is cheap and good to use for the purpose of backing the vinyl to make it wider? Please please don't tell me shouldn't do this as I didn't want to waste any material, trying to improvise at the moment til its all finished, will order correct size next time! lol Unless you really think its an issue of course? :) Thank you!
 

Lindsey

Not A New Member
Hi Lindsay, thanks for the info! Well I took on board the less tension part and once I tried that it seems to be working better! Only had 1 thing to run through today so will know more later this week but defo better! I go about 2.5 speed so not fast :) And when you say you run abit of the lam through on its own, do you mean with the backing still on for testing tension? Sorry, I am a beginner! Lol. As I currently have the backing taped onto the front roller so it peels off when laminating, if I ran it through it would just stick to rollers s there is no backing as such. I know Im missing something here in what you're telling me! Lol Many thanks!

No, not with the backing still on. But I think I see the problem. If you put the laminate through by itself (without the backing), it gets stuck to the rollers. It's because you don't a have a roll of craft paper to act as the "carrier". I'm not sure if the laminator you have can accept a roll of craft paper, but here's a photo of mine. The craft paper goes on the bottom, Laminate film in the centre, and liner paper take-up reel on top. The craft paper acts as a carrier sheet to prevent the laminate from getting stuck on the rollers (and for when you have prints that are smaller than the width of the laminate film).

If you can't use craft paper (based on the photo in the link you gave, I don't think your laminator is designed for this), you could try using a thin sheet of coroplast or sintra, or even a sheet of cardboard would work as the carrier. Just make sure whatever you use doesn't have sharp edges that could cut or gouge the rollers.
 

Attachments

  • 20201111_180136.jpg
    20201111_180136.jpg
    1.1 MB · Views: 322

Lindsey

Not A New Member
Hi guys, just to let you know that today it all went abit ski wiff again! lol. I should mention that the last 2 weeks I have been using a slightly narrower roll of vinyl that I am overlaminating. Before I was using the same width of vinyl as the laminate. However both times I have had issues with wrinkling and also on both it has worked fine sometimes! So this time with the narrower vinyl and wider laminate roll, I have had to use a sheet underneath the laminate to make the vinyl wider going through so that the laminate doesn't stick to the rollers. I realise now that this is now the ideal scenario, just didn't realise it at the time when I ordered the new vinyl! Next time I will order a narrower laminate to match the vinyl. Narrower suits me as I have short arms people! Found it hard to load the wider media. So anyway...for the backing sheet on the vinyl to make it wider I just used the backing paper from the laminate roll, that really thin stuff. Is that a bad idea and will it not work well as a backing for this purpose, could that be causing wrinkling also? And can anyone advise what other material that is cheap and good to use for the purpose of backing the vinyl to make it wider? Please please don't tell me shouldn't do this as I didn't want to waste any material, trying to improvise at the moment til its all finished, will order correct size next time! lol Unless you really think its an issue of course? :) Thank you!

Using the liner/backing paper from the laminate as your "sheet underneath" is better than nothing, but because it's so thin and flexible, it might be causing you some trouble. Something stiffer and rigid, like cardboard, coroplast, sintra, or polystyrene might be better. If you need to, you can use masking tape to attach the vinyl print onto the cardboard before you send it through to help keep it in place. In the laminating world, these stiff carriers are called "sleds".

https://signs101.com/threads/laminator-sled-material.58168/

This isn't quite exactly the same as how our laminators work, but here's a video that shows the concept of the sled. You can place or attach the print onto the sled, and then send it through.


Jester1167

Premium Subscriber
Lots of people forgo the kraft paper and use scrap vinyl between prints, or leave longer tails and leading edges on their prints to keep the laminate from sticking to the bed or rollers. I have used both and they both work fine. The kraft paper is really cheap if you buy it in bulk and guarantees you can laminate by yourself even if it walks slightly. It's my preferred method. You can also use the paper to wrap up your prints for shipping or transport, but you end up making a lot more waste...
 

zillion29

New Member
Welcome to the group and to sign making!
Laminating can be tricky. Don't be too hard on yourself. I've been using a similar cold laminator for over 10 years, and still struggle from time to time.

Speed - go slow.

Tension - I adjust the tension each time I change the roll of laminate, and sometimes also during laminating. In general, I try to use the least amount of tension that I can get away with. When I'm changing rolls of laminate, before I web or attach the film, I release most of the tension, so that the laminate roll spins rather easily & freely. I then slowly increase the tension just until there is just a bit of resistance, and the roll can't free spin. Then I "web" or set-up the laminate. As a print goes through, if you see wrinkles forming in the laminate, especially wrinkles out on the sides/edges (in a "boat wake" pattern), increase the tension a little more. In most cases, wrinkles in the laminate indicate that some more tension is needed.

Getting started - Before I put a print through, I do something similar to what Jester1167 mentions above. I run a bit of lam through on its own (no print), until there is a few inches out the back for me to grab onto. I raise the roller, and tug/pull a few inches or even a foot of film out. You might have to put a bit of slack on the craft paper first if the roll is super heavy. This helps even the tension across the entire roller. I often do this in between prints to ensure a good start. It's handy if there is someone that can help lower the roller while you're pulling the laminate taut/tight.

Wrinkles and bubbles in the laminate is one thing, but if the print itself is wrinkling and creasing over onto itself...
- the issue might be with how you are sending the print in (perhaps to fast)
- this can also happen if the print hasn't had enough time to dry or has too heavy of an ink load (make sure it appears smooth & flat before laminating...no buckles or wavy areas)

The type of laminate you are using plays a role too. The thickness/thin-ness of the films will have an impact. Years ago, I started off with Avery laminates, and my results were hit & miss. I switched to Oraguard laminates for a few years and had good results. Now I mostly use 3M laminates and find that they are more forgiving and yield great results (but I still have trouble with the cast gloss [HASHTAG]#8518[/HASHTAG]).

Good luck and let us know how you make out!
Agree completely on 3M 8518. It is such a nice look, but it'll often unexpectedly just start cupping and bubbling randomly so I cringe if I have to use it on something more than 3 or 4 ft. So so many tantrums over the years. LOL
 
Top