TinFoilHat
Signs of The Times
HI,
So I am getting into wraps on small areas... How would you go about installing a bottom wrap on this door with sharp body lines? I have done one before with a hinge install to the right but that came out okay but not perfect.
How would you go about installing this?
PREVIOUS INSTALL I DID ON A SMOOTH CURVE DOOR RUNNER WRAP
1) Side Hinge Install
-Place print evenly on area with tape and Split the backing paper vertically 1/2 way and then installed onside by running a finger in the middle of curve along the length to adhere decal and then installed top and bottom and then repeated to the other side
2)Top Hinge Install?
-Place print evenly on the area with tape and Split the backing paper horizontally 3" from the top and install from the middle outwards and then roll the graphic up and squeegee down and outwards till it is all installed?
3) Is another install route I am not thinking about or something that would work better?
****It would be just me installing I have no helper.
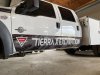
I have attached a picture of the truck and the print set up for the doors.... should I do one large decal 106"x14" or split the decals into sections with the doors? Pink lines show the sharp body line on the truck door
Thanks!")
So I am getting into wraps on small areas... How would you go about installing a bottom wrap on this door with sharp body lines? I have done one before with a hinge install to the right but that came out okay but not perfect.
How would you go about installing this?
| ||
|
PREVIOUS INSTALL I DID ON A SMOOTH CURVE DOOR RUNNER WRAP
1) Side Hinge Install
-Place print evenly on area with tape and Split the backing paper vertically 1/2 way and then installed onside by running a finger in the middle of curve along the length to adhere decal and then installed top and bottom and then repeated to the other side
2)Top Hinge Install?
-Place print evenly on the area with tape and Split the backing paper horizontally 3" from the top and install from the middle outwards and then roll the graphic up and squeegee down and outwards till it is all installed?
3) Is another install route I am not thinking about or something that would work better?
****It would be just me installing I have no helper.
I have attached a picture of the truck and the print set up for the doors.... should I do one large decal 106"x14" or split the decals into sections with the doors? Pink lines show the sharp body line on the truck door
Thanks!