• I want to thank all the members that have upgraded your accounts. I truly appreciate your support of the site monetarily. Supporting the site keeps this site up and running as a lot of work daily goes on behind the scenes. Click to Support Signs101 ...

Help on color alignment with VG-640

emhmotorsports

New Member
Hi everyone, I'm new to printing and looking for some help. I bought a used VG-640. I read all the terrible things people had to say about these machines and how you should never, ever let one sit unplugged for any length of time, and bought one that probably sat for years. I got it really cheap, and I am gifted at fixing things that no one else can, so I looked that particular devil right in the eye. I've learned a bunch about this machine and will be posting some of learnings here later in case it help others.

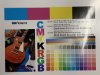
I managed to get the machine up and printing, but am seeing some sort of misalignment between the normal CMYK and (seemingly) the LmLcLk. I went through all the calibrations in the menus (got it cutting precisely on the prints even) but when I print the test image from VersaWorks, this is what I see. I don't know if there is a name for what this is, so maybe it's documented somewhere in this forum and I just don't know what to search for. Any advice would be most appreciated!
 

Attachments

  • unnamed.jpg
    unnamed.jpg
    1,018.2 KB · Views: 257
  • Inkedunnamed2_LI.jpg
    Inkedunnamed2_LI.jpg
    655.3 KB · Views: 153

balstestrat

Problem Solver
You need to physically align the heads. Then do a software alignment after that.
Post your nozzle test print, that usually shows the misalignment pretty well.
 

emhmotorsports

New Member
Hi balstestrat, thanks for the reply! So I ran a test print, as you recommended (see photo) and it is certainly off! The confusing thing is that the VG-640 does not appear to have any sort of mechanical alignment for the print heads as past Rolands appear to have. All 4 heads tuck into a single cast piece of aluminum. But this did get me thinking, so I went back and checked the fitment of the heads again. The Y/K head was looser than the others. The fasteners were tight though. So I pulled the head and looked at it. It seems the back part of the head was cracked where the flange comes out to meet the fastener. I'm going to replace the head and see what the results are. Stay tuned...
 

Attachments

  • IMG_4471.JPG
    IMG_4471.JPG
    737.8 KB · Views: 147

emhmotorsports

New Member
Alright, so I think I had a couple things going on. I did a temporary repair on the Y/K head, then used a machinst's depth gauge on the bottom side of the carriage to check that all heads were a similar depth and even. the C/M head was slightly up and to the right. I pulled all the heads, meticulously cleaned the carriage and then the bodies of the heads and put everything back in. Results were much improved. I ran another BIAS alignment print and it came out perfect (see photo). The machine is now printing gloriously!

If you have a VG machine and are replacing heads, be extremely careful to make sure they are seating fully, and don't tighten the fasteners until you're very sure the head is seated. It apparently does not take much force to snap the bracket supporting the head - which is probably why head strikes result in head replacements - it is not a very robust design on Epson's part.
 

Attachments

  • IMG_4475.JPG
    IMG_4475.JPG
    918.7 KB · Views: 142
Alright, so I think I had a couple things going on. I did a temporary repair on the Y/K head, then used a machinst's depth gauge on the bottom side of the carriage to check that all heads were a similar depth and even. the C/M head was slightly up and to the right. I pulled all the heads, meticulously cleaned the carriage and then the bodies of the heads and put everything back in. Results were much improved. I ran another BIAS alignment print and it came out perfect (see photo). The machine is now printing gloriously!

If you have a VG machine and are replacing heads, be extremely careful to make sure they are seating fully, and don't tighten the fasteners until you're very sure the head is seated. It apparently does not take much force to snap the bracket supporting the head - which is probably why head strikes result in head replacements - it is not a very robust design on Epson's part.
You can't blame Epson for this - they don't make the printheads or inks used in the Roland VG.
 

emhmotorsports

New Member
You can't blame Epson for this - they don't make the printheads or inks used in the Roland VG.
Interesting. Who does make the print heads then? I wanted to have the original heads cleaned, but when I sent a picture to the place they said they probably wouldn't be able to do them since they looked like Epson heads (which apparently don't tolerate high pressure washing). Unfortunately I just have to go by what people tell me because Roland has been zero help so far. I see why people are turning on them. I can't even get a parts diagram out of them - apparently that requires the highest levels of security clearance to view. LOL!

So to help show everyone what I'm talking about, I took a pic of a new head. The yellow arrow marks where these things like to crack. In the engineering profession, we call this region a stress concentrator. It could've been alleviated by some gussets either to the top or bottom side. They put gussets on the head extrustion (just below the metal cap), but opted not to put them on this part for whatever reason. If the head hits something, this is where it's most likely to break, so keep an eye on this spot for the VGs.
 

Attachments

  • InkedIMG_4486_LI.jpg
    InkedIMG_4486_LI.jpg
    944.5 KB · Views: 116
Top