• I want to thank all the members that have upgraded your accounts. I truly appreciate your support of the site monetarily. Supporting the site keeps this site up and running as a lot of work daily goes on behind the scenes. Click to Support Signs101 ...

HP Latex 560 :: Error 98:03

Renato Pinto

Graphics Manager
Hey guys,

I'm getting the following error:

98:03
Potential-print quality problem. Check printheads using the printhead status plot.

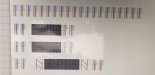
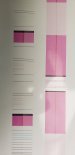
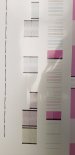
At first, we were having some pretty noticeable horizontal banding issues. We've aligned and cleaned the printheads countless times and also changed all the printheads. So now, its printing fine. No issues with the print quality but its still kicking out the same error.

I've attached an image of the error message and then of all the latest test plots.
Looking at them, there's definitely still a problem, i just don't know what else to do to fix it.

thanks!
 

Attachments

  • 20181123_070355.jpg
    20181123_070355.jpg
    536.2 KB · Views: 2,359
  • 20181123_094102.jpg
    20181123_094102.jpg
    1.9 MB · Views: 2,395
  • 20181123_094122.jpg
    20181123_094122.jpg
    2 MB · Views: 1,722
  • 20181123_094142.jpg
    20181123_094142.jpg
    861.3 KB · Views: 1,629
  • 20181123_094208.jpg
    20181123_094208.jpg
    772.2 KB · Views: 1,778

ikarasu

Active Member
I had the same thing today. All the plots looked fine... First time I've had the issue.

There was graininess/random spots missing when printing... but the plots looked fine. tons of cleanings / auto maintenances and still the same. Took out the optomiser printhead... swapped places and the problem fixed itself.

I don't see a nozzle print test in there... I'd do an nozzle print and see what it looks like. It does look like yellow is having issues though.
 

Signplanet

New Member
You are getting that error because a printhead is failing the printers nozzle droplet check and it does not have sufficient reserve to correct for the error. Replace the Y-M head and you should be good to go!
 

Christian @ 2CT Media

Active Member
Yet no one read that he changed the printheads.

Did you change optimizer heads too? Have you cleaned your platen holes recently? Are you nearing SMK3 100%?

If you changed all the heads, I would take them out 1 by 1 and shake them, then replace them. Some times ink gets clogged up in them the way they are stored and you can get that error.
 

Reveal1

New Member
If you have changed the Y/M head, perhaps try a manual re-alignment plot which gives a more detailed look at alignment.
 

FrankW

New Member
You can check failing nozzles in the service report of the printer (tab „support“ at the EWS, link „Service-Support“). If there is a print head which counts failing nozzles from „1“ continuously (1 2 3 4 5 and so on), replace that head. A friend of mine have set a new printhead 2 days ago which have failed out of the box. Shit happens ...
 

AllStarNow

New Member
Sorry to revive this, but was the issue ever resolved? I'm having the same error code on a latex 360. Replaced all the printheads still giving the code.

Capture2.PNG
 
Last edited:

balstestrat

Problem Solver
Sorry to revive this, but was the issue ever resolved? I'm having the same error code on a latex 360. Replaced all the printheads still giving the code.

View attachment 154093
Please post the position that shows the missing nozzles per head. Its in this same report. I think a little below this one.

Have you printed the nozzle check plot? What does it look like? All nozzles open?
 

AllStarNow

New Member
Reviving this to answer my own question, that is, I've pretty much narrowed it down to the optical drop detector. A test run was saying all the nozzles were out; obviously not correct since it's printing fine. Went to clean it and it seems physically damaged. Is there supposed to be a lens? Mine is just a hole with some debris inside of it. Pretty sure I'll be replacing this soon, didn't look hard to do in the FSM.
 

karst41

New Member
Thi is my recovery print
this forces ink to pump through ALL heads

With Color correction turned OFF you will see the LC and LM Fire Separately.
Proof is the delay for when low percentage values to start firing.

Run this pattern 1X If still banding Run again. If still banding Run the cleaning cycle
to the specific head. Run your print agaim and that bad boy should be looking good

If problem is not improving install new printhead and get on with your day.
If persisting. Pull all Print heads and clean contacs.
Switch the Problematic print head from the Low bank to the High Bank will net
good results

BTW the Attached file uses less ink than 3 cleaning cycles and preserves the
Maint Cartridge life too
 

Attachments

  • Nozzle Clear [Converted].pdf
    152.3 KB · Views: 597

GP_Oz

New Member
Reviving this to answer my own question, that is, I've pretty much narrowed it down to the optical drop detector. A test run was saying all the nozzles were out; obviously not correct since it's printing fine. Went to clean it and it seems physically damaged. Is there supposed to be a lens? Mine is just a hole with some debris inside of it. Pretty sure I'll be replacing this soon, didn't look hard to do in the FSM.
The DD is basically a open pit that has a light beam shooting from one side to the other (long side) if you are getting a 98:03 machine thinks that more than 1056 nozzles are out and quality is compromised etc etc.
Best thing about the 3/5x0 series is it is a single DD that services all heads. So if there is banding in all colours but test print looks fine you know to look at DD first.
Ive seen paper/spiderwebs/foreign bodies throw the DD off. There also can be an excessive build up of waste ink inside and the "stalagmite" of ink can block functionality.
You dont have to clean it all the way to the bottom of the pit, 1/4inch or in cabbage speak about 10mm down is fine.
 

balstestrat

Problem Solver
Thi is my recovery print
this forces ink to pump through ALL heads

With Color correction turned OFF you will see the LC and LM Fire Separately.
Proof is the delay for when low percentage values to start firing.

Run this pattern 1X If still banding Run again. If still banding Run the cleaning cycle
to the specific head. Run your print agaim and that bad boy should be looking good

If problem is not improving install new printhead and get on with your day.
If persisting. Pull all Print heads and clean contacs.
Switch the Problematic print head from the Low bank to the High Bank will net
good results

BTW the Attached file uses less ink than 3 cleaning cycles and preserves the
Maint Cartridge life too
The thing is that if the printer has decided to replace some nozzles and you do this, it won't use those nozzles.
Cleaning cycle is better because it will actually purge the heads -> force ink down all the nozzles.
Yeah they might open at some point but it might not even be because of this test print, rather as it also does the cleaning cycle at the start of the print...
 

balstestrat

Problem Solver
Reviving this to answer my own question, that is, I've pretty much narrowed it down to the optical drop detector. A test run was saying all the nozzles were out; obviously not correct since it's printing fine. Went to clean it and it seems physically damaged. Is there supposed to be a lens? Mine is just a hole with some debris inside of it. Pretty sure I'll be replacing this soon, didn't look hard to do in the FSM.
Does the test show all nozzles missing for every printhead? Or just for some? If it only shows all nozzles missing for some printheads, you know it's not broken.

Like it was already mentioned, do check the drop detector first before replacing it. It's supposed to be open but there can be no Burj khalifa of ink built at the bottom. Knock down any ink build up. Sensor is at the top, inside the hole both sides.
It is very sturdy thing, extremely low chance that it has broken.

Lastly before replacing it, try to do the Drop Detector Calibration. You also have Drop detector test to actually test it and see if it works or not.
And when you take it out, you can open it and see that there is no scrap blocking the sensors.
 
Last edited:
Top