• I want to thank all the members that have upgraded your accounts. I truly appreciate your support of the site monetarily. Supporting the site keeps this site up and running as a lot of work daily goes on behind the scenes. Click to Support Signs101 ...

Magnet cutter

2B

Active Member
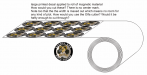
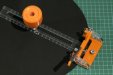
Yes, the suggestion was to use this Olfa type cutter and modify the pin part to be a blunt point of some sort.

I said you will need to attach a non slip pad, a point is still a point and that will damage the imprint.
first thing that comes to mind is the rubber used on vehicle dashes so items do not slip.

aligning is easy, you already know where the center of the design is, the cutter still has the downward stem and surely you can match the two up. Place the cutter and double check to make sure before cutting, measure twice cut once is a good rule to live by

the Olfa cutter was suggested as it is a 1 handed cutter with a ratchet wheel, very easy to use.
https://www.youtube.com/watch?v=bwTGgol2PMo
 

myront

CorelDRAW is best
... you already know where the center of the design is

Where did you get the impression that the center point is already known? As you see in the youtube video she is cutting from a random start point. The magnets we have DO NOT AND CANNOT HAVE A PRINTED CENTER POINT!
 

myront

CorelDRAW is best
attachment.php
 

Attachments

  • magnets.PNG
    magnets.PNG
    116.4 KB · Views: 154

Brian27

New Member
Here you go

1.Cut a circle the same diameter as your magnets design
2.Find the center with a tape measure
3.Mark center with pencil
4.Place that circle over your design
5.Use Olfa or similar circle cutting tool like attached

Repeat steps 4-5 as many times as needed.
 

Attachments

  • cutter.jpg
    cutter.jpg
    51.8 KB · Views: 100

myront

CorelDRAW is best
Here you go

2.Find the center with a tape measure
3.Mark center with pencil


Repeat steps 4-5 as many times as needed.

While you do that let me cut one by hand. By hand is still faster. Why not have a four way ruler on the cutter instead of the one (again see the example in my first post)? This would allow one to quickly center it over the mag.
 

Brian27

New Member
While you do that let me cut one by hand. By hand is still faster. Why not have a four way ruler on the cutter instead of the one (again see the example in my first post)? This would allow one to quickly center it over the mag.

You're telling me it takes longer to place a circle on top of another circle and cut it in the same way your "design" does vs. perfectly lining up a four pointed ruler that doesn't even exist?

You came here supposedly looking for a solution for your problem, and many people offered good input and suggestions, yet all you've done is tell people why their solution isn't as good as your fictitious circle cutting contraption.

Print one design with a red dot in the center. Cut it out. Place ontop of the others to find center. It REALLY does not get any more simple than that.
 

myront

CorelDRAW is best
Brian, calm down. lol I'm trying to follow you the best I can. Bare with me in this journey. How about this scenario. Any thoughts?
attachment.php
 

Attachments

  • magnet template.PNG
    magnet template.PNG
    47.8 KB · Views: 159

Brian27

New Member
Haha fair enough.
What do you mean by use a circular pad?
You really don't even need a hole in the template, just a printed dot would be fine. The template would stay on top of the part you're cutting while you cut it and it should stay since it's magnetic. In theory anyways.

This is all assuming of course the blades on these little circle cutting tools can even cut through the magnet. I've never tried to cut the stuff before.
 

myront

CorelDRAW is best
Holy crap! The light bulb just came on! Easy on me though, I'm an old man. And kind of slow sometimes. Yes, that makes perfectly good sense now! I shall entertain the idea. Thank you all for your patience.
 

Brian27

New Member
Not necessarily. If you're printing 25 custom sized magnets for 'So and so' just print an extra one with a red dot in the center and it becomes your template for that order/specific size. Hand cutting 1 seems better than 25.
 

myront

CorelDRAW is best
But, I'd take a clear piece of lexan, engrave circles every .5" or so depending on variety of sizes, and add a 1/2" hole along each line, mount a fidget spinner bearing in the center, and glue a neodymium magnet to the fidget spinner bearing cover. Now you can look through the grooves on the clear lexan to align the desired diameter to the circular magnet edges, pop a cheap graphtec knife holder in the desired 1/2" hole, and spin away. This would work better with a rigid mounted dedicated armature to keep the center from moving instead of the magnet, but now you're devoting a table to it...
Hmmm, maybe

1673023773720.png
 

James Burke

Being a grandpa is more fun than working
How the heck do you get the water jet to etch and not penetrate the material?
With a waterjet cutter, you can specify the cut pressure and the abrasive usage for each vector in your design. For etching, the pressure drops and the abrasive use throttles back.

Obviously, you do the etching first, and then do the cutting.


JB
 

myront

CorelDRAW is best
One thing I would avoid is suction cups, when making a circle like this its easy to put too much pressure at the pivot while holding it down, causing it to slip around. The more pressure you put on a suction cup, the less hold it generates, part of the strength of the suction is the 'weight' of whatever you're holding, since this would be placed flat on a table, it wouldn't be 'holding' anything. Does this make any sense?
Take a suction cup, stick it on a window, and try to pull it straight away and slide it; its hard. Now place a suction cup against a window, press against it, and try to slide it around; its not as hard.
Hmmm, that is true. Maybe replace the suction cup with a rubber pad of some sort.
 
Top