• I want to thank all the members that have upgraded your accounts. I truly appreciate your support of the site monetarily. Supporting the site keeps this site up and running as a lot of work daily goes on behind the scenes. Click to Support Signs101 ...

Need Help Mimaki JV33 Printing Issues

Black Star

Not A New Member
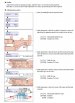
I've been having some issues with my Mimaki JV33 for a while now. It started out last month. I do not have a test print but I can describe it. After the machine sat without printing(like overnight), my test print would have an issue but only on the right side of the test print. The top of the yellow lines(only on the right yellow print) would have some black towards the top. I searched on the forum and found a few people with the same issue. I replaced the Capping Station Assembly hoping that was the issue.

After replacing that I printed for a day. I did a test print and I had bigger issues. I have a picture for this one(Test Print 2)
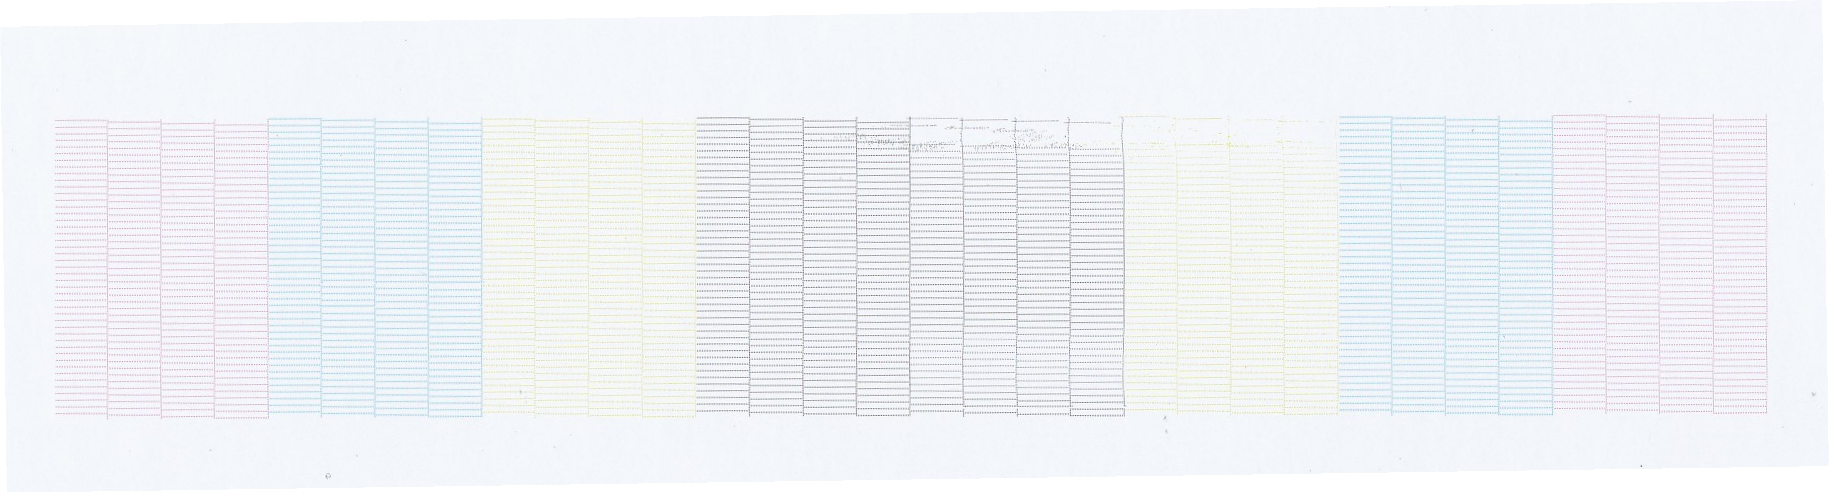
The top part of the black and yellow(once again, only on the right side) are missing. My black looks like it is clogged and there is over spray on my prints around the black. I have to do a custody wash for 15+ minutes to clear that up.

I ended up replacing the dampers for both yellow and the right black side. I'm still having this issue. Now I'm having more issues with the yellow. After sitting overnight, both yellow test prints have Cyan in the them.
Any information would be appreciated!
 

Black Star

Not A New Member
Hi,
Any update on this issue? My CJV30 is doing pretty much the same thing.
Nope. No one ever replied back to me. I am still having issues. I replaced the capping station assembly. I should have only replaced the capping station. That was one of the issues because the alignment was then off. I adjusted the alignment and I was able to fix the issue with the black falling out. There wasn't enough pressure so I did figure that issue out.

As for the cyan getting into the yellow, I don't know. I thought replacing the capping station assembly would help. It didn't. I replaced all of my dampers hoping that it was a pressure issue but that didn't fix it either. I'm still assuming it has something to do with pressure. I'm hoping to have some time in the next couple of months to dig back into it. If I ever come up with something, I will post it. Until then I have to print a solid patch of yellow to clean the cyan out before every print which is a pain but it works for now.
 

Out There

New Member
Bummer...I've also replaced the capping station assembly and the offending dampers. I'm starting to think it maybe the manifold has a crack.
 

Neil

New Member
My thoughts:
The first problem at the top pic may be wiper mis-alignment. You can adjust them back to centre of the head.
It's in the [HASHTAG]#adjust[/HASHTAG] menu

The cyan in the yellow may be a result of bad damper connection.
When you clean the bottom of the head, look to see if there's ink droplets.

Or it may just be due to fibres coming up from the cap top.
Have a good close look with a flashlight and sharp pair of scissors.
Check to make sure your cyan isn't draining away.
 

GutekPL

New Member
overnight nozzle missing seems like a bad parking position on cap top.
Cyan in yellow is it just over night and after some printing is ok ? if yes again parking position or pump under the capping, it can't prime your head
And i would check if the yellow lines arent clocged it could do some back pressure. That dampers do You have? Some cheap dampers have to hard spring and can make some back pressure?
Or your printhead is unsealed and cyan goes to yellow. But if it works ok after some yellow printed i think its cap top possition or pump. Check is the printhead sealed with cap top when doing cleaning or ink fill. When You do ink fill you hear the pump working, watch when the printhead goes to wiper is the cap top full of ink before pupm pumps it to waste tank.
 

Black Star

Not A New Member
My thoughts:
The first problem at the top pic may be wiper mis-alignment. You can adjust them back to centre of the head.
It's in the [HASHTAG]#adjust[/HASHTAG] menu

The cyan in the yellow may be a result of bad damper connection.
When you clean the bottom of the head, look to see if there's ink droplets.

Or it may just be due to fibres coming up from the cap top.
Have a good close look with a flashlight and sharp pair of scissors.
Check to make sure your cyan isn't draining away.

I do believe the cap top is what is giving me an issue. I just can not get it correct. One issue I see is that the cap top isn't perfectly centered in the print head(when moving the print head all the way to the left). I have it centered forward and back but there are no adjustments for moving it right and left. When I look at the print head right now, I can see the capping station needs to go to the right. It's almost all the way to the left of the print head. Any ideas on that? There is no play in the screws on the capping station assembly.

Also, another question I had is while the JV33 is printing, the dock moves all the way to the right but the capping station doesn't touch the actual print head. This is while it is printing only. When it powers down or is done printing, it dock moves far right and then it is touching the capping station.

One major issue that keeps coming back is that my black has overspray. It's not equal, it's just random. Let's say I printing a wide rectangle. There isn't much overspray at the front of the rectangle but it is on the sides and then the worst is in the back. I'm thinking this is also has something to do with my capping station alignment. I'm a little concerned about my print head but I don't want to replace the print head and have that not be the issue. So far I've replaced all of the dampers which were properly prepped and the capping station assembly. I don't have a problem buying a new print head and then installing but that won't fix a capping station issue.
 

Atari

New Member
I do believe the cap top is what is giving me an issue. I just can not get it correct. One issue I see is that the cap top isn't perfectly centered in the print head(when moving the print head all the way to the left). I have it centered forward and back but there are no adjustments for moving it right and left. When I look at the print head right now, I can see the capping station needs to go to the right. It's almost all the way to the left of the print head. Any ideas on that? There is no play in the screws on the capping station assembly.

Also, another question I had is while the JV33 is printing, the dock moves all the way to the right but the capping station doesn't touch the actual print head. This is while it is printing only. When it powers down or is done printing, it dock moves far right and then it is touching the capping station.

One major issue that keeps coming back is that my black has overspray. It's not equal, it's just random. Let's say I printing a wide rectangle. There isn't much overspray at the front of the rectangle but it is on the sides and then the worst is in the back. I'm thinking this is also has something to do with my capping station alignment. I'm a little concerned about my print head but I don't want to replace the print head and have that not be the issue. So far I've replaced all of the dampers which were properly prepped and the capping station assembly. I don't have a problem buying a new print head and then installing but that won't fix a capping station issue.

Struggling with same issue -- misaligned cap on JV33.

Are you using cheap china cap tops?

I'm thinking about buying an original MIMAKI OEM part (MP-M905240) just in case china measured wrong.

The capping station assembly/base has some adjustment forward and back (when you loosen the 2 screws), but not so much left and right.

The right side elevation of the entire capping platform can be raised and lowered by the hex bolt to the right of the pump, but I wouldn't recommend doing that at this point.


Neil

New Member
I do believe the cap top is what is giving me an issue. I just can not get it correct. One issue I see is that the cap top isn't perfectly centered in the print head(when moving the print head all the way to the left). I have it centered forward and back but there are no adjustments for moving it right and left. When I look at the print head right now, I can see the capping station needs to go to the right. It's almost all the way to the left of the print head. Any ideas on that?


I adjusted my wiper and cap top and capping position recently.
See attached pic for instructions

I adjusted the AirPullPos from +0.1 to -0.7 and got it to line up nicely inside the printhead.
However, I then started getting Error 170 - Print Head lock errors.
Suspect the latch was now sticking to the arm when the head docks.
So, I then moved the Capping Position from -1.1mm to -2.1. This moved the cap station to the right and fixed the print head lock error.
 

Attachments

  • Capping adjust.JPG
    Capping adjust.JPG
    128 KB · Views: 394

hand851

Roland Mutoh & Mimaki inks digiprint-parts.com
Replace the Cap slider base M602089 and the cap slider M602088 they cost approx 2 to 4 bucks each. When installing the newly reassembled (take spring, sponge off old base) cap base leave both screws loose pull cap base toward you (two stops on right front of base) should be against plate you are pulling to. Tighten screws while holding in place. I would replace cap top at this time make sure stopper is in place and hoses are not loose.
 

Plotter-FIX

New Member
For all users reading this and trying to solve: If the nozzle test is bent in some "points", mostly the print head is delaminated.
That means the head plate is not glued well anymore. It will spray in this colors and show prinitngs like you have shown to us.
own thing you can do is glue the side with 2k glue and hope that will fix the problem for some time...

unfortunetly you will need a new head with that problem
 
Top