JBurton had it right on how to web it. It's a bit wasteful, but makes life easier.
However, In a pinch to get this little project out of your life:
1. Lay your print on your work table. Roll out the laminate to cover the print - and at least 6" on each end.
2. Measure the lam, move your print out of the way and cut the laminate.
3. Now, bring the print back to the table, and lay the laminate over the print - liner side down.
4. at one end - at least 6" inches from the start of the print, Use 2" blue tape, and tape the laminate to the vinyl all the way across. Squeegee that down good. This is your hinge.
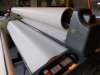
5. Now take this over to your laminator, and put the hinged edge into the laminator... forward until you reach the edge of the Lam (middle of your hinge).
6. Flip the laminate over the laminator, so the liner side is now facing up, and the laminate is draping over the laminator.
7. Take a small knife, and find the edge of the liner - slowly lift it up the way across. Enough to have about 2" or enough to pull on evenly.
8. Use the foot pedal to forward the print and lam through the rollers, while you lift the liner.
9. Trim it and do whatever finishing you have to do.
10 kick it out the door and get paid
")