• I want to thank all the members that have upgraded your accounts. I truly appreciate your support of the site monetarily. Supporting the site keeps this site up and running as a lot of work daily goes on behind the scenes. Click to Support Signs101 ...

Need Help Print Quality (Mimaki CJV30-130)

Coolshrimp

New Member
Hey guy so im just getting into printing I just got a Mimaki CJV30-130.

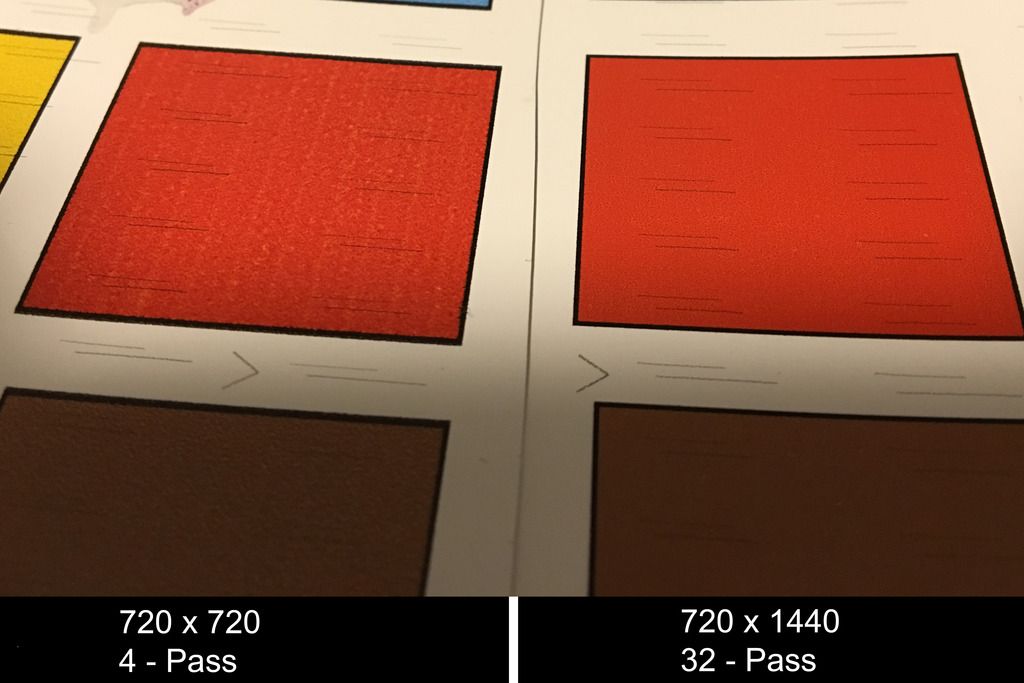
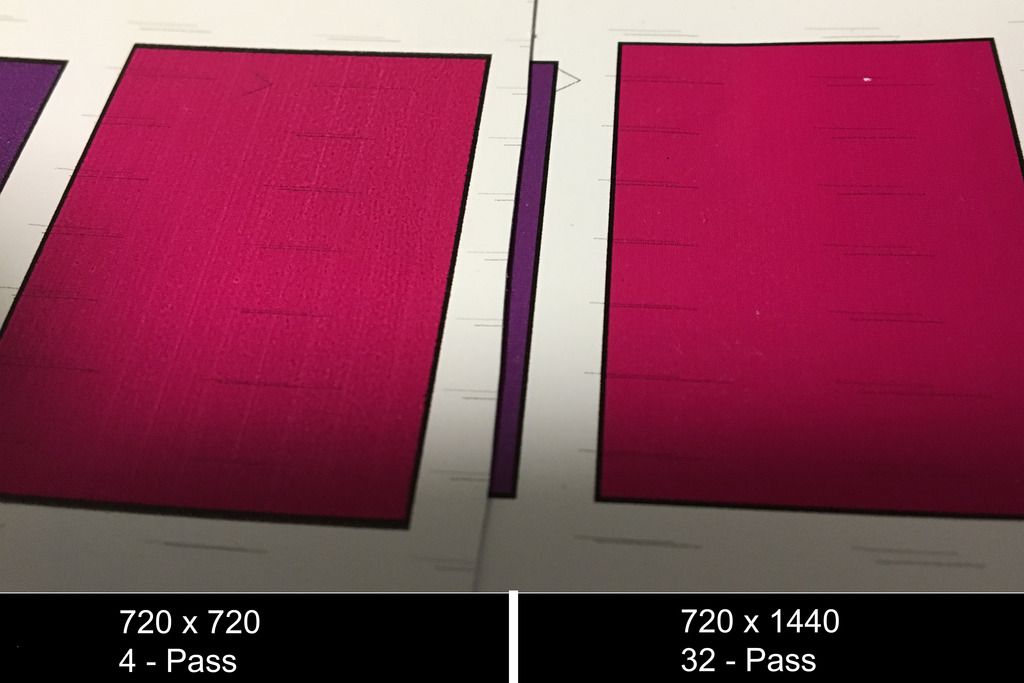
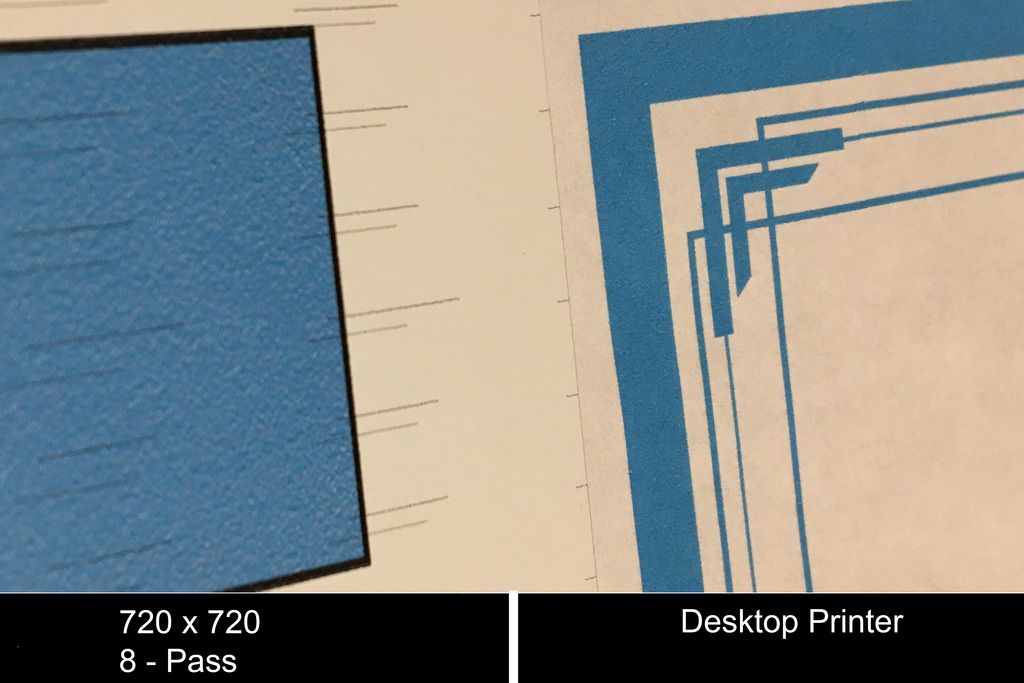
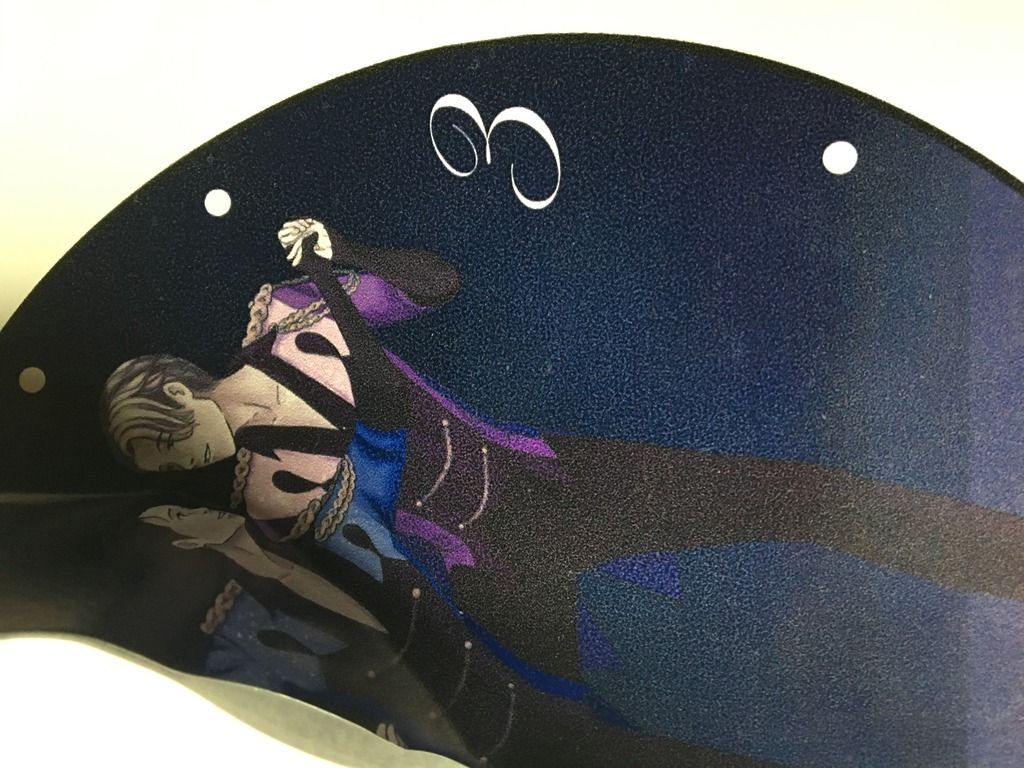
Iv just started using the machine and I notice the printing quality seems low quality.
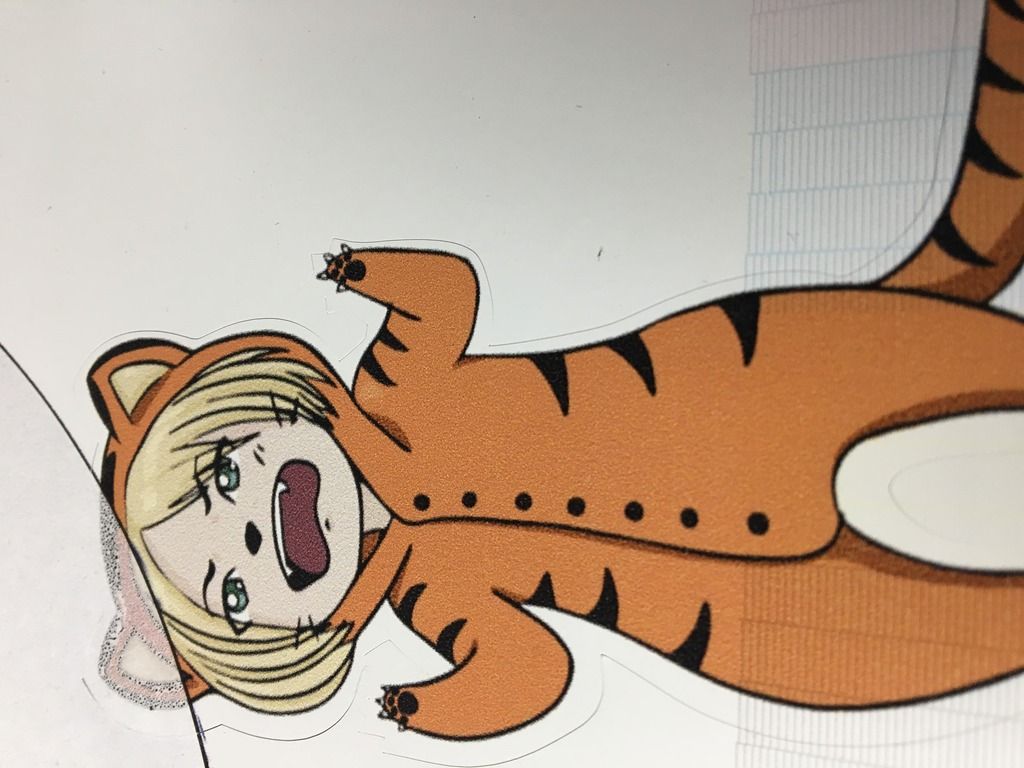
Seems like there is white grainy spots.

I had the original SS21 Inks and iv just converted to some new ES3 ink.
Originally I didn't know you needed profiles setup and was using the default.
So on the machine in panel setting I have print quality set to fine, and draft also set to fine.

now I believe I got the profiles loaded for my new inks on raster link correctly.
Im set to the highest one (ES3 CMYK 1440 X 720).

I haven't seen any difference at all between prints after changing all those settings.

The image im pringing is not grainy at all on pc even when blown up 300%.
The images are under 12" x 12"

Are these white grainy spots normal? or is this a setting issue?
Thanks.

Here is examples:
http://i102.photobucket.com/albums/m102/coolshrimp/7754DE69-D2CA-4488-9801-6D625A7D11CC.jpg
http://i102.photobucket.com/albums/m102/coolshrimp/2717A420-F903-4358-848D-C7E252F085D3.jpg


smartgrafix

New Member
We have a Mimaki CJV150-130 with SS21 inks ... We get grainy / fuzzy prints like that when the heat is too high and / or when the encoder strip needs a good cleaning. Printing from a vector image will also result in better print quality than a JPEG every time, even if it's a great quality JPEG. Still, you should be able to get much smoother quality than this. I also usually set the number of passes in Rasterlink to one higher than recommended and the result is much more rich & vibrant prints.
 

Solventinkjet

DIY Printer Fixing Guide
From what I am seeing, the vinyl is bad/old/dirty. Get some new vinyl and try it out to rule that out.

If it still prints like it is on new vinyl, you are going to need to adjust the heat settings, run the head alignments and make sure all of the nozzles are firing. The CJV30 is completely capable of printing high quality images. Much better than the images above.

Also, ES3 inks are more eco friendly but they are not the best setup for that machine when it comes to print longevity. The scratch resistance is worse as well. If you want long term outdoor prints without having to laminate, switch back to the SS21.
 

JayVal

New Member
It might be a pre/print/post heat setting issue. You can ask your supplier what the recommended heat settings are for the media you are printing on to. Might even be that the media is not compatible with the ink.
 

Coolshrimp

New Member
The Materials and ink are from same company and are brand new.
I have tried different material types they all look the same.

im going with the ES3 as its 1/3 the cost of SS21.
I Dont need printed work to last 3-5 years. most is for indoor applications.

I had clog issues when I let it sit unused for 3 weeks but it is now clear all nozzles are working.

I will check the heat settings but the image quality is like this right after printing before hitting the post-heaters.

Maybe it is a setting in the RasterLink software? Would 8-pass or 12-Pass setting change anything?
Maybe its printing in draft mode and not high quality? i cant find an option for print quality itself in the software.
 

equippaint

Active Member
Don't know if this would cause a problem but did you flush the lines when you switched ink types? Could it be some coagulation or something with inks being mixed?
 

Coolshrimp

New Member
for best image printing what setting should be used from these options and what is the option for?.

Rendering: 8-bit, 16-Bit
Resolution: 540x720, 720 x 1080, 720 x 1440
Pass: 8, 12, 24
Overprint: 1,2,3

Immediate Print VS Rip & Print
 

Solventinkjet

DIY Printer Fixing Guide
for best image printing what setting should be used from these options and what is the option for?.

Rendering: 8-bit, 16-Bit
Resolution: 540x720, 720 x 1080, 720 x 1440
Pass: 8, 12, 24
Overprint: 1,2,3

Immediate Print VS Rip & Print

Rendering - 16 bit is better than 8 bit by far in every case. The only reason I can think of to use 8bit is on simple designs that only have a few colors and no gradients or transitions such as a banner with a solid color background and solid color text. The advantage is it will RIP faster. If you print a complex image such as a human face or a landscape with sky in it, or anything with gradients in it or shadows, 8bit will look horrible.

Resolution - For almost everything, anything close to 720x720 is going to come out near perfect. For more detailed images such as small text, bar codes, tiny details that may get blurred in lower resolutions, 720x1440 or 1440x1440 is the best way to go. 99% of people print 720x720 or lower for most jobs in my experience.

Pass: When your printer is in perfect alignment and all of the nozzles are firing, 8 pass should look great. Some profiles allow you to go to 4 pass and that will look fine for banners etc. In my opinion, if your printer isn't printing well at 8 pass, it needs to be aligned and calibrated. The higher the number of passes the slower it will print but it also makes defects harder to see like nozzle drop out especially. People who don't want to spend money on a new print head tend to just up their passes and can get away with if for a while.

Overprint - Always set to 1 unless you are printing back lit material. Imagine your print head could print an entire image in 1 pass of the print head. Overprint 2 would print the exact same image over the original and overprint 3 would print the exact same image over the 2 that are already there. In practice, the machine does this per pass, not the whole image at once. People use this to add saturation to the prints that are going to be back lit so they don't look washed out.

Immediate print RIPs about 10% of the file and then starts printing and RIPing at the same time. This saves a ton of time. RIP and Print RIPs the entire file first and then prints. Normally immediate print is what you want to use but if the file is huge and the computer can't RIP it faster than the printer can print it, you will want to use RIP and Print. If you have a good computer, you can use Immediate print almost always.
 
Last edited:

Coolshrimp

New Member
Rendering - 16 bit is better than 8 bit by far in every case. The only reason I can think of to use 8bit is on simple designs that only have a few colors and no gradients or transitions such as a banner with a solid color background and solid color text. The advantage is it will RIP faster. If you print a complex image such as a human face or a landscape with sky in it, or anything with gradients in it or shadows, 8bit will look horrible.

Resolution - For almost everything, anything close to 720x720 is going to come out near perfect. For more detailed images such as small text, bar codes, tiny details that may get blurred in lower resolutions, 720x1440 or 1440x1440 is the best way to go. 99% of people print 720x720 or lower for most jobs in my experience.

Pass: When your printer is in perfect alignment and all of the nozzles are firing, 8 pass should look great. Some profiles allow you to go to 4 pass and that will look fine for banners etc. In my opinion, if your printer isn't printing well at 8 pass, it needs to be aligned and calibrated. The higher the number of passes the slower it will print but it also makes defects harder to see like nozzle drop out especially. People who don't want to spend money on a new print head tend to just up their passes and can get away with if for a while.

Overprint - Always set to 1 unless you are printing back lit material. Imagine your print head could print an entire image in 1 pass of the print head. Overprint 2 would print the exact same image over the original and overprint 3 would print the exact same image over the 2 that are already there. In practice, the machine does this per pass, not the whole image at once. People use this to add saturation to the prints that are going to be back lit so they don't look washed out.

Immediate print RIPs about 10% of the file and then starts printing and RIPing at the same time. This saves a ton of time. RIP and Print RIPs the entire file first and then prints. Normally immediate print is what you want to use but if the file is huge and the computer can't RIP it faster than the printer can print it, you will want to use RIP and Print. If you have a good computer, you can use Immediate print almost always.


thanks very good info.
 

Coolshrimp

New Member
So I played around today seems I can get best print if i go with (720x1440 - 32 Pass - Highest my profiles go from supplier - VERY SLOW..) then the quality is comparable to my desktop printer.

I did check the Media Comp, DotPos all is good. Heaters are set (35-35-45)
Anything lower still has that grainy look is this just how it is? or dose it mean the head is bad?
In one of the pictures you can see even my desktop printer looks better. should it?

Samples: ignore the black little lines i was doing the alignment

2%20Color.jpg


Pinks.jpg


Color%20Blocks.jpg


Printer%20Comp.jpg
 

Coolshrimp

New Member
So it seems iv found the issue.

There is a big difference in quality between Uni-direction vs Bi-direction print setting.

Best Option if viewing from 3ft or closer like cellphone skins and stickers (720 x 1440 - 16-Pass - Uni-Directional)
For larger banners and prints that will be viewed from 3+ ft. away then its OK to use (720 x 1440 - 8 or 16-Pass - Bi-Directional)
 
From my experience running a CJV150-130, you really should hardly ever have to run uni-directional to get good quality prints. I only use uni-directional on static cling material, which will look like the first images you posted or worse when printing bi-directional. When you print it uni-directional it doesn't look too bad, but it's still pretty grainy. We run bi-directional on everything else, every time, all day long. We've thus far printed on Orajet 3651, 3551RA, 3951RA, 5600 reflective, 3850, 751, 651, 631, 3M 1080, Sihl canvas and poster paper, Key Banner both gloss and matte, Glass Ad-here, and Convex High Bond and our prints always look incredibly vibrant and detailed. Unidirectional printing will cut your productivity in half and that can never be good for a growing business. You might get by with it now, but you'll need that productivity later down the road. I think your printer might still possess some issues or bugs that need to be worked out.
 
Top