• I want to thank all the members that have upgraded your accounts. I truly appreciate your support of the site monetarily. Supporting the site keeps this site up and running as a lot of work daily goes on behind the scenes. Click to Support Signs101 ...

Printing large banner w/ Mutoh Valuejet

dzign

New Member
I'm seeking advice for printing a large banner with a Valuejet 1204, 48" printer. The vector file will be printed on 51" wide 13 oz vinyl banner material, 20' long. When printing banners, I've had problems with buckling followed by head strikes and with media tracking off and then stopping. I'm going to use hem tape.

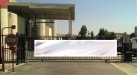
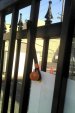
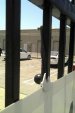
I'm going to cut 1" strips of the banner material and hemtape them to the back of the banner instead of folding over as I'm not confident it'll stay down. I'm going to place grommets every 2' after this and it will be installed on an automatic entrance wrought iron gate. Wind will be a factor. I will be following this link's advice:

http://www.signwarehouse.com/blog/?p=779

When the material gets close to the floor, I tape it onto a tube and roll it up face out and rest this roll on the back of my Graphtec vinyl cutter's media rollers. I can print slow or fast. I'm thinking slow to give the heaters more time to dry it as I manually release the media off the roll and also roll up the printed portion as it prints. After a day or so to fully cure, I'll put in the grommets, then I'll spray a coat of water-based ClearShield on it. Some of the grommets may need to be placed on-site. I'm considering using a combination of ball bungees and screws. I'd like to have the grommets done before I deliver the banner to install.
 

Attachments

  • Forum review.jpg
    Forum review.jpg
    263.3 KB · Views: 276

GAC05

Quit buggin' me
Sounds like you have it covered.
If it was me I wouldn't go to the trouble of adding in cut strips to the hem. A good tape will keep the edges down if you crease the fold and use a roller to set the tape.
If you don't want to do that get some power tape.
Keeping that slack loop behind the printer is a good idea with reverse wound material.
If you are really worried roll off 21 feet or so and wind it so the print side is on the outside and do a normal feed. Just make sure to avoid touching the print area unless you use some clean gloves.
Another thing to do is turn off the "Slant Check" option in the set-up at the printer.
This will allow more room for error if the material starts to walk.
I have a 1304 so it has pretty much the same issues.
wayne k
guam usa
 

401Graphics

New Member
Load the banner perfectly straight. you cant make sure its straight by pre-feeding it out and watching the edge of the banner. And make sure there is some slack off the roll when printing so its not pulling on a heavy roll.
 

Conor Knoxx

New Member
I have a 1204 as well, and have definitely seen some of these problems. As for hemming, I always just fold it over - then use something very hard/metal to make a good solid crease. Once its got grommets every 2 ft, it really can't open back up.

I'd agree too on feeding some out (5 or 6 feet) to make sure its straight - and I've also had "media end " errors because it wasn't unrolling off a heavy roll smoothly enough (so keep some slack behind it )

But mostly, I understand the concern about the rippling under the rollers, and head strikes! To completely avoid this, I use no heat, except on the dryer (0,0,45) and try to keep some distance to the take up roll you're using, so it has a bit more "open time" to dry. Also set the head to "high" just in case (just remember to put it back when you're done!)

Good luck, it really shouldn't be a problem.
 

dzign

New Member
Thank you all for your helpful comments. I'm using Pro Ban, 25 yd face out. Supplier cut the media to 51" on the edge nearest the print head. I've noticed there are fibers there, like spider webs. I'm thinking of first calling them to make sure they understand they probably cut the wrong side, however I didn't specify it. I really don't need the fibers on either side as I can just imagine how they'll end up in the printer. I could quickly torch that end of the roll, hot iron it (I know, careful!), or hair trim it.

GAC05, even though it's a normal feed, I should probably still pre-feed this, correct? I like the suggestion of turning off the slant check. I'd planned on not folding, but instead just adding a strip of the same banner material hemtaped to the backside. This way I could get at least one smooth side taped to the more textured backside. I know its an extra step cutting this, but it beats having to fold it over and creasing it. I tried this on a smaller banner already. I'm also considering power tape. I want it to hold up with wind and abuse later. I've already specified damage could occur due to any of these factors, especially the multiple gate openings and closings it'll be subjected to.
 

bob

It's better to have two hands than one glove.
Thank you all for your helpful comments. I'm using Pro Ban, 25 yd face out. Supplier cut the media to 51" on the edge nearest the print head. I've noticed there are fibers there, like spider webs. I'm thinking of first calling them to make sure they understand they probably cut the wrong side, however I didn't specify it. I really don't need the fibers on either side as I can just imagine how they'll end up in the printer. I could quickly torch that end of the roll, hot iron it (I know, careful!), or hair trim it.

Whoever split the media is an idiot. The cut end is ALWAYS away from carriage path, I.E. on the left as you face this particular, and most likely every, printer. If it's cut on the wrong end, just wind what you need on another core.

As for the rest of it, you're making a big deal out of nothing, you're worrying needlessly. Just load the media and print it. Loading the media straight is not a big deal if you do these two things:

One, make certain that the media is wound on the core straight, at least the bit of it you're about to use.

Two, load the media, stand at the right side of the machine, put your right hand on the plastic in-feed flange, and your left hand grasping the edge of the center of the media between thumb and forefinger. Keeping tension on the media with you right hand wiggle the media back and forth gently [in the direction of carriage travel] and you'll feel the point of least resistance, the media's happy place. Drop the media lever and the stuff s as straight as it's ever going to be.

Once you've done the above, just print the damn thing and stop worrying about it like some little old lady. You're printing a banner, not sending men to the moon.

As far as pre-feeding the media as in letting there be a loop on the in-feed side, I used to be a big proponent of this. Until I realized that it was the source of a lot of needless problems with the media feeding true.

Now I just load the media and let the printer pull it off the roll. Even reverse wound, which is all I ever use in banner material. I've never had a problem with either feed or slippage that wasn't due to some stupid thing I'd done. The in-feed roller is sufficiently well balanced and the in-feed drive mechanism is powerful enough to work properly without any special effort. Use it.
 
Last edited:

300mphGraphics

New Member
Yep, just print it, fold it over to hem, grommet and go. I use a gold squeege to pre-crease the hem, lay in the banner tape, fold over, go over again hard with the squeege. As stated before, the grommets reinforce the banner tape and help hold it all together. Don't worry about the finished banner size if it ends up being a little short of 4 foot. Pretty common in the industry to have listed dimensions be pre-finished size. And, like your link said, if it buckles, turn down the heat. I run my heaters at 32-32-50. I've been told you want at least some pre-heat to open the pores in the material to accept ink better. Beats me, but a little heat doesn't hurt. Each brand will be different, just watch it come out of the machine and if it is too hot, you can see the material get waves or tunnel.
 

anotherdog

New Member
Although I use a roland, many issues are the same;
To keep head strikes down I ensure the roll of banner is fixed in the media holders at each end. This ensures a straight feed. To stop wrinkling as it feeds I run the temp slightly lower and ensure there is no tension on the rollers by having a length of banner pulled off the feed roll.
Since I'm running a little cooler and in the case of the banners I'm printing now a heavy ink coverage, I don't wind right onto a roll. I have created a set of racks that can drape up to 150 ft of banners without rolling. left overnight the banners will cure ready for cutting and finishing.

On that size of banner hung that way I would be reluctant to tape hem and go for weld or stitch. looking at the picture I would have thought mesh would be a good bet.
That is a lot of banner to hang on a gate.
 

Conor Knoxx

New Member
good point anotherdog,
mesh would be a great choice here. That is a big sail to attach to movable gate.... might even be some concern about damaging the gate / hinges in a heavy wind.

hehe.... reminds me of the first time I "accidentally" ordered mesh banner... I called the supplier after printing some and said "this banner is defective! its all separating and falling apart!.... " there was kind of a big pause, then a polite explanation of how "mesh banner" worked (not only didn't I know... but I was printing right on that smooth backing, lol ) .... :Oops: ah yes, one of my more embarrassing moments! Some of the best lessons are like that though! Luckily we have signs101 to protect us from many of them though :signs101:
 

anotherdog

New Member
Hmm, here is the thing, a good gust can generate 5-10lbs per square foot (60 mph would be about 7.5 lbs per square) on a solid barrier (in this case banner). That banner looks to be about 100 square feet of banner, there could be a lateral push of 1000 lbs, not just once but many many times on a windy day.

Couple of years ago I made a couple of 10x20 ft banners that were installed on a building crane. 22oz double seat-belted, didn't last the weekend and actually bent the angle iron strut they were bolted to before they shreded. Wind is a tricky thing and they always blame the sign guy. (we redid in mesh).
 

dzign

New Member
Well, I see your concerns. Thanx! I'm looking into the mesh material soon. If I can't find good advice regarding sewing, grommets, rope, etc. from my [idiotic] supplier, I'll come back here and pose some more questions. I'm going to ask the customer to throw this concern at his engineer and see what they come up with. It's a huge plant and they probably built the gate. The banner at 80 sq. ft. x 7.5 lbs is roughly 600lbs of wind force at 60 mph. I doubt the gate can handle that. And there's cars and people around so it's fantastic this has been mentioned! We might just put the banner somewhere else, or change it to mesh. Awesome help, you guys.
 

Brad Knight

New Member
Actually - the fence should be okay - I live in Oklahoma where we have 50-60 mile and hour winds regularly... and though we occasionally have privacy fences blown down - generally speaking it's not an issue. They make PVC fence that can withstand that amount of force.

NOW, if you were relying on the banner to support itself over a span like that, it would be a different situation.
 

4R Graphics

New Member
You couold use a wind sliter its basically a compass with a razor blade on it just cut a lot of 3/4 circles so no wind looks like banner when the wind blowes the circles open up to allow the wind to pass through.

If you do the math you could put enough circles in it to reduce the load to an exceptable level and still have a solid looking banner.
 

dzign

New Member
I printed it. Powertaped it, with grommets. Now I'm concerned about the gates shadows as sunlight comes through the back. Should have used a blockout material. Any suggestions? I'm thinking spraying a black coat and then white coat over the back so it doesn't heat up. I'm going to take it over to have the customer look at it first and see if they can live with it. Didn't think ahead on this one.
 

bob

It's better to have two hands than one glove.
I printed it. Powertaped it, with grommets. Now I'm concerned about the gates shadows as sunlight comes through the back. Should have used a blockout material. Any suggestions? I'm thinking spraying a black coat and then white coat over the back so it doesn't heat up. I'm going to take it over to have the customer look at it first and see if they can live with it. Didn't think ahead on this one.

You worry too much, just give it too them and collect your money.

Wind slits, I assume what you refer to as 'gates', are usually losers. They don't spill all that much wind, they just wear and tear. Sometime calculate the ratio of the open areas of any wind slits versus the entire area of the banner. Small.
 

dzign

New Member
I'm using 13 oz. material, with powertape. I'm installing using ball bungee cords. I can only attach to the vertical rails as the horizontal rails go through rollers. I'm going to use either twist ties or a screw with a short aluminum or plastic spacer screwed into the back of the gate rails to support the ball bungees. There about 4" of play between the rails and the vertical posts the gate tracks in between. I'll see if the banner could bulge out there too much and then address that later. I'm using hook tabs to attach to the top and bottom of the banner so I can easily place the ball bungees and avoid grommets there. Customer's already contacted Bob. I want to promote this company as corporate brass are coming to town and they need to impress them. They've almost had their plant shelved in the past. It's also a big account for me as well, with 15 tractors and trailers I redo every 6 years, and numerous other signage. I'm doing the plant manager's boat soon, if he's not too pissed at me for bringing this up now. But I'm a perfectionist and they do like my work
 

dzign

New Member
I installed the banner this morning at 7 am. It's really easy to wake up at 4:30 am when you don't smoke, drink or get laid too often. The whole job took me less than 2 hours, mostly because their power was out and the gate was difficult to pull back and forth. They timed an electrical repair at the same time as my installation. Somebody's got to get it right, right? I'm attaching pics of the installation method using ball bungee cords, self-tapping screws with spacers and banner hook tabs. These things are amazing. The banner bulges slightly with the light breeze that was blowing, protruding about 2 inches with 5" of clearance. I can attach white vinyl covered large flat washers with narrow centers along the middle of of the banner later. The ClearShield® clear semi-gloss coating acts like a slippery layer so adding these might not be necessary. I'm going to buy blockout banner material after I finish this roll. Not happy with the backlit appearance in the afternoon sun. You see shadows of the rails, but worse are all the informational and hazard signs that are covered up creating shadows in a few places.
 

Attachments

  • banner corner.jpg
    banner corner.jpg
    53.4 KB · Views: 189
  • banner ball bungee install with hook tab.jpg
    banner ball bungee install with hook tab.jpg
    54.9 KB · Views: 214
Top