
Think713
New Member
The finishing depth I think is only going to be a 1/2".I have a friend in virginia that has some nice burl and black oak boards that might be perfect. He'll likely plane them for me. I think that will be the best compromise. I understand what you are saying with the steps now with that visual but I really don't think thats going to be necessary. I'm looking for a bit that will cut the entire depth of the wood in one pass without having to do any finishing at the end. Which again, may be easier to just use a miter or table saw. Can literally do these cuts in like 30 seconds.That's what I said!
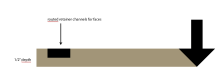
The problem with using like a 1/2" wide V bit to cut all the way through is the shoulder you will leave if your substrate is thicker than 1/4". Here is a picture as an example.
View attachment 182342
In order to get the 45 to extend all the way to the 'back' side of the panel, you'll have to run it 3 times, on 3 different toolpaths. Like this
View attachment 182343
And each one of those will need to be stepped in, or roughed out with a square end mill, if you have tool change capabilities, otherwise I'd step it through at maybe 1/8" per pass. The first pass will seem very easy, but the second pass is going to be 3-4 times the load on the bit.
If these aren't going outside, I'd really recommend a partial sheet of MDF from lowes or hd. It'll give you way more hold down area than a 1x4, be flat, and MDF is a much easier cut, though it is messier. Plus it will be flat and have a consistent thickness, which should save time on finishing the parts to get a perfect fit.
All that said, I agree with John on the yonico bits, I've gotten them a handful of times and they've worked just as well as high dollar vortex bits and the like, but I'm not a wood worker so I'm probably not pushing the tools to the limit.
Again this box is not going outside. This is not for a client, this is for personal project stuff. I'm essentially building a sign cabinet out of wood. Its just a lightbox. The only stipulation here is the edges. I want these finished edges because I'm not going to paint the outsides. If i was going to paint them I would sand all the edges, fill the creases, sand again and paint for a smooth finish. These I want all the corners to meet to be seamless. They will be glued together, but then bracketed on the inside. I probably wont even need to bracket them, but thats what I did with my previous box and the thing was damn near hard to budge. It was pretty stout as far as its stability. And for something that is going to be relatively small (the rough dimensions are going to be around 12x18 but that is not the final size.)
Btw thank you for all the input everyone.