• I want to thank all the members that have upgraded your accounts. I truly appreciate your support of the site monetarily. Supporting the site keeps this site up and running as a lot of work daily goes on behind the scenes. Click to Support Signs101 ...

Roland sp-300 looking for printing help.

zooraw

New Member
Hello,

I have a Roland sp-300 that has some issues that i would like to get the community's input on.

CMYK-test-print-errors01.png
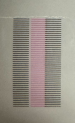
This is the first 2 prints
CMYK-test-print-errors00.png
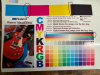
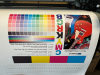
This is the 6th print a lot has cleared up but still having the following issues

Issues:
Magenta and Yellow print lines, see attached images.
Magenta will leave a blotch or a drop of ink on the left side of the print occasionally. This has lessened as i have printed more but still happens.
Seems to use a lot of magenta.
There is some red when printing just black you can see this on the right side of the black strip.
When doing a black gradient you can see in the images that its using blue, why is that?

What I have done:
I have replaced; endcaps, cap tops, and encoder strip
I have printed a bunch of the images attached. This seemed to clear up a bunch of issues
Pump
All FILTER pad things
All the Wipers
Basic the 6 month cleaning
Updated to latest firmware
Updated to sp-300v

Thank you for looking
Regards,
 

Terry01

New Member
Do your test in versaworks, alternatively go into the service mode menu, arrow down to test print, enter, arrow down to fill and print that pattern.
Also a nozzle test print would be handy to verify the heads are ok.
 

zooraw

New Member
Do your test in versaworks, alternatively go into the service mode menu, arrow down to test print, enter, arrow down to fill and print that pattern.
Also a nozzle test print would be handy to verify the heads are ok.
Thanks for looking here are the images as requested.

I didn't know about that test print, much better then the one I made :)
 

Attachments

  • IMG_9590.jpg
    1.5 MB · Views: 68
  • IMG_9591.jpg
    1.6 MB · Views: 57

Terry01

New Member
You need to spend more time cleaning the heads and only then do a complete calibration. Too many missing nozzles causing the banding.
 

zooraw

New Member
You need to spend more time cleaning the heads and only then do a complete calibration. Too many missing nozzles causing the banding.
Like a bunch or medium cleans or what do you suggest?
Also what would a complete calibration be?
Maybe you can point me at a video if not to much trouble?

Thank you,
 

damonCA21

New Member
I agree, the banding is caused by the missing nozzles on your yellow head. Do a test print from service mode as well, this will show you how the small nozzles are firing as well as the the large ones. It really depends if the nozzles are just clogged, or if they are actually dead how well cleaning will work.
First step would be to do a thorough manual cleaning of the head to eliminate anything stuck to the front of it and around the edges. Then run a powerful clean and see if the nozzles improve at all.

The black and cyan are also looking bad for deflected nozzles, this is causing the overspray around your print on the test print.

Is this a printer you have just bought or one you have owned a while? It could be it is time for a couple of new heads if the cleaning doesn't give any improvement
 

damonCA21

New Member
For the blue tinge in the gradient it is because the printer will often print black/grey by mixing the CMYK colours to create it. If your magenta and yellow are printing as badly as yours are then it won't give a smooth black to grey gradient. You can change this on actual artwork by printing using just the black head instead, but IIRC the test print just uses the standard mixing inks technique
 

zooraw

New Member
Thank you all for the feedback. I am working on doing all the stuff that was mentioned. I will post an update soon, again thank you!
 

zooraw

New Member
Ok here is where I am, which seem really good. I am still having an issue with an offset. You can see it in text and between black and yellow also between magenta and blue. Also on a vertical test print it looks like magenta is on top of the black, is this the issue and if so how do you fix it? I have done a manual head alignment with no luck. I mean you could push a head to one side, it that what needs to be done?
 

Attachments

  • testprint02.png
    testprint02.png
    591.6 KB · Views: 79
  • testprint01.png
    testprint01.png
    3.3 MB · Views: 61
  • testprint00.png
    testprint00.png
    3.3 MB · Views: 75

damonCA21

New Member
There are initial manual adjustments when you fit a new head ( moving the head with the little white adjuster on the front ). This get the two heads vertically aligned with each other. From the test print this looks good as the magenta and black lines should line up with each other.

But once this is done you also need to go into service mode and do the full calibrations in there to fine tune it electronically to get the horizontal alignment correct as well. There isn't a way to manually adjust the horizontal, it depends on the time the head fires compared to the other one. At the moment yours is firing at slightly the wrong time ( too early or too late ) which causes the overlap

If you have the service manual go through the head calibration routine in there and that should fix it
 

damonCA21

New Member
You may find you also need to set up the print cut calibration once you have done it as sometimes this can go out and need some tweaking too
 

Jim Hancock

Old School Technician
Vastly improved! Questions... Did you also do the bi-directional alignment in user mode? And what resolution was the last sample printed at? Looks grainy...
 

zooraw

New Member
Q) Did you also do the bi-directional alignment in user mode?
I did, but before the horizontal alignment.
Q) And what resolution was the last sample printed at?
In Roland VersaWorks I selected Printer > Test Print. I was not given the option to select a resolution. If i had to guess I would say its at 720x720

Regards,
 

Jim Hancock

Old School Technician
OK, just to be clear - the sequence of alignments should be - in service mode - bias, vertical - go back and forth between these 2 until they are both perfect and you don't have to make any adjustments, as they are mechanical and one can affect the other. Then, still in service mode, do the horizontal and bidirectional. These only need to be done once, as they are electronic. Then in user mode, do the bi-directional alignment. This setting is automatically zeroed out when you do the bi-directional in service mode, so it is done last. Its function is to fine tune bi-directional alignment corrections for different thicknesses of media, and you can save 8 different settings. This allows you to get optimum quality on all thicknesses of media.
 
Top