• I want to thank all the members that have upgraded your accounts. I truly appreciate your support of the site monetarily. Supporting the site keeps this site up and running as a lot of work daily goes on behind the scenes. Click to Support Signs101 ...

Roland SP300v printing issues

Dan28

New Member
Hi all,
New here!
I’ve joined to hopefully get some advice about a printer I have just purchased.
It’s a cadet printer which is running as a Roland SP300v.
The person I bought it from says it’s just been serviced and recently had a new head but I’m having some problems.

Basically:
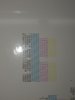
The print quality is very poor. There’s a section missing from the M and Y section of the head print. The C is pretty much perfect and the K has some missing nozzles.

It will print but there is banding, fuzzy printing and if it prints anything substantial the black will begin to turn green.

Just wondered if I could get some expert knowledge here, I’ve performed a couple of head soaks using Roland cleaning fluid, I’ve cleaned the cap tops and the wiper and tried a load of different profiles to print from.

When first printing everything came out very faint and no colours, I found some air bubbles in the lines so I’ve removed these using the cleaning functions, it’s had a couple of powerful cleans and some medium ones as well as just using the cleaning button on the printer control panel.

I’m printing from versaworks 5.

Thanks for reading
 

Dan28

New Member
Hopefully these images show the latest head print as well as an image of a bi directional print and a uni directional print. Also a print I did the other day before the 2 logos which show the black with the fuzzy printing. The logos show some of the banding issues and droplets that can be seen within the white text. I’ve made some progress with this over the last few days but I’m beginning to run out of ideas and hoping it isn’t the head, obviously! On another note does anyone know of a Roland engineer that covers Tamworth?

Many thanks
 

Attachments

  • 61C0F8ED-F11F-481C-AA06-5488824C4727.jpeg
    61C0F8ED-F11F-481C-AA06-5488824C4727.jpeg
    1.2 MB · Views: 509
  • FFF5D025-2322-4175-991E-DBDA302FAED7.jpeg
    FFF5D025-2322-4175-991E-DBDA302FAED7.jpeg
    1.1 MB · Views: 364
  • C7B1C419-8E03-45DC-BDF3-75902896AF98.jpeg
    C7B1C419-8E03-45DC-BDF3-75902896AF98.jpeg
    1.1 MB · Views: 461
  • 5CD9C617-CFAC-4068-AAB2-FF5D100E2FFB.jpeg
    5CD9C617-CFAC-4068-AAB2-FF5D100E2FFB.jpeg
    225.4 KB · Views: 483

tim99

New Member
your prints are never going to come out that great until you can get that test print looking good. head soaks is where i would start just like you did.. its been a while since i heard anyone speak of it but there used to be a ultrasonic cleaner for the print heads. there's plenty of videos on Youtube about that, I have never tried it myself but it might be worth looking into
 

Solventinkjet

DIY Printer Fixing Guide
That nozzle check it pretty messed up. I would say the cap tops are probably not working properly or are clogged. Also check the bottom of the heads to see if there is any physical damage.
 

Dan28

New Member
Thanks. There is no obvious damage to the head surface. Is there a way to check the cap tops or is it just a replace them type of job? When I put the cleaning fluid on them it drains away after taking the clip off the drain pipe when I do the head soak.
I’ll have a look in to that ultra sonic cleaning aswell.
 

Solventinkjet

DIY Printer Fixing Guide
Usually you want to replace the cap tops once per year but most people go until they fail. You can test them by capping the heads and disconnecting the pump from the cap top and pulling with a syringe from the tube. If you pull air then it is bad or something is breaking the seal. You should get a good stream of ink into the syringe as soon as you pull.
 

Dan28

New Member
Great I’ll have a look in my service book and find where I need to disconnect and give it a go. If need be I’ll get new caps
 

Dan28

New Member
Thanks. It’s a shame as the guy I had it from told me it had a new head recently and a big service. I’m beginning to think that isn’t the whole truth. I’m hoping I don’t need to replace them both. I can probably stretch to the yellow magenta head but if both are shot I will need to rethink my options with this machine I think
 

klingsdesigns

New Member
I had to do many head soaks and print in high quality until i finally broke down and bought a new head. I ended up replacing myself. Wasnt bad. Price was around $700 i think. Cap tops are easy to replace and are fairly cheap to replace.
 

Dan28

New Member
Yeah it’s probably going that way! Best I’ve found one here in the UK is approx £450, then it’s fitting it.
I haven’t tried printing in high quality I’ll give that a try and see if it makes things any better, in the short term at least.
 

Dan28

New Member
I’m clamping the drain tube going in to the bottle, take bottle off and clamp the tube then put bottle back on. That will work ok?
It’s had about 9 hours today so I’ll check it when I get back and see if it’s any better. Most it’s had before is about 2 hours so I’m really hoping!
 

Dan28

New Member
This is a print done just on high quality. Using the generic vinyl 2 setting in versaworks. The cut path is way out but I can’t use the normal marks as I get an error to do with the sensor, but it’s the quality I’m more concerned about at the moment.
I don’t think this looks too bad compared with what I have been getting.
After the 9 hour soak a couple of nozzles came back on magenta but there’s still a sizeable block missing.
 

Attachments

  • 996CBEC7-FF42-4846-95EC-D3A43BD1FAE1.jpeg
    996CBEC7-FF42-4846-95EC-D3A43BD1FAE1.jpeg
    1.4 MB · Views: 450

klingsdesigns

New Member
I have noticed after a head soak on friday and then it sit not running over the weekend on monday it can clear up a lot. Printing helps as well. Looks to me your colors are way off on alignment as well. Looks like you need to get into system mode or whatever its called and fine tune it. Then you can go back in regular mode and make sure everything is still good from alignment for printing and also for cutting. Takes a while to get used to, to learn everything. For the cap tops i just take printer apart get to the cap top hoses and crimp them with a close pin and make sure when you move head over and fill that the solution doesnt drain down almost have it overflow. then carefully slide the heads over the tops to it locks into place and make sure printer is unplugged. Let it sit overnight if you know for sure you have it set on the heads correctly so it doesnt cause more problems.
 

Dan28

New Member
It’s certainly a lot to get used to. The logo that’s printed is looking very close to how it’s designed which is much closer than it was before. I’ll give it an overnight soak and see if it brings back anymore nozzles. Thank you to everyone for advice so far, it’s very valuable.
 

Dan28

New Member
Ok so it’s definitely a head job.
I’ve just done another test print which I’ve attached, I’ve also managed to get the flashlight from my phone under there and I can clearly see head damage on the magenta yellow head in the area of the issues I’m having with the missing nozzles. Damn it! Need to figure out why the blacks missing nozzles now too...or maybe its 2 new heads....hoping not! I don’t think my light was strong enough to see this damage the last time I looked!
 

Attachments

  • 99EDC90A-0F1A-4DF1-9767-666DD27A617C.jpeg
    99EDC90A-0F1A-4DF1-9767-666DD27A617C.jpeg
    809.7 KB · Views: 413
  • BB66D098-AC3B-4F7C-804D-1C86C3282E1E.jpeg
    BB66D098-AC3B-4F7C-804D-1C86C3282E1E.jpeg
    803.8 KB · Views: 407

Jodean

New Member
the guy i bought mine from (SP540V) talked like he knew everything, turns out he did know anything, how he ran it for 10 years amazes me. When i got it my black head looked like yours, i ended up fixing the main board after putting a cable in crooked, in mean time i pull cleaning fluid into the head, i put a line on the manifold and then let it sit in my bottle of cleaner, pulled fluid into head with syringe from where the pump is, took 2 weeks or so till i got the board back in. My black is almost perfect now, thought i needed a head also, guess not!!

I had tried many head soaks previously with no correction also. Pure fluid into manifold seems to be the trick
 

Dan28

New Member
So much has happened since I last posted here.
I ended up throwing 2 new heads in there.
The black head fell apart in my hands when it was removed!

I’m having some banding issues on magenta prints at the moment that I’m trying to sort but other than that it’s a hundred times better than when I picked it up.
 
Top