VCE INDUSTRIES
New Member
There’s got to be something I’m missing or doing wrong here…
I just bought a new Summa S One D75… and I can’t quite get the OPOS Calibration dialed in. How do I manually input the offset dx / dy values? I can’t seem to find instructions anywhere on how to manually make corrections to those values- neither at the panel nor in Summa Cutter Control.
When I run the automated OPOS Calibration at the panel, it’s like spinning a slot machine. Each time I do it, it finds a different value than the last. I can’t seem to get it actually dialed in as tight as I’d like it. I’ve been able to get more accurate results on old Print/Cut machines simply due to manual input adjustments. I have a hard time believing Summa doesn’t offer the ability to make my own adjustments!
Even when printing a large black patch and then just running back-to-back OPOS calibrations without even removing the media or anything- I get different values each time!! Feeling like I wasted money here and was oversold on Summa accuracy superiority! This is no better (often worse) than what I can do on a cheap or outdated Print/Cut combo from Roland or Mimaki!
Any help would be hugely appreciated! I feel like there HAS to be something I’m missing!
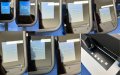
(The pictures attached are literally back-to-back all on the same media - I tried to make a quick little collage to keep it simple)
Maybe my sensor is faulty?? Either way I’m baffled at the concept of not being able to easily (or even at all) manually adjust these values! And these margins seem.... wider than the Summa precision I was sold on...
I just bought a new Summa S One D75… and I can’t quite get the OPOS Calibration dialed in. How do I manually input the offset dx / dy values? I can’t seem to find instructions anywhere on how to manually make corrections to those values- neither at the panel nor in Summa Cutter Control.
When I run the automated OPOS Calibration at the panel, it’s like spinning a slot machine. Each time I do it, it finds a different value than the last. I can’t seem to get it actually dialed in as tight as I’d like it. I’ve been able to get more accurate results on old Print/Cut machines simply due to manual input adjustments. I have a hard time believing Summa doesn’t offer the ability to make my own adjustments!
Even when printing a large black patch and then just running back-to-back OPOS calibrations without even removing the media or anything- I get different values each time!! Feeling like I wasted money here and was oversold on Summa accuracy superiority! This is no better (often worse) than what I can do on a cheap or outdated Print/Cut combo from Roland or Mimaki!
Any help would be hugely appreciated! I feel like there HAS to be something I’m missing!
(The pictures attached are literally back-to-back all on the same media - I tried to make a quick little collage to keep it simple)
Maybe my sensor is faulty?? Either way I’m baffled at the concept of not being able to easily (or even at all) manually adjust these values! And these margins seem.... wider than the Summa precision I was sold on...