• I want to thank all the members that have upgraded your accounts. I truly appreciate your support of the site monetarily. Supporting the site keeps this site up and running as a lot of work daily goes on behind the scenes. Click to Support Signs101 ...

This partial trailer wrap could be a little challenging

tulsagraphics

New Member
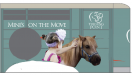
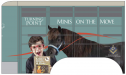
My customer is getting her trailer painted teal, and wants me to add print/cut wrap graphics to the sides. Okay, it sounded pretty straightforward -- until I saw the trailer photos. Yek! This looks like a PITA install. (I think these channels are too deep for a Primer 94 scenario).

The first option that came to mind was slicing the artwork into horizontal panels w/ 1" top/bottom overlap bleeds (to get down into those V channels, and then print vertical panels w/ left/right bleeds to deal with the vertical square tubing -- but this will prevent artwork from lining up correctly at the seams. Maybe I could digitally stretch those overlaps which would sort of simulate a stretched wrap when installed. Hmmm...

I haven't quoted the customer yet, but I think they're going to be surprised at the cost.

Anyone have thoughts/suggestions on an easier way to produce/install this type of design?
 

Attachments

  • chrome_WaAW1kfngR.png
    chrome_WaAW1kfngR.png
    703.2 KB · Views: 314
  • chrome_YcHxJ5WpcS.png
    chrome_YcHxJ5WpcS.png
    998.6 KB · Views: 227
  • Illustrator_Kf3I6if7lo.png
    Illustrator_Kf3I6if7lo.png
    229.4 KB · Views: 212
  • Illustrator_1gPl0HlfHU.png
    Illustrator_1gPl0HlfHU.png
    563.6 KB · Views: 218

fuzzy_cam

The Granbury Wrap & Sign Guy
Much like De.Signs, I would print this into smaller sections paneled similar to the below (magnet boxes). I would choose a starting point for all of the panels (red line) and start each panel installation there. Working from the top down, feed the vinyl into each of the valleys - no amount of primer or special cast film is going to last long or look good stretched into those areas. You'll need to use a good cast wrap film either way.
 

Attachments

  • 1630592089793.png
    1630592089793.png
    442.9 KB · Views: 154

fuzzy_cam

The Granbury Wrap & Sign Guy
Much like De.Signs, I would print this into smaller sections paneled similar to the below (magnet boxes). I would choose a starting point for all of the panels (red line) and start each panel installation there. Working from the top down, feed the vinyl into each of the valleys - no amount of primer or special cast film is going to last long or look good stretched into those areas. You'll need to use a good cast wrap film either way.

Sorry, I pasted the wrong image at first without the red line.

1630592284912.png
 

citysignshop

New Member
Don't do a wrap at all!.....a waste of time in my opinion, with the high likelihood of failure in the seams. How good is the paint job?....typically if it's hard to prep, the painter won't get into the seams and angles properly....it's 'just a horse trailer'...right? fast and cheap paint job means crappy vinyl adhesion.
Instead......Apply the graphic to alupanel and pop rivet to the trailer frame channels. Possibly the spare tire could be moved to the front or hitch? When they tire of the graphic, or sell the trailer, the graphic is gone in minutes, instead of hours.

It's just going to look crappy from any angle except straight - on. My $.02.
 
Top