Stephenedwardgraphic
New Member
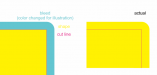
We are supplied Illustrator files from some marketing companies that we make decals for. Just curious if someone has an easy way of creating bleed. Many times we will create our cut path and then offset the path and bring it in a bit. Problem is that on some graphics it doesn't look good (see attached sample). It makes different paths and blends not look correct.
These customers don't want a white border around the decal either. Looking for a quick solution so that we don't need to spend valuable time fixing the cut paths by hand...
Thanks in advance...
These customers don't want a white border around the decal either. Looking for a quick solution so that we don't need to spend valuable time fixing the cut paths by hand...
Thanks in advance...