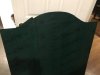
I have a one time cut to make on the alupanel for a decorative shape at the top as seen in the picture. I used a jig saw which worked fine until I did the other side using the cutout piece for a template. I would like to properly learn how to do this. I normally send them out but that’s becoming harder. I was wondering if a router is the proper tool or if I should purchase a cut out tool if it easier. Any quick and easy way to do a templates when it will only be used one time. Thanks
-
I want to thank all the members that have upgraded your accounts. I truly appreciate your support of the site monetarily. Supporting the site keeps this site up and running as a lot of work daily goes on behind the scenes. Click to Support Signs101 ...
You are using an out of date browser. It may not display this or other websites correctly.
You should upgrade or use an alternative browser.
You should upgrade or use an alternative browser.
Cutting A Decorative Alupanel Sign
- Thread starter kroger
- Start date
visual800
Active Member
gotta keep the edges close to a flat surface while cutting especially on 3 mil material. I use a bi metal blade and go slow. After jigsaw it time to smooth it out with palm sander or belt sander keeping it straight and light. I prefer a router hands down BUT sometimes you have those one off simple cuts like this, 6mil is much better to cut than 3mil
Do you ever get it perfectly symetrical doing it by hand like that? Seems to me one side is going to have a different profile than the other. I mean... before CNC's were a thing it had to be done another way, but that seems like a lost art!
Personally I would print whatever it is your printing with an outline... Rather than drawing one. Then use a jigsaw to cut as close to the edge as possible, and then sand it down. Even if youre just printing on a cheap vinyl to use as a template... I think you'd get more accurate / consistant results than using the cut out piece as a template... Especially when cutting it out with a jigsaw.
Personally I would print whatever it is your printing with an outline... Rather than drawing one. Then use a jigsaw to cut as close to the edge as possible, and then sand it down. Even if youre just printing on a cheap vinyl to use as a template... I think you'd get more accurate / consistant results than using the cut out piece as a template... Especially when cutting it out with a jigsaw.
Yes. The first side went well freehanding it but to get the match on the other side was a fail. So a template using just vinyl and going slow. I’ll try that. I didn’t realize you could sand the edges. I used to file them until I got a burnishing tool which isn’t always perfect, if it hits a bad spot it goes wavy. Great tips!
Thanks.
Thanks.
Johnny Best
Active Member
Gino
Premium Subscriber
Not to be mean, but your eye to hand coordination is kinda p!ss-poor. The marks you made on that panel weren't even precise. How would you expect to cut accurately ?? Practice on some smaller scraps before you waste a lotta good material. A belt sander can really be your friend in this one.
Wow that’s harsh! But I recognize your name! lolNot to be mean, but your eye to hand coordination is kinda p!ss-poor. The marks you made on that panel weren't even precise. How would you expect to cut accurately ?? Practice on some smaller scraps before you waste a lotta good material. A belt sander can really be your friend in this one.
Gino
Premium Subscriber
Recognizing a name has nothing to do with God's honest truth or harshness.
Fact : Your eye to hand coordination does not exist. Your picture is proof of it. But I commend you on posting up your picture for help.
Fact : Your tracing/pattern is horrible. No one could follow that.
Fact : Your profile says you have no experience whatsoever.
Fact : You might try to find out answers before you go around spoiling perfectly good pieces of substrate.
lol....... what is that for ??
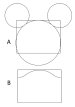
What you're trying to do is quite easy, even for the non-equipped. Like Johnny showed, his is the safest way, but you really only need your top freeform. Make it in any software of your choosing of 1/2 way. Draw it out on your plotter. Place it on the substrate, and trace it on. Now, flip it over and it should be an exact replica of the first side. Cut within about 1/8" and then use your belt sander to go right up to your previously traced lines. What you have pictured would take maybe 15 minutes for boths sides to be cut, sanded and finished off.
Fact : Your eye to hand coordination does not exist. Your picture is proof of it. But I commend you on posting up your picture for help.
Fact : Your tracing/pattern is horrible. No one could follow that.
Fact : Your profile says you have no experience whatsoever.
Fact : You might try to find out answers before you go around spoiling perfectly good pieces of substrate.
lol....... what is that for ??
What you're trying to do is quite easy, even for the non-equipped. Like Johnny showed, his is the safest way, but you really only need your top freeform. Make it in any software of your choosing of 1/2 way. Draw it out on your plotter. Place it on the substrate, and trace it on. Now, flip it over and it should be an exact replica of the first side. Cut within about 1/8" and then use your belt sander to go right up to your previously traced lines. What you have pictured would take maybe 15 minutes for boths sides to be cut, sanded and finished off.
Johnny Best
Active Member
"Pi$$-poor" is better than "not having a pot to pi$$ in".
I should have mentioned the Previous marker lines I was just visualizing, yes sloppy!
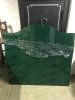
So it turned out pretty good! Vinyl template and using a jigsaw slowly then sanding. Thanks for the help everyone!
Actually 20 years experience I just never fill out a complete profile. Lol is for knowing your comments usually come with criticism before advice. That’s all.
So it turned out pretty good! Vinyl template and using a jigsaw slowly then sanding. Thanks for the help everyone!
Actually 20 years experience I just never fill out a complete profile. Lol is for knowing your comments usually come with criticism before advice. That’s all.
Attachments
Gino
Premium Subscriber
Hahahaaaa.... kroger. I see, now. 6 or 7 years ago, you put down you had ZERO experience in the sign industry, but now ya tell us you have 20 years in it, but ya can't cut out a simple piece of acm. Guess math isn't your strong suit, either. Yep, it all makes sense now. Yep. Uh-huh. That's the ticket. What's next ?? I sure hope that thing is one sided. Ask me why................. go ahead, I dare ya.
bob
It's better to have two hands than one glove.
Preferred equipment for cutting al laminates, in descending order of desirability:
CNC [my preferred vend or al laminates provides this service for a modest price]
Cutawl
Band Saw
Jig Saw
Preferred equipment for edge sanding al laminates, in descending order of desirability:
Spindle Sander
Oscillating Belt Sander
Belt Sander
For dressing al laminate edges either reforming edge with round metal bar or a deburring tool. Which method depends on the condition as well as the shape of the edge. There is no other acceptable method.
Gino
Premium Subscriber
Yep, ya got me pegged ya lil' whippersnapper. My mom's been gone for over 35 years. It's my basement, but the basement has been converted into an 1,100 sq ft dance studio on one side. My wife teaches ballroom and latin dancing with Argentine Tango and Salsa being her specialties. The other 2/3's of the basement is a woodworking area and her office area split down the middle. I'm going on over 56 years of this sh!t and I'm still learning, but really, I know most of the basics.Yes one sided and I get why!
Oh wow. I feel like you sit in your moms basement ordering pizza and watching you tube videos. That where you get all your advice. Always so quick to respond.
20+ years and still learning what can I say!
John_Smith
Enjoying retirement in Central Florida
in the future, if you are using the same method and one side cuts well, I would suggest you continue along the same cutting path and not start from the opposite side to do the mirror image of the template. see how that works for you.
gnubler
Active Member
Wife schmife. Though I figured you more for lambada with some pole dancing thrown in.Yep, ya got me pegged ya lil' whippersnapper. It's my basement, but the basement has been converted into an 1,100 sq ft dance studio on one side.
Stacey K
I like making signs
I am no expert in this area but I go slowly and use a sander afterwards to smooth it out if I get a little off track. Better to go off track on the scrap side vs. the sign side because you can use the sander to smooth it out. I use stencil vinyl as a template and cut on the scrap part instead of using a sharpie. I've had the saw scratch through the plastic wrapper already, the stencil vinyl is a bit thicker and it also seems to help my brain keep the blade on the scrap side vs. cutting into the vinyl where the sign is. Then I use the sander to smooth it out and remove the vinyl template. It's probably not the right way to do it but it works for me. Allow plenty of time and go slow.