• I want to thank all the members that have upgraded your accounts. I truly appreciate your support of the site monetarily. Supporting the site keeps this site up and running as a lot of work daily goes on behind the scenes. Click to Support Signs101 ...

Grainy prints after new head installed. ( Mimaki cjv150 )

Shawnclift

New Member
Hi everyone …
I’m back
1f602.png
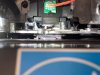
. Ok new head installed , but I’m getting grainy prints . Done all the config with drop and feed in the service menu and normal menu . But I think the slant needs adjusting . Does this look correct after averaging 34 adjust ?
Thank again everyone !


Untitled-6.JPG
 

Solventinkjet

DIY Printer Fixing Guide
In the slant adjustment, the main concern is getting the cyan and magenta dots on the same horizonal plane. Since yours are overlapping, it is correct. Post a picture of the graininess.
 

Shawnclift

New Member
In the slant adjustment, the main concern is getting the cyan and magenta dots on the same horizonal plane. Since yours are overlapping, it is correct. Post a picture of the graininess.
Ahhh Ok I was hoping that wasn't the case, but good news I guess. I've attached a picture of the last design and just compared before the head swap seems so much more grainy .

I've played around with Maps aswell , which didn't help, just took longer to print :p .

20230216_191344128_iOS.jpg
 

Shawnclift

New Member
In the slant adjustment, the main concern is getting the cyan and magenta dots on the same horizonal plane. Since yours are overlapping, it is correct. Post a picture of the graininess.
I've also tested all overpass numbers and Bi/Uni Direction , going through different profiles and different temps of the printer. All giving the same grainy effect, so something just can't be calibrated right .
 

Impact1

Wide Format Technical Solutions
Did you have the carriage in the low position when running the print adjustments in service mode. Did you verify by running end user drop.pos after. CJV150’s don’t really take a lot of adjusting when replacing the head. Something was done incorrectly or the head could be defective. Make sure you seated the head cables correctly. Also, make sure your environment has a humidity range of 35 to 55 percent.
 

netsol

Active Member
Did you have the carriage in the low position when running the print adjustments in service mode. Did you verify by running end user drop.pos after. CJV150’s don’t really take a lot of adjusting when replacing the head. Something was done incorrectly or the head could be defective. Make sure you seated the head cables correctly. Also, make sure your environment has a humidity range of 35 to 55 percent.
ALL VALID POINTS, but, i would think humidity is the sameas it was with the old head.
how senisitve is the leveling/print head heght.?
should he be measuring like he is performing a tramming adjustment, on a cnc?
 

Shawnclift

New Member
Did you have the carriage in the low position when running the print adjustments in service mode. Did you verify by running end user drop.pos after. CJV150’s don’t really take a lot of adjusting when replacing the head. Something was done incorrectly or the head could be defective. Make sure you seated the head cables correctly. Also, make sure your environment has a humidity range of 35 to 55 percent.
Head was in low during the calibration. I did double-check this throughout the calibration. Cables all looked good when carefully placing them back in and all to be seated on the pins. I have a stronger magnifying glass coming today that hopefully will give a better look at the dots and can calibrate the head skew, as the dots look a bit warped.
 

SightLine

║▌║█║▌│║▌║▌█
Starting to wonder if it might be a new "old" printhead that could cause this. Seeing the exact same thing here. We bought 2 JV150 machines 4 years ago. Put on into production asap - been great. Ended up not needing the second one so it sat in the crate still brand new and unused. Pulled it out and set it up about 2 weeks ago. Exact same model, exact same age. Exact same ink, everything configured exactly the same. Same RIP, same profiles. All lighter colors are grainy on the new machine. Perfect test draw. Did all of the #ADJUST alignments for slant (average 34) which is near perfect left/right flat. All of the #ADJUST dot position alignments for each mode and dot size. Still grainy. So checked head gap, that was a bit higher than normal in thin (was about 2.4mm) so adjusted that to 1.8mm to the head guard plate (2.0 to the actual head surface). Rechecked all the calibrations, upgraded the firmware (both are are 4.0 although the new one came back up as 4.0R1), double checked that every single setting was the same. Tried different profiles and resolutions/passes. Tried multiple rolls of materials (Avery 1105, 3M 180 and 175). Yes going to 16 pass 1440 helps some but the other machines runs 720x720 8 pass and has always printed nice solid colors. The one we have been running sitting right next to it in the same room still prints far better.

I'm stumped. Spent another 4 hours calibrating things today and burning up a bunch more material.
 

Shawnclift

New Member
Starting to wonder if it might be a new "old" printhead that could cause this. Seeing the exact same thing here. We bought 2 JV150 machines 4 years ago. Put on into production asap - been great. Ended up not needing the second one so it sat in the crate still brand new and unused. Pulled it out and set it up about 2 weeks ago. Exact same model, exact same age. Exact same ink, everything configured exactly the same. Same RIP, same profiles. All lighter colors are grainy on the new machine. Perfect test draw. Did all of the #ADJUST alignments for slant (average 34) which is near perfect left/right flat. All of the #ADJUST dot position alignments for each mode and dot size. Still grainy. So checked head gap, that was a bit higher than normal in thin (was about 2.4mm) so adjusted that to 1.8mm to the head guard plate (2.0 to the actual head surface). Rechecked all the calibrations, upgraded the firmware (both are are 4.0 although the new one came back up as 4.0R1), double checked that every single setting was the same. Tried different profiles and resolutions/passes. Tried multiple rolls of materials (Avery 1105, 3M 180 and 175). Yes going to 16 pass 1440 helps some but the other machines runs 720x720 8 pass and has always printed nice solid colors. The one we have been running sitting right next to it in the same room still prints far better.

I'm stumped. Spent another 4 hours calibrating things today and burning up a bunch more material.
I don't think I've ever been able to run our Mimaki cjv150 at 8-16 passes. The ink pools up and gets the big fish eyed effect. I'm going to dive a bit more into it today as I got burned out last week from it all but work needs going out so even if uni 32 passes, I just have to deal with it :p . Coming from Bn-20 the Mimaki cjv has never livid up to the standard in our eyes. Maybe we just had bad luck with it.
 

SightLine

║▌║█║▌│║▌║▌█
This in an exception.... This is our 7th Mimaki over the past 21 years (2 JV3, 3 JV33, 2 JV150). All have been top notch machines with excellent print quality. Just this second JV150 that we just uncrated and setup is doing this.
 

Shawnclift

New Member
If you push the head out over the platen, does the gap between the head and platen look even?
Think I found a problem, the capping station looks to be on the metal part . How do I move the capping station right ?
 

Attachments

  • 332163538_2577136405773531_9200090976493207296_n.jpg
    332163538_2577136405773531_9200090976493207296_n.jpg
    158.5 KB · Views: 176

Shawnclift

New Member
Yeah no luck guys and i think it's gotten worse, as it;s more grainy and i'm losing the right black channel :(. Any other help would be great or any ideas what to check ?
332163538_2577136405773531_9200090976493207296_n.jpg untitled.JPG
 
Top