• I want to thank all the members that have upgraded your accounts. I truly appreciate your support of the site monetarily. Supporting the site keeps this site up and running as a lot of work daily goes on behind the scenes. Click to Support Signs101 ...

head adjustment

jiro

New Member
Hi all,
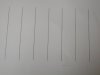
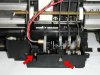
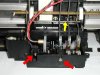
Have a outdoor jr. that needs a head adjustment.Think it's the color head that needs the adjustment but want to be sure.I attached thee jpeg.s from a head tilt test print. The first is of the blk. reading the manual it sounds like to me, the lines should line up like they are. The second of the color, reading the instructions it looks like I have to slide the head adjustment down? The third is a pic of what I think are the screws to adjust, am I on the right track? Also the instructions say (when fastening the print head , push it towards the taper of the head adjustment A for depth and towards the taper of adjustment B for tilt) I get a little lost on this part. I've been reading the theads on this forum for some time anticipating working in my printer that I recently purchased, and have learned much from all of you that are very generous with your knowledge.
Any help with input on this is much appreciated. thanks :unclesam:
 

Attachments

  • P1010102.jpg
    P1010102.jpg
    21.5 KB · Views: 86
  • P1010103.jpg
    P1010103.jpg
    17 KB · Views: 85
  • Untitled1.jpg
    Untitled1.jpg
    70.6 KB · Views: 57

RG

New Member
Hi, jiro. Looks like the real pros are on break. So, I'll give you my 2 cents worth about your first picture (the one on the left). When I installed new heads on my FOJ, the test print looked like yours. That's not good. The black needs to line up with the color. To make my black line up with the color, I loosened the one screw that holds the black printhead in place and pushed it slightly away from me (toward the back of the printer). Then I tightened the secrw that holds it in place and did another test print. It may take a few tries to get it perfectly lined up, but it's doable. It worked for me. Good luck.
 

Jackpine

New Member
Ditto! Techs have access to change the firing of the print head when you get it real close but I haven't been able to get that information from anyone. After replacing my K head was off a bit and I adjusted it as close as I thought I could. My head was off less then 1 pt when I was done.
The screws you are showing are for tilt.
Hi, jiro. Looks like the real pros are on break. So, I'll give you my 2 cents worth about your first picture (the one on the left). When I installed new heads on my FOJ, the test print looked like yours. That's not good. The black needs to line up with the color. To make my black line up with the color, I loosened the one screw that holds the black printhead in place and pushed it slightly away from me (toward the back of the printer). Then I tightened the secrw that holds it in place and did another test print. It may take a few tries to get it perfectly lined up, but it's doable. It worked for me. Good luck.
 

jiro

New Member
Thanks, for the help, I do have a manual RG thanks..... Although it's a bit vague (to me anyhow) are the head adjustments the points that I referred to in red arrows on photo three? Or is it what looks like an adjustment behind the color head ( yellow arrow in attached photo) to line up the black with the colors from the test print in photo one.
 

Attachments

  • Untitled2.jpg
    Untitled2.jpg
    70.8 KB · Views: 70

RG

New Member
Jiro, I agree with you 100%--the repair manual is NOT really clear. I don't know what the screw you have the yellow arrow pointing at is for. But, the screw for you to loosen to move the black head is the one between and slightly above the 2 screws that you have the red arrows pointing at. I assume that you do have the repair manual and not just the owners manual. If you need the repair manual, I can help.
 

randya

New Member
The adjustment you need is the ones with the red arrows.

This is a step wedge that "pushes" the head back, as you can see your cym head is back pretty far and the black is pretty forward.

You may have to adjust both. if needed.
 

jiro

New Member
Great that's what I that Randy, Now do I loosen the screws on top off the head that RG referred to when I move the step wedge to make adjustments?

And what is that thingamajig that I marked with a yellow arrow??? Is that some kind of adjustment?
 

randya

New Member
That should be the tilt for the color head.

Take you time and get these alignments right, they can be tricky.
The little step wedges click into place to push the head back, but you have to kind of pull the head against the wedge to bring it forward.
 

randya

New Member
Randy...
how long would it take Chuck to do??
Glenn

Probably an hour or two to install the heads and do physical and electrical alignments.

The first one I did on my own machine (before Mutoh) took me 2 tries and the better part of a day.
 

jiro

New Member
Alright made the adjustment to the color head and it looks good!!!!!

:beer

Thanks all for the input and good advise. It's nice to have a forum like this to help navigate threw things you have to do that the manual kind of does not cover or has you head scratching.
 
Top