• I want to thank all the members that have upgraded your accounts. I truly appreciate your support of the site monetarily. Supporting the site keeps this site up and running as a lot of work daily goes on behind the scenes. Click to Support Signs101 ...

help going from design to output for printer

texascamoman

New Member
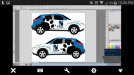
OK first off im new to wraps and pretty new to photoshop. I have been all over the web looking for info or training on wrap design and Ive purchased dvds on photo shop, making templates, illustartor and none teach about how to go from a wrap design to a printable file. I need to know how to break up the design into panels with bleed to send to my rip software (flexi CC). This may be asking alot or maybe its simple and I feel a little dumb to be asking, but its where I'm hung up at with my work. I have photoshop CS5 and Illustrator, I'm using a mutoh valuejet 48" printer and have flexi 8. Any help or direction to go for instructions would be a great help.
 
Many designers will create separate files for the various surfaces of the vehicle (driver side, passenger side, hood, roof, etc) and allow the RIP software to break the file into the panels (aka tiles), define overlaps etc.
 

ccuddey

New Member
I'm with The op. I have bought the templates for my design but not sure how it rips from the design. I know how to size an artboard for a single panel print. But my problem is the graphic on the different panels is obviously going to be printed and sized accordignly. So what I don't know how to do is take a snippet of a panel and not the whole side and send that panel only to print. Confusing to try to explain. But I understand what the op is trying to get across becuase i have the same problem.
 

Attachments

  • 20150125_093842.jpg
    20150125_093842.jpg
    59.3 KB · Views: 237

texascamoman

New Member
pro designer

Aurora Graphics has a good Photoshop design cd called Pro Designer 1 and 2. excellent for wraps design and outputting.
I have pro designer II while useful information, not what I need. I don't have pro designer I I'll have to look into getting that.
 

GAC05

Quit buggin' me
As you are just starting out this is a good time to avoid developing bad habits.
My advice would be to stop designing your wraps in Photoshop and start doing them in Illustrator.
With AI you can design at full size and you will not have to worry (too much) about dpi ppi etc until it is time to export to the RIP.
AI, EPS, PDF can contain Photoshop (bitmap) objects if needed.
Your files will be smaller, easier to edit and higher quality at export.

wayne k
guam usa
 

jtcollins

New Member
Hope this helps...

Illustrator all the way. We purchased a 1/20 vehicle .eps data bank of templates, dont remember from where maybe someone else here uses them as well and can help out with a url, and i use them AFTER i get my measurements for the wrap to double check my numbers and see how the design will lay on the vehicle. Then we send the job to print in parts: bumper, hood, mirrors, doors, etc and make sure you have your seams thought out (or better yet design so you dont have any). How are you planning to cut your prints? I hope the attached images of our rip help more than confuse. The black image with pink lines are the cut path previews
 

Attachments

  • Screenshot_2015-01-26-22-36-13.jpg
    Screenshot_2015-01-26-22-36-13.jpg
    43.2 KB · Views: 228
  • Screenshot_2015-01-26-22-33-27.jpg
    Screenshot_2015-01-26-22-33-27.jpg
    62.6 KB · Views: 188
  • Screenshot_2015-01-26-22-30-32.jpg
    Screenshot_2015-01-26-22-30-32.jpg
    46.2 KB · Views: 202
  • Screenshot_2015-01-26-22-29-48.jpg
    Screenshot_2015-01-26-22-29-48.jpg
    60 KB · Views: 213

ccuddey

New Member
The graphic I attached was designed using a template in illustrator. I've got the design down but not sure how to rip it from here. For instance trying to rip just the top wing or to rip just a part of the side board and not the whole thing. problem is every race car is different and I don't know how to resize for a measurement different theN the initial template. Hope that makes sense. Any advice would be greatly appreciated. Ps just like the op I've bought several books, watched sevreal videos and the only info I can get is "when you are done designing, get acutate measurements and send it to your rip software". That doesn't quite explain it for me. I understand what it means just not sure how the rip software gets its information for my template if my template needs to be adjusted for a different size panel or if I only want to print a particular section of my template. I would pay a shop or someone in the know for their time if I could see a wrap job designed and printed from beginning to end.
 

jtcollins

New Member
Think about how wide you can print and start applying that width limitation to the bigger parts of the car to help determine where you may need more than one print to cover an area (like the sides) and then look at where youd like to hide a seam if necesary. For example, maybe you can only cover from the window down, so turn the side in to two prints. I think i would do the wing in several pieces, with each piece covering a face or contour a couple faces where applicable. As far as using the same design on different bodies you will need to be able to break your design down into multiple layers so you can make adjustments to the individual pieces without distorting the whole design. You will have to break the template into pieces (pathfinder tool) with a bleed (couple inches) to send it to rip
 

ccuddey

New Member
I have a 64 inch printer so I should not have to break it into multiple sections. The biggest piece on the whole car is only 52 inches. The problem I have is when it comes to sizing for a different size car. For example the template size of the one I used is different then the actual car. is there a way to resize the template?

I can understand a way I could do it by just cutting out a specific panel with the pathfinder tool. Can I lock the template layer and then draw a box and cut it with the pathfinder tool. Maybe pen tool? And then take that and apply it to the specific panel then add bleeding and then rip? If so how would I extract it without extracting the whole design? Again very hard to explain when I have never seen it done. Thank you for all your help thus far.

The reason I ask all this is because I know my printer is big enough to just rip in one big piece. The problem I have is when I need a replacement panel. I only need the damaged part of the graphic to print. I need a way to cut just that part of the graphic out, size it And rip it without having to print the whole paneled graphic again. Saves a lot of time and money For everyone involved.
 

jtcollins

New Member
Find the closest body lines to the damage to determine the size and shape of the piece you will replace, then create a compound path around the area with the pen tool in illustrator so you can use pathfinder to crop out the part of the design you do not need. If there is solid color in the background then make sure you stretch that color out into the bleed, if there is artwork then you may need to adjust the points into the bleed using the direct selection tool. As far as sending to rip just delete what you dont need, set the art board to what you do, save the file to your rip hot folder or whatever, and then undo the delete. Is the template you have the correct body shape and style? Does it just need to be bigger but retain the same shape? Make sure your units are set to inches and not points and adjust the template according to the measurements you took for the vehicle.
 

ccuddey

New Member
Ok i think I'm finally grasping what you are saying. Thank you so much for the help.

So my plan of action would be this....


Measure the peice I want to cover.

open a new documwnt and set the artboard in inches to the same size.

Go to the original document with the artwork and crop out using the pen tool the area I want to cover From the original graphic.

Place on the new artboard. Add bleed, rip and print.

Sound about right?
 

ccuddey

New Member
And to reply to your question. The graphic I attached is a sprint car. A sprint car can have multiple different sizes as far as length of panels, height and any concave or convex surfaces. when I got the template I already knew that it would not be an exact replica because each owner modifys it the way they want. Hence the reason I need a way to either rezise the graphic to the specific car or be able to crop and size a specific section of a graphic.
 

jtcollins

New Member
Ya, that makes sense. You can bypass worrying about the artboard initially and after you paste your art, you can either select the art and press shift-O to bring up the artboard tool and you can use the presets in the top left drop down to select "fit to selected art" or if you need a "bleed, or dead space" for your digital cutter "so the cut path doesn't get molested then make a box around the art a little bigger than necessary but still in the printer bounds and snap your artboard to that. Also, if you're using controltac or something similar then yes the vinyl can stretch but dont forget to include the curves in your measurement, just a heads up, our graphic designer did that one job and it created...issues.
 

ccuddey

New Member
Thanks so much jtcollins. As soon as I get a chnace I will try it out. Thanks again. Hopefully the op could follow along and help him solve his original question.
 

jtcollins

New Member
Thanks so much jtcollins. As soon as I get a chnace I will try it out. Thanks again. Hopefully the op could follow along and help him solve his original question.

No prob man, hope your wrap goes well. Feel free to pm me if you have issues along the way
 

jfiscus

Rap Master
I think you're on the right track with how you are setting them up now,.
However on your first couple wraps, before you hit print it may be worth your time to send the files by someone with more experience in making/printing wraps that work. (like hiring a consultant)
Have you installed any wraps? That helps tremendously with setting them up correctly for installation. (where to / where not to place graphics/elements and how to transition from sides to hoods/rear, etc)

I would also like to (respectfully) disagree with a previous post stating that you should be designing your wraps in Illustrator instead of Photoshop.
I have designed quite a few wraps and have designed many of them in each program. When you are working on the artwork (or are provided artwork) you will get a feel for whichever program you should be working in for that particular wrap. Both programs will get the job done correctly, and both have strengths and weaknesses in certain areas. If you are confident in Photoshop and not as experienced in Illustrator then by all means stick with PS until you are more confident in Illustrator.

Good Luck!
 

jfiscus

Rap Master
Illustrator all the way. We purchased a 1/20 vehicle .eps data bank of templates, dont remember from where maybe someone else here uses them as well and can help out with a url, and i use them AFTER i get my measurements for the wrap to double check my numbers and see how the design will lay on the vehicle. Then we send the job to print in parts: bumper, hood, mirrors, doors, etc and make sure you have your seams thought out (or better yet design so you dont have any). How are you planning to cut your prints? I hope the attached images of our rip help more than confuse. The black image with pink lines are the cut path previews

Pro Vehicle Outlines has a GREAT set of templates, but try to take some actual measurements and photos of the real vehicle whenever possible as the vehicle is not 2-dimensional like the templates are. major problem areas to verify on templates are overall lengths/heights, any rear/front window getting graphics, actual hood sizes and any curved rear hatch/trunk. Rear hatch window templates (for perf) are the most incorrect areas I have found.
 

texascamoman

New Member
more info..please

Well I've heard a lot of opinions about which program to use and I have both so im trying to learn them both. But I think with ether I'm not clear on how to select say just the front fender of the wrap and take it to print. I'm getting the idea that you create a box around that area and make a new layer of it, but unsure of how to do this exactly. I to would like to see this done in person and have even looked for a class but found none. I appreciate any and all help you guys are giving.
 

ccuddey

New Member
I have installed a couple of wraps but outsourced the whole thing to where all I did was install the graphics. I decided to get into making them myself when I had enough people interested that I could justify buying the equipment.

I use illustrator for the pupose of vector. If I design something in photos hop that the customer wants in a certain spot in a certain color in a certain sizeand it's a complex design the live trace function is useless. I basically have to redesign it in a vector format. So I just go ahead and design in a vector format right off the bat and if I ever need let's say a pair of angle wings again for another client but he wants slight modifications I can do so easily if in a vector format. Just my 2 cents.
 
Top