A field seam has a lip of clear thin plastic glued to the back side of one of halves of the face. 1-1/2 inch x 1/16 inch clear is common. This is usually enough to keep the sides from gapping. Of course, the hanging bars are necessary so the plastic will hang straight and not sag or bow.
And I am assuming 3/16-inch plastic faces. Why use 1/8-inch? It will tend to sag inward and be a greater risk for a blowout. Plus the lack of rigidity makes sliding it more difficult, even with a hanging bar. Remember that if you need two, or even three people, to re-lamp in the future, the service calls will be more expensive, though this may not be a real issue, as many shops send two-man crews routinely. However, a 4x20 with hanging bars and a middle seam should, theoretically, be an easy service call for a single worker.
The plastic seam strip on the back sometimes needs to be cut short of the retainer at the top and bottom. The retainer may not allow for the extra thickness. Often a thin strip of translucent vinyl applied to the face of the scab piece just behind the seam helps hide the crack, especially where a letter crosses the seam.
I realize that a full coverage print may present a problem that we never had back in the day.
Seams are not always perfect. Occasionally there will be a light leak. I always tried to avoid positioning a vertical lamp directly behind a seam for this reason, though I don't know if it really made a difference. A leak can be more likely on a long
sign that is center pole mounted. The ends of the cabinet can sag. If the ends of the cabinet do not remain level with the middle, a clean seam may not be possible. But in that case, installing a single large face will be a problem, too.
Long cabinets that are center pole mounted should
always have diagonal bracing running from top center to the lower corners at the ends. Not doing so can create a problem not only with re-facing but re-lamping as well.
I am not saying I have never installed single-piece oversized faces. I have, but sometimes lived to regret it.
I once installed a pair of 6x8 pans in an existing double-sided pole
sign. They were heavy, to be sure, but I man-handled the first one in place. I took the precaution of first thoroughly cleaning the inside lip of the top retainer that was to receive the hanging bar. I even waxed it with a piece of paraffin and then waxed the bottom of the hanging bar as well. The challenge, of course, was hanging onto the face with one hand while controlling the bucket lift with the other. So I attached a rope to the top edge of the plastic using machinist-type center-pull clamps (center-pull clamps don't try to bend the plastic like a regular C-clamp can). I put a rope through the clamps and hooked it over the end of the boom and held it there with one hand while I worked the lift. Once I got a top corner with its hanging bar started, I slid the face in, removing the clamps from the top as I slid the face. Ha, ha, I was invincible!
Unfortunately, the other side did not want to fit at all. The bottom of the cabinet appeared to be a little cantilevered, making the opening on the open side shorter in height. And I think there may have been some sag at the ends, too. In hindsight, perhaps I should have immediately trimmed the bottom edge of the second face, even if it meant going back to the shop, but I didn't. It took the rest of the day to install the face, and I no longer felt invincible.
To get the face into the opening, I put a ratchet strap on the other side of the cabinet to try and pinch the top and bottom together a little on that side, hoping that would spread the open side a little. I don't know if that helped or not, but it wasn't till I loosened the bottom retainer considerably that I was able to get the face started and hanging securely on its hanging bar. I slid the face a ways into the cabinet till it stuck and would go no further. So to get it to slide the rest of the way, I clamped a rope to the leading edge of the face and, leaving a large length of the face extended precariously in the air, positioned myself beyond the opposite end of the
sign and used the rotation function of the boom to gently tug the face sideways into the cabinet with the rope attached to the boom. I was then able to button up the retainers and I quit for the day, exhausted, and went home to sit on the porch.
When I eventually got a call to service the same
sign, I told them I would "have a hard time getting to it" and suggested they call one of the big shops.
Brad
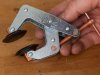
Center pull C-clamp picture attached. Probably not the correct name for the clamp