• I want to thank all the members that have upgraded your accounts. I truly appreciate your support of the site monetarily. Supporting the site keeps this site up and running as a lot of work daily goes on behind the scenes. Click to Support Signs101 ...

I'm too dumb....

Lonely Fisherman

New Member
I'm too dumb to run computers and design signs... At least it seems that way today.

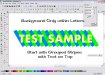
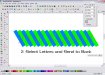
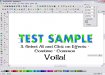
Here's a question for the Flexi & LXI crowd: I have a background object in my design. I've overlayed lettering across the top of the object and now I want to remove (cut out) the material in the background object in order to lower the number of vinyl layers.

When I got out of bed this morning, this was gonna be my learning experience for the day. (yes, I set low goals so they're easy to achive!) But the ability to do that seem to elude me.

I'm using LXI Master 7.5 v5

Thanks to anyone that can shed light on this subject for me.

Fish....
 

MVIP

New Member
For Flexi Weld-Exclude common

This is in Flexi pro not sure which version you have.
 

Geary

New Member
Well, Fish, I guess I'm too dumb to understand your question. Could you restate what you want to do using different words. Somehow in this form....it eludes me as to what you want to end up with.

Sorry. :tongue:

~gear
 

iSign

New Member
If I understand correctly, there are at least 2 elements to the design... an "object", and text.

Instead of cutting the entire object in one color, blue for example... & then the text in, let's say, red... resulting in red letters crossing over (and layering on top of, the blue "object" ...you want to "knock out" the lettering from the blue object & drop in the red text so it is not "layered"

Is that right? ...maybe an over simplified version... but the basic idea?

What would be one more step that may be relevant, is to put a white outline around the red. The white could be the substrate showing through, instead of yet another layer of white vinyl.

In either case, I think making the drawing look correct on screen should usually be easy & at least one way of setting up the proper cuts to get the job done should be even easier...

But, if the background object were very complex... with tons of shapes, within shapes... all "combined" or "compounded" or whatever term folks use for holes within shapes within holes within shapes ... then sometimes all the welding & trimming gets so complex... I would just skip that work & send the cut file for the entire background object with the text (or the outline of the text) laid over the top of it (but eliminating any extra letters that don't overlap it)
in this way, the weeding process will easily remove the correct parts of several complex shapes that might not have been so easy to remove in the file.

EDITED TO MAKE THINGS EVEN MORE CONFUSING...

here is a graphic I drew up to go with my commentary:

what you will see is a simple version on the left & a complex version on the right. The top shows the background object, then with text, then what the background only should look like at the application stage... THEN, what the actual cut file might look like. Here is where the simple one shows that an effort could be made to eliminate any unneccessary cut lines... the complex side shows that up to an hour of confusing computing can be avoided & just cut a bunch of lines & weed carefully :smile:
 

Attachments

  • TRIMS.jpg
    TRIMS.jpg
    51.1 KB · Views: 163
Last edited:

Fred Weiss

Merchant Member
The confusing thing here is getting the layer order right for what you want to do. That which you want to retain must be on the bottom.
 

Attachments

  • bkg in letters 01.jpg
    bkg in letters 01.jpg
    327.1 KB · Views: 141
  • bkg in letters 02.jpg
    bkg in letters 02.jpg
    331 KB · Views: 179
  • bkg in letters 03.jpg
    bkg in letters 03.jpg
    288.9 KB · Views: 142

Deaton Design

New Member
I dont know about Flexi, etc. but in Illustrator, what you are wanting to do, I do by selecting both the lettering and the background piece and using the trim command. This cuts out the area behind the lettering allowing the background piece to fit around the lettering. I do this all the time when doing vehicles, so there wont be so much layering showing through.
Hope you get it worked out.:)
 

Lonely Fisherman

New Member
Hello Everyone,

Sorry that my explaination wasn't very clear Geary, I'm told that I never explain myself very well. (guess thats true)

Doug, you have the clearest idea of what I'm trying to accomplish. The background object is an inverted triangle. If I just cut the lettering and apply it over the object, it has too many small ridges running through the lettering. So, I'm trying to eliminate overlap or lamination of the vinyl. Your graphics show the exact thing that I'm trying to accomplish.

Matt mentioned 'exclude common' which is an option on LXI Master. I'll give that a try too.

Fred, your strategy will come in handy for another project that I've been putting off for a week. Thanks for that.

Learning software like this is a never-ending battle. With my bad memory (pre-Alzheimers maybe?) it makes for a new discovery every week or so! LOL

Thanks everyone, I'll keep trying and let you know what I discover.

Fish....
 

iSign

New Member
You should consider 2 other facts for this approach...

1. it is easy to apply vinyl almost perfectly where you want it... but difficult to acheive true perfection

2. even if you acheive perfection, vinyl will shrink & expose a gap between colors where one was not desired.

...so, the idea of a white outline is one option that might help in this regard.

..another idea would be to weld the text to the inverted triangle... then lay the text in it's second color over the first color. You still end up with layers.. but no ridges. ...except you up up against striving for perfection again.
 

Merlin

New Member
Geary said:
Well, Fish, I guess I'm too dumb to understand your question. Could you restate what you want to do using different words. Somehow in this form....it eludes me as to what you want to end up with.

Sorry. :tongue:

~gear
How come they all understood what he said, Gear? I guess we should go sit in the corner. I just hate that funny hat and the gum on the forehead, thingy. :thumb:
 

Lonely Fisherman

New Member
Doug Allan said:
You should consider 2 other facts for this approach...

1. it is easy to apply vinyl almost perfectly where you want it... but difficult to acheive true perfection

2. even if you acheive perfection, vinyl will shrink & expose a gap between colors where one was not desired.

...so, the idea of a white outline is one option that might help in this regard.

..another idea would be to weld the text to the inverted triangle... then lay the text in it's second color over the first color. You still end up with layers.. but no ridges. ...except you up up against striving for perfection again.


This little project is going on a 2' x 3' white plastic board supplied by the customer. It's almost like plexi but it's white in color and really ridgid. (nice stuff) Since it's semi-clear I can lay the vinyl pretty accurately by placing it against a bright light or in a sunny window. (makes that part of the job simple)

The customer places this on an easel at eye level at trade shows in front of his booth. He's been very specific about the overlaps and ridges because they were pretty obvious on the last version. And I'm not too concerned with shrinking because he has this redone every season.

Last night I played around this LXI's cutout features. I re-read the manual too and found out that there's one more version above mine called LXI Master (PLUS). It contains a feature that will remove or minimize the overlaps automatically. The choice to leave a small overlap offsets the shrinkage effects as well. Since this is the first time that I've ever run into the problem I'm not planning to spend the money on an upgrade. ($300 according to SW)

While playing around last night, I found that I could achieve the desired results using a cheezy technique of bringing things forward in the order and using the cutout feature. While it's completely backward and makes a mess out of the sign on screen, if I'm careful it will do exactly what I'm after. Sometime I'll go through the steps and save some screenprints to show it. Having the right software would certainly make it alot easier but having a printer would simplify the whole process. One sheet of printed vinyl and no ridges!

Time to start shopping, I really didn't want to spend $15 to $30k on a printer yet but it sure would simplify my life sometimes. If I'm gonnna keep building my business this seems like a good next step anyway. (I can dream can't I?)

Thanks for the help everyone!

Fish.....
 

Cadmn

New Member
Fish Kenny along with several others do wholesale printing for us guys on the board & its really alot cheaper than buying a printer unless you get to the point of doing lots & at 15K+ I mean LOTS of color printing
My .02
 

GAC05

Quit buggin' me
See if LXI Master has the Color Trapping tool.
If it does this becomes a 1 click operation.
Flexi Pro 7.6 has this and it works very well.
It is under the "Effects" menu.
You can set the trap size and select the trapping order (Dark to Light or Light to Dark).
Makes it real easy on those mornings when the coffee won't kick in and all those layers won't trim out the way you want them to.

wayne k
guam usa
 

Lonely Fisherman

New Member
Ahhh!!! "Color Trapping" is the technical term that I've been looking for. Just $300 more and SW will send it right out..

Wayne, the LXI Master hasn't got the color trapping feature, just the LXI Master 'Plus' version contains that. But you are certainly right, it would have done the trick!

I got the work done and its out of here by using my little workaround. My customer picked it up this afternoon while I was out. My girlfriend said he was happy with the outcome so I'm happy too...
 

iSign

New Member
thanks Wayne... I'll try that. I've become fairly proficient in Illustrator... but some complex jobs does get me pulling my hair out. I have Flexi 7.6... but just output to my Mimaki from their & haven't done much designing in it.
 
Top