Andriy
New Member
Hi,
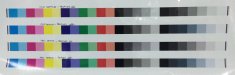
I've been having issues with both of latex 360s not printing a color continuously.
If it's 1 continuous color, it will change throughout a 30 foot run almost guaranteed.
If it's a multi-color print, the color will change enough towards the end of the roll making it impossible to run full jobs and leaving me with resorting to the solvents that have consistent color.
I have tried switching every single print-head but it keeps doing it.
Color calibrations before matching and doing the run, print head tests are all great.
Also it doesn't seem to matter on the material, anything from IJ180 to Photo Paper does the same thing.
Doing a color calibration when the color is off doesn't get me back to the original color either which leaves me with adjusting the color to match the original print now.
As nice as these printers are, I can't seem to rely on them for color which limits production greatly.
Any suggestions would be welcome.
Thanks,
Andriy