Jester1167
Premium Subscriber
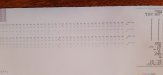
Your test print doesn't look like CMYK, That's pretty dark blue and red compared to pure cyan and magenta. Even the yellow looks darker than the nozzle check.
You may be right, I just assumed that the built-in fill test (service menu) would use pure CMYK.Your test print doesn't look like CMYK, That's pretty dark blue and red compared to pure cyan and magenta. Even the yellow looks darker than the nozzle check.
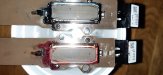
The penknife is fine (no touching).Take o look to the penknife holder pls. And move the printcariadge to the left side of the printer (mentenance position) and make o picture for as. Its important to see the surface of the printhead.
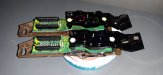
The head alignment is good. It was 100% clean a couple of days ago, now its a little dirty, agreed I should clean it again, but the lines where there then aswell.Clean the metalic outline of the printhead...must be clear metalic...I see dirth on it. And after that in service mode make the default head alignment...in service mod not user mode.b
When increasing the passes the distance between the erroneous lines just get closer.Make a best quality print...if is possible 12 pass and another print in low quality mode . Increase to the maximum the temperature for print and drier The issue is in the same position for both printheads.. . In my opinion the printheads are fine .
Thanks for the detailed reply.First, the internal fill test prints each head separately, pure color, no mixing. Your fill test is fine as far as purity goes.
I went back and zoomed in on the printed images and see a lot of blotchiness. Two questions - what is the heat setting and are you printing the images while in service mode? The heat is disabled in service mode unless it has been enabled in the system switch menu. Put your hand on the platen and see if it is hot. You should be running at least 38C or higher. What I'm seeing looks like "dot gain banding", which occurs when printing without heat or insufficient heat. The correct heat setting makes each ink drop dry quickly without spreading. Insufficient heat allows the individual drops to spread before drying. Where the pass boundaries meet, the ink drops attract each other (they have a charge on them) and create a pattern similar to what I am seeing. Proper heat dries the ink quickly enough to stop this.
")
I had a similar problem with my SP30V, I would first Align the heads ( Bias-Adjustment which is mechanical / Vertical Adjustment which is mechanical / Horizontal Adjustment which is manually adjusted on the printer / Bidirectional Adjustment which is manually adjusted. Also, make sure the heads are at 2.2mm height in the lower position to the platten!