Hellow everyone~:signs101:
Is there a good technique to apply the premask application tape without getting any wrinkles? 12" is ok for me but 18" or 24" - lots of wrinkles. I use freehand & squeegee to apply application tape. I didn't invest my $$$ on one of those premask applicator machine. (quite expensive)
Any suggestions? I thank you in advance ~!!!
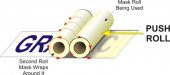
 illustration~
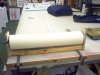

")