• I want to thank all the members that have upgraded your accounts. I truly appreciate your support of the site monetarily. Supporting the site keeps this site up and running as a lot of work daily goes on behind the scenes. Click to Support Signs101 ...

Printer woes

Williams Signs

New Member
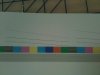
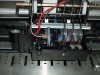
In March of this year had 2 new print heads installed in my Falcon Outdoor Jr. Started having problems with the new ink. Next my printheads started clogging so I started replacing parts. I put in new capping station, rebuilt the pump, new lines, new dampers and orings, new transmission gear, pulled the printheads out and soaked them. Put everything back together and done a fill, got color heads to do just fine but still having issues with the black. Se attached photo. Any help would be appreciated.
 

Attachments

  • Picture.jpg
    Picture.jpg
    31.8 KB · Views: 53

Stealth Ryder

New Member
I don't any issue other than some mis-directed nozzles on the K PrintHead... Clean them or replace it... It's truly not bad enough to replace, just need to clean until they all fire correctly...
 

RG

New Member
IG, be sure to use the powerful cleaning feature. The last time I bought a new black printhead it cost only $55. Like SR said, replacing it is another good option.
 

RG

New Member
The name of the place where I get them is National Parts Depot (nationalparts.com). The item # for the black head is F056030. The color head is item # F055090 and my last one costs about $101. Luckily these printheads are the exact same heads that Epson puts in 3 or 4 of their desktop printers. In fact, some people call them Epson 3000 printheads. I've been using them with no problems for about 4 years.
 

tomence

New Member
That's where i buy them from too. $55 for black head and 100 some dollars for the color head.
I posted few times here that i buy them from natioanal parts depot but nobody noticed i guess.
 

tomence

New Member
I used them in my converted roland that i had and now i installed them in a mutoh falcon jr. Exacatlly the same heads as the ones sold for $180 on ebay or here from some merchant members.
 

RG

New Member
No, you don't have to assign head ranks again for the same heads. If you ever install a new head, be sure to write down the head rank before you install the new head. And, be sure to input the new head rank(s) before you try to use the new head(s).
 

RG

New Member
Nope. You just remove the old (used) printhead from the FOJ carriage and replace it with the new one. I think the black head is held in by only one screw. Note that there is no automatic perfect alignment here. I had to loosen this one screw and physically slide the black head forward, backward, or sideways to get it aligned with the color head. To make this screw accessible, I did away with the black plastic retainer that puts a little pressure on the dampers to hold them in place and replaced it with a thin metal bar. This might not be for everyone, but it has worked for me for the last 4 years.
 

Compilla

New Member
, I did away with the black plastic retainer that puts a little pressure on the dampers to hold them in place and replaced it with a thin metal bar. This might not be for everyone, but it has worked for me for the last 4 years.

Yep, ever since I change my own heads I have that damper retainer on my tool box.
 

RG

New Member
Yep, ever since I change my own heads I have that damper retainer on my tool box.


Just more evidence that great minds think alike. Another reason for doing this is that it gives you access to the black head and damper without removing the ink lines from all of the color dampers. If my color head if printing OK, I don't want to do anything to mess up a good thing.
 

RG

New Member
Can you please post a pic of the "thin metal bar"

Here you go, thmooch. No problem. I put a strip of weather stripping foam on the under side, next to the dampers. Note that the original screws will not work with this. The two screws have to be longer and they have to be metric. I don't remember the exact size of the screws.
 

Attachments

  • Bar.jpg
    Bar.jpg
    66.1 KB · Views: 48

Stealth Ryder

New Member
Here you go, thmooch. No problem. I put a strip of weather stripping foam on the under side, next to the dampers. Note that the original screws will not work with this. The two screws have to be longer and they have to be metric. I don't remember the exact size of the screws.

Very proffesional look to it....
 
Top