• I want to thank all the members that have upgraded your accounts. I truly appreciate your support of the site monetarily. Supporting the site keeps this site up and running as a lot of work daily goes on behind the scenes. Click to Support Signs101 ...

Printing faded flag for police car

Stacey K

I like making signs
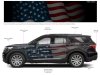
I have 2 squads coming up and they want this faded flag and their shield and POLICE (with city underneath). Flag and shield design are pretty much complete. Still working on the POLICE but he definately wants the blue fading inside.

My question is...do I print this as one big panel and do you contour cut between the stripes? The blue stripe will extend just about to the rear light.

Thank you and hope you all had a great New Year!

1672671257599.png
 

Gino

Premium Subscriber
Just did a sheriff's suv with the exact same flag. All was reflective, but the words and stuff were all separate reflective pieces.

That mockup the word is very crooked.
 

Stacey K

I like making signs
Yes, it's just a picture I downloaded from the internet. He's still waiting for the actual aquads to arrive. I downloaded the templates so everything will be on the level.

He doesn't want any reflective as he doesn't want people seeing the cars from a distance or when they are parked. I wasnt' sure if I should print the flag then add solid cut vinyl for the words and the badge?

Gino - was the flag just one piece? I'm not sure why this is so confusing to me.
 

myront

CorelDRAW is best
I'd print & Plot the flag, POLICE and logo as one piece. Yes cutting in between the stripes. Given enough "extra" would allow it to be rotated as needed. The 911 and small flag separate. Given that the "fade" will actually be a blue to black blend it'll look better with the cuts between the stripes.
 

Stacey K

I like making signs
Just did a sheriff's suv with the exact same flag. All was reflective, but the words and stuff were all separate reflective pieces.

That mockup the word is very crooked.
OK so the stars and the stripes were all separate? And then overlay the words...
 

2B

Active Member
Unless you are doing a full wrap, you will have to contour the flag & stars.
It will be a total PITA to try and match the "black" background so the printed vinyl looks the same as the vehicle, both color, and shine

The text and shield are an overlay to ensure proper alignment.
NOTE: the shield needs to be moved, you have it spanning a door jam, move it forward and up so it is entirely on the front fender
 

DL Signs

Never go against the family
If the car is straight up black, I'd print it as a wrap & do everything below the window line, trim it off at the hood line, front & rear bumper seams, and trim it to the stripe for the transition between the back door and back window. Everything else, logo, police, etc, I'd do as separate graphics. It wouldn't take much more vinyl than doing all those stripes. I think it would be easier as a wrap, and the rest of the graphics would lay easy, and be more visually appealing not being applied over all those cut vinyl stripes.

That's just me though... ;)
 

Attachments

  • Po-Po wrap.jpg
    Po-Po wrap.jpg
    355.6 KB · Views: 271

yukon

New Member
Have you considered wrapping the entire side as one image? It would eliminate the hassle of contour cutting and matching the black on the side.
 

Scotchbrite

No comment
That's what I'm hung up on here. It's really hard to fade an image onto a dark vehicle without using some white ink on clear vinyl.
That's what I'm thinking, print on IJ180mC-114 clear. I've done a couple vehicles like that without white ink but one was red and the other dark gray so the print showed up but pretty subtle. They were meant to be decorative so subtle was fine.

Craig Stumbough-Mountaineers-Jeep graphics (2).jpg
 

DL Signs

Never go against the family
I was thinking just clear would work, but only with the white ink to back it up. The blue will be dark navy blue near the front, and as the color is faded out, it will shift to match the vehicle as much as the laminate finish matches. Unless they are convinced to make that stripe a darker blue, and the real color printed is something like 100% cyan, I don't think this will work.
How does that clear 180 work out for install? As forgiving as the white or is it a different animal?
For a black vehicle I would just wrap the sides with a printed vinyl, it's easy to design the flag to be however faded or color adjusted you want, and I'd overlay all the other graphics, gives you more wiggle room on laying the wrap part making aligning them a breeze. There's good seams and trim to break at on Explorers, rich black usually matches good to vehicle paint (and you can easily adjust black if it's too dark/ light), luster lam usually matches the sheen, and breaking at body seams helps make slight color variations not as noticeable. The only thing you have to do with the artwork is make sure it fades to black before it meets with other body panels so you always have black meeting black. All you need to remove is the door handles to get in the recesses behind them, the only hand trimming not on a seam is between the back door and back window, I'd just make sure there's part of a stripe in that area and trim to it so it flows, and look like it's supposed to be there. Quick, & easy to do the artwork, background installation is just doing a partial wrap. I'm doing a mockup of something totally different for a customer with an Explorer (not a PD), so it's not the same trim level, or the same flag, I just used the image I'm using for that one & grabbed a flag to show how I'd do it. Without the bottom door trim on PD models, just wrap to the bottom of the doors. Black vehicles are the easiest to do this type of stuff on.
 

Attachments

  • Explorer.jpg
    Explorer.jpg
    435 KB · Views: 188

Stacey K

I like making signs
I'm really not a wrapper so I'm not too confident in trying to wrap the entire side....and the design started out as just regular graphics on the side then he changed his mind to this flag thing. So, I may need to go with the contour cut on this one. I guess it doesn't look that hard to try and wrap this type of vehicle. Maybe I could try it and if I fail I could go with the contour cut?
 

DL Signs

Never go against the family
I'm really not a wrapper so I'm not too confident in trying to wrap the entire side....and the design started out as just regular graphics on the side then he changed his mind to this flag thing. So, I may need to go with the contour cut on this one. I guess it doesn't look that hard to try and wrap this type of vehicle. Maybe I could try it and if I fail I could go with the contour cut?
Always do what you're most comfortable with. But if you decide to try to tackle it, that's not a real hard one to wrap. All the real tricky parts are beyond where you'd be ending it, would be a good one for you to learn on. To make it easier, print plenty of black bleed around it to help with positioning. The only things you should have to remove are the door handles so you can get the wrap into the recesses under them, but if it's a new/ newer vehicle you don't have to worry about Wisco's famous "rusted screws syndrome". Could open the door to more stuff like this for you, or make you decide wrapping ain't for you.

Another option is something we do. Like Burton, we don't have the time or manpower to do a wrap, or if I just want a hand on bigger stuff, we have a guy down the street who does mainly window tints and color change wraps, we just pay him to come in evenings and help when we need him, we send all our tint jobs to him, everyone wins. If you know anyone like that in your area, have them come in, help them with it, and learn.
 

Stacey K

I like making signs
Back to this post. I have one squad coming Thursday. I hired a guy to come in and show me how to do this! He's a pretty sketchy character but I actually worked with him once before and he seems to really know what he's doing so I'm hoping this works out LOL
 

JBurton

Signtologist
Back to this post. I have one squad coming Thursday. I hired a guy to come in and show me how to do this! He's a pretty sketchy character but I actually worked with him once before and he seems to really know what he's doing so I'm hoping this works out LOL
Yay?
I'm hung up on the sketchy comment here... have you paid him prior to work being completed?
 

Stacey K

I like making signs
Yay?
I'm hung up on the sketchy comment here... have you paid him prior to work being completed?
LOL, no, he lives up the street. He does odd jobs and farm work for another one of my customers who has a bunch of food trucks. The customer had me come over and apply some vinyl to one of his trucks and this guy was there and ended up helping me. That's how we got to talking about doing wraps, etc. Turned out I really wasn't needed for the food truck as this guy ended up doing most of it and I left. He did a really nice job...cheaper than me also
 

Stacey K

I like making signs
Well, I ran into a problem with the installer guy. He's good with the squeegee but I left him alone and he cut panels - not good. Have to redoside one today. I'm going to try doing this today as one panel myself with his help becuase I have nobody else so it's do or die today. With this vehicle do I start at the top and work down or start in the middle? I tried som large scraps here and there as practice and it went well. I feel like I should tack this down until it looks like glass then work from the top curve which goes across the car and work horizontally from the top down. Again, I messed up on hiring this guy but now I'm in a pickle. He's real good with the squeegee and the heat gun but I need this as one panel, lining panels up is not going work. I think I can do it myself except that the panel is long and I would need a hand. I only have his hand today so it is what it is. Any advice is appreciated!!!!!!
 

JBurton

Signtologist
I hate it when a new guy takes it upon himself to f*ck up your plans.
As far as doing the one side with a full panel alone, I'd use SLX, it has stupid low initial adhesion, tape the front edge down or center hinge, split the liner and tack it to the vehicle. You can then start working it from the center outward. Maybe even using center of the rear door as the initial start point as it appears flattest.
Reminder, I wrap about 3 vehicles a year...
 
Top