• I want to thank all the members that have upgraded your accounts. I truly appreciate your support of the site monetarily. Supporting the site keeps this site up and running as a lot of work daily goes on behind the scenes. Click to Support Signs101 ...

Need Help Problem with the artwork in Illustrator - Roland VG2-640

Mita

New Member
Hi everyone.
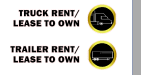
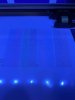
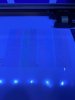
I am new in this business and still figuring out as I go but I have hit a wall and perhaps some of you might help. I made this in Illustrator and everything is OK. The cut is the top player and the artwork a second layer. When I put it in VersaWorks I get - the second picture -as part of the circle is cut. Second problem I have and I don't think it should be like this since Roland is a powerful beast as far as I know, I don't like how it printed the gradient - you can see the lines. On the third picture you can see the result.
I tried putting some of the layers up or down when a friend suggested that maybe the text is cutting a part of the circle but that didnt help, that was not the issue. It's probably something else I cant think of.
 

Attachments

  • Illustrator - picture 1.png
    Illustrator - picture 1.png
    144.2 KB · Views: 304
  • VersaWorks - Picture 2.png
    VersaWorks - Picture 2.png
    33.1 KB · Views: 140
  • picture 3.jpg
    picture 3.jpg
    948.6 KB · Views: 148

Adam Vreeke

Knows just enough to get in a lot of trouble..
Could be something weird going on in the file, especially with a gradient.

In AI go to File > Export > Export As > TIFF. I keep settings as CMYK, 300 DPI, and Art Optimized. Doing this will 'Flatten' your artwork, meaning what you see on screen is what you will get. Keep in mind this rasterizes the vector artwork, so you can't do high scaling with it. If you ever get any weird boxes, art cut off, or just anything weird in general this is what I will typically do.
 

Mita

New Member
Could be something weird going on in the file, especially with a gradient.

In AI go to File > Export > Export As > TIFF. I keep settings as CMYK, 300 DPI, and Art Optimized. Doing this will 'Flatten' your artwork, meaning what you see on screen is what you will get. Keep in mind this rasterizes the vector artwork, so you can't do high scaling with it. If you ever get any weird boxes, art cut off, or just anything weird in general this is what I will typically do.
I can see the change in the gradient. It's way better but what about the cut lines. I cant see the dancing ants around the artwork. Does the TIFF file import the CutCoutur layer also?
 

Adam Vreeke

Knows just enough to get in a lot of trouble..
I can see the change in the gradient. It's way better but what about the cut lines. I cant see the dancing ants around the artwork. Does the TIFF file import the CutCoutur layer also?
No, saving as a tiff will flatten everything the layers, and the layers within the layers. If you can't figure it out with the vector file, you could do this.

Save image as TIFF
Re-import it into AI,
Move so your cutline lines up. Usually if the document is the same size you can do ctrl+c to copy, and then ctrl+f to paste in place on top.
 

Saturn

Aging Member
Those fine lines and overspray really look like bad nozzles, clogged or affected by static rather than "stepping" of the gradient. You can see the out of whack overspray at the edges.

Adam's suggestion at flattening things is a good test to rule it out though.

If they continue you should post the nozzle check, regardless of how you think it looks. Even a single nozzle bad has always been noticeable on the machines I've had. :(
 

Mita

New Member
You can see the nozzle check here. :/

A tech came and did all the test prints calibration, gave me so much information but couldn't spare more time to address this problem, taught me how to set up the machine in general and how to maintain it which is very important. I dont see anything here even when I zoom in.
 

Attachments

  • picture4.jpg
    picture4.jpg
    267.3 KB · Views: 142

Adam Vreeke

Knows just enough to get in a lot of trouble..
You can see the nozzle check here. :/

A tech came and did all the test prints calibration, gave me so much information but couldn't spare more time to address this problem, taught me how to set up the machine in general and how to maintain it which is very important. I dont see anything here even when I zoom in.
Could you upload the file for this? I can pick it apart and see what may be causing this.
 

Saturn

Aging Member
So if you kind of think of that as eight columns, the two on the very far right look squeezed together. Maybe one of the techs of folks with head replacement/setup experience can chime in. The nozzles look good, but I wonder if there's still an alignment issue?

I put a little white arrow underneath the spot I'm talking about an uploaded an edited copy of your photo.
 

Attachments

  • picture4b.jpg
    picture4b.jpg
    368.3 KB · Views: 133

Adam Vreeke

Knows just enough to get in a lot of trouble..
So if you kind of think of that as eight columns, the two on the very far right look squeezed together. Maybe one of the techs of folks with head replacement/setup experience can chime in. The nozzles look good, but I wonder if there's still an alignment issue?

I put a little white arrow underneath the spot I'm talking about an uploaded an edited copy of your photo.
Looks a bit more like junk on the bottom of the heads, or a dirty capping station to me.
 

Adam Vreeke

Knows just enough to get in a lot of trouble..
I don't see anything missing, or that's obviously deflected. ? But usually the columns have a uniform spacing between them.
Well I was thinking more like if there is a buildup under the head, but nothing blocking the nozzles for a nozzle check. Might be enough for static to build up as the head is traveling over the material to build up static, which will then pull the ink away from the intended spot.

But you are correct, what I would call B2, the spacing between the colors on the nozzle check seem to be flush instead of a bit of spacing.
 
Top