• I want to thank all the members that have upgraded your accounts. I truly appreciate your support of the site monetarily. Supporting the site keeps this site up and running as a lot of work daily goes on behind the scenes. Click to Support Signs101 ...

Quill ADA Braille

JBurton

Signtologist
how to do the braille first and than route out the sign.
What if you just took the blank panel, put it on the router, applied the braille with the quill, then stick the tactile after curing the dots? (Worst part is keeping up with the panels in some way so you know what lettering goes with what braille, I'd just label the back with a legend or writing out the text if it's a small run)
 

crashaffinity

New Member
Yes, we do have information on ADA and we do know that the braille is off. That is why I originally asked if anyone is using the Quill because I have a question on how to do the braille first and than route out the sign.
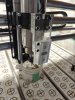
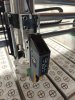
Do your braille first, then go back in and cut out with your cutter. You need to know the offset between the center point of the quill and the center point of your spindle though. I built an adapter for my quill to attach on the face, when i'm not using it i remove it.
 

Attachments

  • IMG20251105090604.jpg
    IMG20251105090604.jpg
    4.1 MB · Views: 50
  • IMG20251105090617.jpg
    IMG20251105090617.jpg
    4 MB · Views: 36

VCastaneda

New Member
What if you just took the blank panel, put it on the router, applied the braille with the quill, then stick the tactile after curing the dots? (Worst part is keeping up with the panels in some way so you know what lettering goes with what braille, I'd just label the back with a legend or writing out the text if it's a small run)
This is the process we are doing now but we have to set the home position for the Quill first and then for the routing bit. We want to set the home position just once for both the Quill and the routing bit.
 

JBurton

Signtologist
This is the process we are doing now but we have to set the home position for the Quill first and then for the routing bit. We want to set the home position just once for both the Quill and the routing bit.
Oh, in that case, what router are you using? You should be able to set a tool offset for the different tools (quill vs router)
 

VCastaneda

New Member
Oh, in that case, what router are you using? You should be able to set a tool offset for the different tools (quill vs router)
We are using a Vision 48 CNC. That is about all I know about the machine lol Sorry, I run the laser and the now deceased Mutoh.
 

JBurton

Signtologist
Simplest solution, make a jig that you can rack at home, that will place the quill at the corner of the panel, and when not in place will put the router bit at the corner of the panel. But, if the CNC isn't your responsibility, I'd tell the CNC operator to figure it out!
Also, I believe vision supports their machines well, they should be able to help your cnc guy set up a tool offset. You'll just have to rely on the cnc guy to label all the braille signs accurately.
 

DarkerKat

design & such
The fact that y'all apply cut out letters baffles me. I mean 200 a day is good speed, but I'd hate to measure and place little ada signs, not to mention removing all the bits of backing and face film. Applying and routing with a poperly measured tool, then removing the excess and popping out inserts makes tons of sense to me.
Further, we would always do the lettering before the braille, as either the applique would possibly overlap the braille, signs could get mixed up, or chips would fill the little braille holes, and if someone mistakenly put in a bead with white under it, it stood out like a sore thumb, the clear beads would hilariously magnify whatever color was behind them.
Anyway, I'm following along out of interest in this product.
sorry to side track this thread, I'm mostly following because the quill looks interesting but this comment stuck out to me.
For most signs with applique we also typically laser cut, tape the face, and apply to sign material the same way VCastaneda outlines. Only exception is on Hardwood signs we will route the applique directly onto the sign face, but we've never had luck with any other sign face materials - my CNC operator swears it cannot be done without leaving a jagged outline around each letter (also happens on the wood but it's not as noticeable after finishing)
Does anyone have photos of a sign with routed applique on an acrylic face? We've been going back and forth on it for years but I don't run the CNC so there is only so much push back i can give.
 

crashaffinity

New Member
sorry to side track this thread, I'm mostly following because the quill looks interesting but this comment stuck out to me.
For most signs with applique we also typically laser cut, tape the face, and apply to sign material the same way VCastaneda outlines. Only exception is on Hardwood signs we will route the applique directly onto the sign face, but we've never had luck with any other sign face materials - my CNC operator swears it cannot be done without leaving a jagged outline around each letter (also happens on the wood but it's not as noticeable after finishing)
Does anyone have photos of a sign with routed applique on an acrylic face? We've been going back and forth on it for years but I don't run the CNC so there is only so much push back i can give.

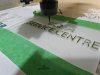
Here is some i recently did 1/32" clear ada back painted with 468MP adhesive on the back laid down to 1/4" P95 clear acrylic backpainted white, cut on the CNC. after i cut it i took the excess off then did a cleanup pass, and then cleaned with a soft toothbrush under warm water to get the fuzzies off. Going to try this with a laser directly soon.

I should add these (about 10 signs) were done one at a time because i had to redo them last minute and came up with this method at the last moment. Otherwise i would have done it as a batch.
 

Attachments

  • IMG20251023113032.jpg
    IMG20251023113032.jpg
    3.4 MB · Views: 30
  • IMG20251023113058.jpg
    IMG20251023113058.jpg
    3.6 MB · Views: 28
  • IMG20251023113110.jpg
    IMG20251023113110.jpg
    3.8 MB · Views: 25
  • IMG20251023115023.jpg
    IMG20251023115023.jpg
    4.1 MB · Views: 24

DarkerKat

design & such
Thanks for the photos. It does look like these have that faint halo around the letters (maybe there is no avoiding it), but I'm impressed how much the frosted acrylic hides it.
after i cut it i took the excess off then did a cleanup pass, and then cleaned with a soft toothbrush under warm water to get the fuzzies off
^ these extra steps make a lot of sense, don't know if I'll ever be able to convince him to try them, there tends to be a lot of pushback on the idea of "clean up passes"
 

crashaffinity

New Member
Thanks for the photos. It does look like these have that faint halo around the letters (maybe there is no avoiding it), but I'm impressed how much the frosted acrylic hides it.

^ these extra steps make a lot of sense, don't know if I'll ever be able to convince him to try them, there tends to be a lot of pushback on the idea of "clean up passes"
The key is the frosted acrylic hides it.

Now also that i remember, initially i cut too slow that's why i needed to do the cleanup pass. Later i tried one much faster didn't need to do a cleanup and it was only minor edge cleanup after. Also i noticed that if I peel off the protective liner on the ada on top first, apply premask instead, it gives me a nicer top edge, and the water and toothbrush just takes the mask right off without having to manually peel
 

VCastaneda

New Member
Simplest solution, make a jig that you can rack at home, that will place the quill at the corner of the panel, and when not in place will put the router bit at the corner of the panel. But, if the CNC isn't your responsibility, I'd tell the CNC operator to figure it out!
Also, I believe vision supports their machines well, they should be able to help your cnc guy set up a tool offset. You'll just have to rely on the cnc guy to label all the braille signs accurately.
Good morning everyone,

Usually I would say "Let them figure it out" BUT the company wants me to learn how to run the Quill on the CNC. I have to help figure it out.
 

crashaffinity

New Member
This is the process we are doing now but we have to set the home position for the Quill first and then for the routing bit. We want to set the home position just once for both the Quill and the routing bit.

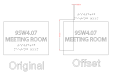
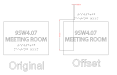
Do it like this. I know my offset on the Quill is 4.16" lower on the Y and shifted 0.05" on the X. So in my file, i offset my braille by that amount, home my router bit to 0,0, but offset the braille by my offset as shown below. I put the quill on, do the dots, take the quill off, and router it out, without having to rehome anything.

1763740200618.png
 

Attachments

  • 1763740106473.png
    1763740106473.png
    178.2 KB · Views: 36

StarSign

New Member
They way I understand it Vision should have it all set up for you to be able to have the pen running on their machine.
 

JBurton

Signtologist
It does look like these have that faint halo around the letters (maybe there is no avoiding it)
I have found that while you can really minimize it, it's a necessary 'feature' of the direct apply and route process. I've toyed with dialing it down to a perfect depth, but in reality after the first one cuts, the nose cone will ride on chip dust and potentially not cut through a spot or two. Not being cut through basically ruins the sign unless you can rerun it deeper, and the shallower the pass, the more fuzzies you generate. Big chips are always better.
Also, like crash says, p95 is awesome for this. It's matte texture lets go of the adhesive fair easier, and it doesn't cloud up anything like normal rowmark material surfaces.
Also i noticed that if I peel off the protective liner on the ada on top first, apply premask instead, it gives me a nicer top edge
If I run them on our big router that doesn't have a nose cone, I just remove the film and don't add anything. Why do you apply the premask?
And here, we run about 120psi airline to a handle with a brass barbed fitting that narrows down to 1/16", it blasts the fuzzies off pretty easily, but it is not an osha approved tool and can really f*ck someone up if they were to jam it under their skin.
Usually I would say "Let them figure it out" BUT the company wants me to learn how to run the Quill on the CNC. I have to help figure it out.
Reach out to Vision, they offer the quill as an attachment, so they should be able to help you with the tool offsets. While it can be done with plain none value differences, that leaves room for error. Setting up a tool offset is trivial and repeatable without any extra input from the operator/programmer.
Do it like this. I know my offset on the Quill is 4.16" lower on the Y and shifted 0.05" on the X. So in my file, i offset my braille by that amount, home my router bit to 0,0, but offset the braille by my offset as shown below. I put the quill on, do the dots, take the quill off, and router it out, without having to rehome anything.
What router are you running the quill on?


Otherwise, how is everyone like the quill? If I hadn't just invested in the pen that holds braille beads, I'd consider this, but my big router is usually tied up with metal work, and is in a very dusty room, so I didn't even consider the quill so much as I could imagine getting dust on the wet braille beads frequently.

 

VCastaneda

New Member
Otherwise, how is everyone like the quill? If I hadn't just invested in the pen that holds braille beads, I'd consider this, but my big router is usually tied up with metal work, and is in a very dusty room, so I didn't even consider the quill so much as I could imagine getting dust on the wet braille beads frequently.
Well, the Quill operator ran a 16x96 sheet of dibond yesterday and one sheet today, the braille sizes are different from the two days. Today's braille is smaller than yesterday's, he reached out to Jack the invertor and he said it's the humidity that's causing it to be different sizes. I would rather use the Mutoh, even though it was a pain sometimes and the customer service sucked, it ran the buildup and braille consist. Plus, I liked the fact that I can send the files and let it print without babysitting it (most of the time). I am waiting see to see how the Quill really is after a few months.
 

crashaffinity

New Member
I have found that while you can really minimize it, it's a necessary 'feature' of the direct apply and route process. I've toyed with dialing it down to a perfect depth, but in reality after the first one cuts, the nose cone will ride on chip dust and potentially not cut through a spot or two. Not being cut through basically ruins the sign unless you can rerun it deeper, and the shallower the pass, the more fuzzies you generate. Big chips are always better.
Also, like crash says, p95 is awesome for this. It's matte texture lets go of the adhesive fair easier, and it doesn't cloud up anything like normal rowmark material surfaces.

If I run them on our big router that doesn't have a nose cone, I just remove the film and don't add anything. Why do you apply the premask?
And here, we run about 120psi airline to a handle with a brass barbed fitting that narrows down to 1/16", it blasts the fuzzies off pretty easily, but it is not an osha approved tool and can really f*ck someone up if they were to jam it under their skin.

Reach out to Vision, they offer the quill as an attachment, so they should be able to help you with the tool offsets. While it can be done with plain none value differences, that leaves room for error. Setting up a tool offset is trivial and repeatable without any extra input from the operator/programmer.

What router are you running the quill on?


Otherwise, how is everyone like the quill? If I hadn't just invested in the pen that holds braille beads, I'd consider this, but my big router is usually tied up with metal work, and is in a very dusty room, so I didn't even consider the quill so much as I could imagine getting dust on the wet braille beads frequently.

Onefinity Elite Journeyman, with a custom mount i made that threads into the spindle mount. I posted pics above.
 

CanuckSigns

Active Member
sorry to side track this thread, I'm mostly following because the quill looks interesting but this comment stuck out to me.
For most signs with applique we also typically laser cut, tape the face, and apply to sign material the same way VCastaneda outlines. Only exception is on Hardwood signs we will route the applique directly onto the sign face, but we've never had luck with any other sign face materials - my CNC operator swears it cannot be done without leaving a jagged outline around each letter (also happens on the wood but it's not as noticeable after finishing)
Does anyone have photos of a sign with routed applique on an acrylic face? We've been going back and forth on it for years but I don't run the CNC so there is only so much push back i can give.
Heres how our tactiles comes off our laser
 

Attachments

  • 20201014_104658.jpg
    20201014_104658.jpg
    1.9 MB · Views: 33

JBurton

Signtologist
Onefinity Elite Journeyman, with a custom mount i made that threads into the spindle mount. I posted pics above.
It looks like they support laser add ons, you may look into whether they can set you up a different tool position for the quill to save the headache of adjusting art. What you are doing is perfectly fine, it's just relying on you whomever generates the art to consistently make that adjustment, when instead you could have it all automated via software/configurations.
Heres how our tactiles comes off our laser
I know the answer I guess, but why is the 4 a different font than 112... and is it me or are those some pretty wobbly curves?
 

crashaffinity

New Member
It looks like they support laser add ons, you may look into whether they can set you up a different tool position for the quill to save the headache of adjusting art. What you are doing is perfectly fine, it's just relying on you whomever generates the art to consistently make that adjustment, when instead you could have it all automated via software/configurations.
Yeah i need to use the offset on my masso screen and put in the alternate coordinates, i'll get around to that eventually :D, then add the extra Gcode
 
  • Agree
Reactions: 1 user

DarkerKat

design & such
I know the answer I guess, but why is the 4 a different font than 112... and is it me or are those some pretty wobbly curves?
Wobbly curves - this is just particularly noticeable on applique, technically it's a laser maintenance issue (belt too tight, or too loose, or mirror is jiggling around a bit when it changes direction) but pin-pointing the problem can be tricky and this would fall solidly into the "eh, its good enough" category at least for our production team..
 
Top