Hi all
After reading many posts and looking at many videos, I can’t get my head around making a new media and profile in Onyx, so I thought I would start a new thread so that any newbies like myself have a step by step guide to follow. To do this I need everyones help first and I’ll keep editing this first post with the updated info.
So I’ll start with what I know or think I know… I’ll add question in bold as I go along.
**This guide is for an Epson S60600 (dual CMYK) and Onyx 12.2, i1Pro2 and I’m creating it for a gloss adhesive vinyl**
* Create a new Workgroup if not already done so
* Open Onyx Production Manager
* Click Media Manager
* Click New > Media Group
* Give it a name i.e.
* Vinyl
* Banner
* Backlit
* Static Film
* Canvas
* Photo
* Poster
* Click OK
• A new ‘Media Group’ has now been created
**What do you call your workgroups?**
* Open Onyx Production Manager
* Click Media Manager
* Click New > Media Profile
* Create a new Media
* Select Onyx Workflow
* Select the chosen media group i.e. Vinyl
* Give it a name i.e. 3M IJ180
* Ink Configuration: CMYK
* Process Colours: CMYK
* Media Type: Adhesive Vinyl
* Configure Spot Colors: Leave as it is
* Page Sizes: Leave as it is
* Print label Color: K
* Name the print mode: Standard - 720dpi, Stochastic, 4 Pass (I name this based on my selections and then I have Fast, Standard, High Quality, Best Outcome)
* Change print mode resolution: 720dpi
* Dot Pattern: Stochastic
**Is this the best dot pattern?**
* Media Options
* Print Mode: 4 Pass
* Media Setting Number: Use Panel Setting
**What is the best option here, Use panel setting or chose Media number 1, 2, 3, 4 etc?**
* Print Direction: Bi
* Print Vertical Cut Line: Off
* Margin, Feed & Dry Time: all 0
* Scale the print Width and Height: Ignore
**I have no clue what to do for ‘Scale print width and height’? So I just ignore it**
* Print Ink Restrictions Swatch: Click Print swatch
* Leave every option as it is and click print
**I’m new to Onyx, it says the media is my new media and it has a media mismatch. oN the right side pane, it says current media and page size which is different. What do I do here? Do I click the settings and change the media to my new media and manually update the page size? That will work but I wanted to be sure. **
• Click Print
**When printing this chart to save time, could I not just print 1 high quality uni directional chart and limit the ink based off that?, I’m guessing no but thought I’d ask**
• Wait for the print to dry and go back to Media Manager
• Make sure your i1Pro2 is plugged in and the drivers installed (Install i1Profiler before not done already)
• Click Read swatch
• Put the i1pro2 On the white calibration tool and click the measurement button on the i1pro2
• Now follow the on screen instructions carefully, it changes from left to right to right to left.
• I’ve set my i1pro2 to read the patches twice when I set it up
• Once done, click ok
• Now click the arrow next to ‘As necessary, make adjustments to the ink restrictions’
• Click next to go the Calibration tab
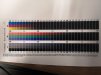
• Click Print Swatch
• Leave everything as it is and click print
• The media and size should still be correct from when you printed the last chart so click print.
• Once dry, go back to Media Manager
• Click Read swatch
• Put the i1pro2 On the white calibration tool and click the measurement button on the i1pro2
• Now follow the on screen instructions carefully, it changes from left to right to right to left.
• I’ve set my i1pro2 to read the patches twice when I set it up
• Once done, click ok
• Click advanced
• Click Build
• Go to the ink limits tab
• Leave as basic and click Print swatch
• Leave everything as it is and click Print
• Media and size should still be setup so click print
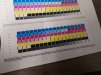
• Look at the chart and determine the Ink limit
**Looking at the image, 200%?**
This is as far as I have got today and I will continue tomorrow based on feedback.
After reading many posts and looking at many videos, I can’t get my head around making a new media and profile in Onyx, so I thought I would start a new thread so that any newbies like myself have a step by step guide to follow. To do this I need everyones help first and I’ll keep editing this first post with the updated info.
So I’ll start with what I know or think I know… I’ll add question in bold as I go along.
**This guide is for an Epson S60600 (dual CMYK) and Onyx 12.2, i1Pro2 and I’m creating it for a gloss adhesive vinyl**
* Create a new Workgroup if not already done so
* Open Onyx Production Manager
* Click Media Manager
* Click New > Media Group
* Give it a name i.e.
* Vinyl
* Banner
* Backlit
* Static Film
* Canvas
* Photo
* Poster
* Click OK
• A new ‘Media Group’ has now been created
**What do you call your workgroups?**
* Open Onyx Production Manager
* Click Media Manager
* Click New > Media Profile
* Create a new Media
* Select Onyx Workflow
* Select the chosen media group i.e. Vinyl
* Give it a name i.e. 3M IJ180
* Ink Configuration: CMYK
* Process Colours: CMYK
* Media Type: Adhesive Vinyl
* Configure Spot Colors: Leave as it is
* Page Sizes: Leave as it is
* Print label Color: K
* Name the print mode: Standard - 720dpi, Stochastic, 4 Pass (I name this based on my selections and then I have Fast, Standard, High Quality, Best Outcome)
* Change print mode resolution: 720dpi
* Dot Pattern: Stochastic
**Is this the best dot pattern?**
* Media Options
* Print Mode: 4 Pass
* Media Setting Number: Use Panel Setting
**What is the best option here, Use panel setting or chose Media number 1, 2, 3, 4 etc?**
* Print Direction: Bi
* Print Vertical Cut Line: Off
* Margin, Feed & Dry Time: all 0
* Scale the print Width and Height: Ignore
**I have no clue what to do for ‘Scale print width and height’? So I just ignore it**
* Print Ink Restrictions Swatch: Click Print swatch
* Leave every option as it is and click print
**I’m new to Onyx, it says the media is my new media and it has a media mismatch. oN the right side pane, it says current media and page size which is different. What do I do here? Do I click the settings and change the media to my new media and manually update the page size? That will work but I wanted to be sure. **
• Click Print
**When printing this chart to save time, could I not just print 1 high quality uni directional chart and limit the ink based off that?, I’m guessing no but thought I’d ask**
• Wait for the print to dry and go back to Media Manager
• Make sure your i1Pro2 is plugged in and the drivers installed (Install i1Profiler before not done already)
• Click Read swatch
• Put the i1pro2 On the white calibration tool and click the measurement button on the i1pro2
• Now follow the on screen instructions carefully, it changes from left to right to right to left.
• I’ve set my i1pro2 to read the patches twice when I set it up
• Once done, click ok
• Now click the arrow next to ‘As necessary, make adjustments to the ink restrictions’
• Click next to go the Calibration tab
• Click Print Swatch
• Leave everything as it is and click print
• The media and size should still be correct from when you printed the last chart so click print.
• Once dry, go back to Media Manager
• Click Read swatch
• Put the i1pro2 On the white calibration tool and click the measurement button on the i1pro2
• Now follow the on screen instructions carefully, it changes from left to right to right to left.
• I’ve set my i1pro2 to read the patches twice when I set it up
• Once done, click ok
• Click advanced
• Click Build
• Go to the ink limits tab
• Leave as basic and click Print swatch
• Leave everything as it is and click Print
• Media and size should still be setup so click print
• Look at the chart and determine the Ink limit
**Looking at the image, 200%?**
This is as far as I have got today and I will continue tomorrow based on feedback.