tdgraphics
New Member
I have a job that is 72" wide and my printer is 52" wide, so I need to tile my job.
The job contains 2 images so what I need to do is print the large portion of the image, 52 x 60 then the remainder of the 20" of both images I want to tile onto the remainder.
I have used the Tile Icon in signlab which is fine, however the remaining 20" sections are printed one behind the other, when there is enough room to print them side by side.
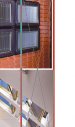
As you can see in the attached image, the tiles could be printed side by side and therefor same 6 ft of material.
Can someone please tell me how to do this as the manual is not the best at explaining it.
Thanks in advance,
Neil
The job contains 2 images so what I need to do is print the large portion of the image, 52 x 60 then the remainder of the 20" of both images I want to tile onto the remainder.
I have used the Tile Icon in signlab which is fine, however the remaining 20" sections are printed one behind the other, when there is enough room to print them side by side.
As you can see in the attached image, the tiles could be printed side by side and therefor same 6 ft of material.
Can someone please tell me how to do this as the manual is not the best at explaining it.
Thanks in advance,
Neil