• I want to thank all the members that have upgraded your accounts. I truly appreciate your support of the site monetarily. Supporting the site keeps this site up and running as a lot of work daily goes on behind the scenes. Click to Support Signs101 ...

VersaCAMM SP 300i replacing PrintHead

StickyLizard

New Member
Hello, I am going to be replacing the Black / Cyan printhead on my SP 300i.

I have the printhead and bought a service manual, read several times and searched videos. I think I am going to be ok, just have one question for the community.

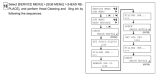
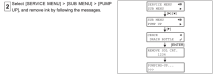
In the service manual it states after install go into SERVICE MENU and pick "HEAD REPLACE" this then asks for Cleaning Cartridges and pumps cleaning solution through system. Then asks for Ink and PUMPS ink back into system.

Do I really need cleaning cartridges, or can I skip this step and PUMP-UP ink back into system when head is replaced?

If I need cleaning cartridges, how many do I need 2 or 4?

Thanks in advance
 

Attachments

  • SP300i post head replace.png
    SP300i post head replace.png
    44.9 KB · Views: 168

cornholio

New Member
I never use the change head function on this model.
I just replace the head and dampers, enter the head rank, reset the heads counters.
Then I do 1-2 medium cleanings until the test print is perfect.
Then I do the adjustments.
 

netsol

Active Member
agreed! it would be foolish and wasteful to do that

I WOULD buy one of solventinkjets tapered syringes, in case you havevone of those situations (that happen so often) where one color of ink will not pull through

i am sure roland meant well, putting that feature in service menu, but, changing a print head is no longer magic
 

StickyLizard

New Member
Thank you both for your comments. That is going to be my plan. Just replace head and dampers, then clean and align / test.
 

StickyLizard

New Member
Quick follow up. Do you think I should do a PUMP-UP (step 2 in the service manual) before replacing Black and Cyan Dampers and print head?

Or do I just power off and replace parts, followed by 1-2 medium cleanings, then do the adjustments.
 

Attachments

  • SP 300i head replace step 2.png
    SP 300i head replace step 2.png
    27.3 KB · Views: 75

cornholio

New Member
Change dampers quickly. The ink will flow back in the tubing, as soon as the old damper is dismounted. Mount the new damper and pull ink through it with a syringe, until no bubbles come through the in port. As soon as the filter in the damper is wet with ink, the flowback stops.
No need for pump up and subsequent fill ink.
 
Top