Greetings to all!
I’m new to the Signs101 site and forums. I have searched for related topics and come up short so far, but please let me know if this has been discussed elsewhere and I just missed it. I have a few years of vehicle install experience, but it’s not the main thrust of what I do. I am currently looking at a fleet of at least 30 vehicles where this scenario will come into play. So…I need some advice from more seasoned, experienced installers.
My question is in regards to installing vinyl to the back of a tanker truck. I handled all the other graphics for the truck-doors, large logo and graphical elements on the side of the tanks with little trouble, but the compound curves on the back end are proving to be a real nightmare for me. I’m just getting a lot of wrinkles and tension while applying the graphic due to the convex of the tank and the geometric shape of the graphics.
It is NOT a full coverage graphic that covers the whole back end, so no, I cannot just work all the wrinkles and issues out past the edge and cut them off. I need to maintain the hexagon shape of the graphic element without stretching and distorting the shape. I do not want to do this as separate cut pieces laid on top of each other. It has to be one full piece-printed, plotted and applied. I’ve had some success doing the top half of the graphic in quarters, but by the time I got those down I had to do the bottom as a half and it just went sideways due to what was already adhered. I’m completely open to suggestions and methods.
Here are the materials being used:
Vinyl- 3M IJ180 cv3-10
Laminate- 3M 8519
I’ve tried applying it with masking and without, I think with this large of an area and the compound curves involved, masking is not helping-But open to suggestions.
Obviously trying to use as little heat as possible to avoid accidental stretching and damage to the vinyl.
Any experiences, techniques and advice is welcome. I’m hoping someone just has experience with these things and could give me some basic tips and a starting point.
-Would you suggest hinging vertically or horizontally?
-Starting from the middle and working your way outward?
-Any special tools or techniques that can help with this type of application?
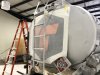
I'v attached a couple pics below for reference. Someone else did the "finished" one and while it's better than the results I was getting, it still has major issues with bubbling, distortion and wrinkles. Any help would be greatly appreciated!
I’m new to the Signs101 site and forums. I have searched for related topics and come up short so far, but please let me know if this has been discussed elsewhere and I just missed it. I have a few years of vehicle install experience, but it’s not the main thrust of what I do. I am currently looking at a fleet of at least 30 vehicles where this scenario will come into play. So…I need some advice from more seasoned, experienced installers.
My question is in regards to installing vinyl to the back of a tanker truck. I handled all the other graphics for the truck-doors, large logo and graphical elements on the side of the tanks with little trouble, but the compound curves on the back end are proving to be a real nightmare for me. I’m just getting a lot of wrinkles and tension while applying the graphic due to the convex of the tank and the geometric shape of the graphics.
It is NOT a full coverage graphic that covers the whole back end, so no, I cannot just work all the wrinkles and issues out past the edge and cut them off. I need to maintain the hexagon shape of the graphic element without stretching and distorting the shape. I do not want to do this as separate cut pieces laid on top of each other. It has to be one full piece-printed, plotted and applied. I’ve had some success doing the top half of the graphic in quarters, but by the time I got those down I had to do the bottom as a half and it just went sideways due to what was already adhered. I’m completely open to suggestions and methods.
Here are the materials being used:
Vinyl- 3M IJ180 cv3-10
Laminate- 3M 8519
I’ve tried applying it with masking and without, I think with this large of an area and the compound curves involved, masking is not helping-But open to suggestions.
Obviously trying to use as little heat as possible to avoid accidental stretching and damage to the vinyl.
Any experiences, techniques and advice is welcome. I’m hoping someone just has experience with these things and could give me some basic tips and a starting point.
-Would you suggest hinging vertically or horizontally?
-Starting from the middle and working your way outward?
-Any special tools or techniques that can help with this type of application?
I'v attached a couple pics below for reference. Someone else did the "finished" one and while it's better than the results I was getting, it still has major issues with bubbling, distortion and wrinkles. Any help would be greatly appreciated!
Attachments

Last edited: