• I want to thank all the members that have upgraded your accounts. I truly appreciate your support of the site monetarily. Supporting the site keeps this site up and running as a lot of work daily goes on behind the scenes. Click to Support Signs101 ...

Vinyl Wrinkling At Beginning of Application

Thyll

New Member
Hello,

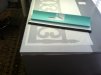
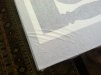
From time to time I have issues with my application tape wrinkling at the beginning of the application. This is really an aesthetic issue. We sell vinyl wall art and the customer handles the installation. To date I have not had any customer complaints but I am trying to put out a better product. It mainly happens with the 24" tape and not the 12 inch. I use the Big Squeegee which is a tremendous help but cannot find a process to get the corners wrinkle free every time. I have attached images to show you what I am talking about. Any advice is appreciated.

Thanks,

Tom
 

Attachments

  • photo-11.jpg
    photo-11.jpg
    35.2 KB · Views: 146
  • photo-10.jpg
    photo-10.jpg
    35.6 KB · Views: 125
  • photo-9.jpg
    photo-9.jpg
    43.8 KB · Views: 136

boxerbay

New Member
you have more pressure in the middle vs the edges. try holding your hands further apart to maintain an even amount of pressure across the squeegee edge.
 

bob

It's better to have two hands than one glove.
Trim the excess vinyl down to 1/2" or so or, more better, get rid of it completely, before you mask. What's happening here is the relatively massive amount of waste vinyl is grabbing onto the mask far more aggressively than the neighboring areas where there is no vinyl. Which is exactly what it is supposed to do. Unfortunately the mask that's down on the waste vinyl is slightly stressed whiles the mask that's over the weeded areas is not. Making the situation worse, the excess vinyl is on at least two and often three sides of the actual image. These tiny amounts of stress are relieved at the border between the excess vinyl and the weeded regions and create small wrinkles.

Get rid of the excess vinyl, get rid of the stress on the mask, get rid of the wrinkles.
 

CreatedDesigns

New Member
I always just unwind a small amount off the mask and then roll backwards to start the mask clean and square then i use the big squeegee to mask my vinyl i hold it 3-4 inches off the table at an angle then push with one hand. I never have the problems you have unless i am not started straight or pushing at an angle distorting the masking.
 
Last edited:

bob

It's better to have two hands than one glove.
looks completely weeded to me, bob

I never said it wasn't completely weeded, I said that there's a border of excess vinyl. It looks very much like a bounding rectangle was cut around the text and the final product will be trimmed to this rectangle. What's outside this rectangle is excess vinyl.

Regardless of the presence of excess vinyl, when you mask you want to have the application tape completely overlap whatever it is you're masking. You start with the mask on your table-top and you end up with mask on the table-top both top and bottom as well as the end where you started. If the mask doesn't overlap in this manner, you're inviting all sorts of interesting wrinkles.
 

Thyll

New Member
Trim the excess vinyl down to 1/2" or so or, more better, get rid of it completely, before you mask. What's happening here is the relatively massive amount of waste vinyl is grabbing onto the mask far more aggressively than the neighboring areas where there is no vinyl. Which is exactly what it is supposed to do. Unfortunately the mask that's down on the waste vinyl is slightly stressed whiles the mask that's over the weeded areas is not. Making the situation worse, the excess vinyl is on at least two and often three sides of the actual image. These tiny amounts of stress are relieved at the border between the excess vinyl and the weeded regions and create small wrinkles.

Get rid of the excess vinyl, get rid of the stress on the mask, get rid of the wrinkles.

When you refers to "vinyl" are you talking about the backing paper?
 

bob

It's better to have two hands than one glove.
When you refers to "vinyl" are you talking about the backing paper?

No, I'm talking about the excess vinyl that lies outside the rectangle you cut around the images. Unless, of course, in the photos you posted the image is white vinyl on a gray backing paper. I assumed it was gray vinyl on a white backer. Silly me.
 
Top