-
I want to thank all the members that have upgraded your accounts. I truly appreciate your support of the site monetarily. Supporting the site keeps this site up and running as a lot of work daily goes on behind the scenes. Click to Support Signs101 ...
Search results
-

-
-
Changing 540i Cap Tops
here you go>>>>> http://www.imagerssupply.com/PDF/Support_captop_SP.pdf- rushworks graphics
- Post #2
- Forum: Roland
-
Phone/laptop decals - win or fail?
its an idea many have had and few have succeded at. you have to much compatition online from well established companies. you don't have any equipment, so you would either have to outsource the stuff to someone else or buy the equipment yourself which costs many thousands of...- rushworks graphics
- Post #10
- Forum: Newbie Forum
-
seal el laminator
oh ok! yeah we usualy just put the roll on and then change up the roll when needed. i think the clutch's are to tighten up the roll speed or something like that.- rushworks graphics
- Post #14
- Forum: General Signmaking Topics
-
this will be an interesting day....
wow, thats a real busy layout!- rushworks graphics
- Post #23
- Forum: Vehicle Wraps
-
seal el laminator
we got ours from proveer(raleigh/garner). they gave us a great deal. i know they have several locations.- rushworks graphics
- Post #12
- Forum: General Signmaking Topics
-
seal el laminator
on the top roller feeder you put the laminate on, there is a clutch setting on the right hand side, which you can loosen or tighten up. same on the second holder which you attach the backing paper from the laminate on, again there is a clutch on the right hand side. i know you can adjust...- rushworks graphics
- Post #10
- Forum: General Signmaking Topics
-
Illuminated Car Magnets?
when i saw the $47 dealership statement that got my alarmbells ringing too. seems alittle bit suspect to me, but, you never know!- rushworks graphics
- Post #5
- Forum: General Signmaking Topics
-
seal el laminator
we were doing 5 ft sheets and continuously feeding them in one after the other. agreed on the material holder/scoop/trough thingy for the front if your going to be doing large runs though. i didn't get a manual with mine so i'm alittle unsure of the clutch settings for the top and bottom...- rushworks graphics
- Post #7
- Forum: General Signmaking Topics
-
Avery 1005 EZ RS profile for Roland?
we tried the premium profile first and it was ok..........alittle grainy and we were getting some very slight banding using it.- rushworks graphics
- Post #5
- Forum: Roland
-
Illuminated Car Magnets?
looks pretty cool on the website. never seen or heard of them before though.- rushworks graphics
- Post #2
- Forum: General Signmaking Topics
-
Avery 1005 EZ RS profile for Roland?
funny enough we downloaded that profile from the avery website yesterday. its on there for sure! you can also you a generic profile such as the gcvp profile, that also works with that material, i know as i just did over 100 feet of it using said profile.- rushworks graphics
- Post #2
- Forum: Roland
-
seal el laminator
to be honest, i new that a better quality laminator would be a good idea, but never thought i'd be laminating 100+ feet of prints on my first try! like i said in my origanal post, i would be lucky to get 2-3 feet on the diage, and i know others will say the same!- rushworks graphics
- Post #4
- Forum: General Signmaking Topics
-
CutContour appears centered in Ai but not in Rolland VW
:thumb: anytime!- rushworks graphics
- Post #41
- Forum: Roland
-
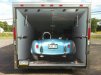
Trailer Door
nice!, seen these done afew times and it always look great.- rushworks graphics
- Post #4
- Forum: Portfolio Board
-
CutContour appears centered in Ai but not in Rolland VW
there are a few ways of doing a bleed. its whats easiest for you. sometimes just quicky coping and pasting something is real simple and takes 2 seconds. or if you have a more complex shape the off set path way is better.- rushworks graphics
- Post #39
- Forum: Roland
-
CutContour appears centered in Ai but not in Rolland VW
for example, if you have a box. make a box shape and copy it. now put a stroke on the origanal box so you have your bleed. then put the copied box over that and use that as your cutline. or you can create a box for example, go into object, path, offset path and adjust there.- rushworks graphics
- Post #34
- Forum: Roland
-
A con Artist Customer
thats an old trick! promise off ALOT of future work if only you will drop your price alittle more! don't fall for it man, shes just yanking your chain in the hopes you will drop your price yet again.- rushworks graphics
- Post #12
- Forum: Sales, Marketing, Pricing Etc.
-
CutContour appears centered in Ai but not in Rolland VW
if you click onto the boxes with colors in, one of them is the stroke box. when you click on the stroke box, the stroke tool comes up on the top of the screen, there you can adjust the width.- rushworks graphics
- Post #32
- Forum: Roland
-
CutContour appears centered in Ai but not in Rolland VW
you can adjust it to whatever you think looks right. for example an easy way to do a bleed with cutline is this.......take your star, then press on the outline on the edge, use that as your cutline. then, you can use an offset path for your stroke, or use the tool i told you about in the above...- rushworks graphics
- Post #31
- Forum: Roland