-
I want to thank all the members that have upgraded your accounts. I truly appreciate your support of the site monetarily. Supporting the site keeps this site up and running as a lot of work daily goes on behind the scenes. Click to Support Signs101 ...
You are using an out of date browser. It may not display this or other websites correctly.
You should upgrade or use an alternative browser.
You should upgrade or use an alternative browser.
Head height adjustment on Valuejet 1604
- Thread starter heyskull
- Start date
Solventinkjet
DIY Printer Fixing Guide
There is a special tool you can get from Mutoh that's basically a feeler gauge with 2 thicknesses. You move the carriage over it and it should clear the lower thickness but not the higher one. If you can get a tech manual, it describes it in section 7.9.
GAC05
Quit buggin' me
I have a 1624 and I don't think the print head is the same model as the 1604 but the carriage that it mounts to looks the same.
Here is the page from my maintenance guide:

Procedure should work for you. I did not have the jig that is required. You can use an old blade style automotive feeler gauge (used to gap spark plugs & adjust valves). Or, if you have a set of digital calipers you can find something that is 1.3mm. thick and use it to set the gap. I ended up using 2 coins that mic'd out to the same 1.3 edge thickness and set the head height so that it would slide over them without touching. Seems to have worked.
Good luck
*I also needed a strong flashlight and a magnifying glass to see what I was doing, but if you are less than half a century old they shouldn't be required.
Here is the page from my maintenance guide:
Procedure should work for you. I did not have the jig that is required. You can use an old blade style automotive feeler gauge (used to gap spark plugs & adjust valves). Or, if you have a set of digital calipers you can find something that is 1.3mm. thick and use it to set the gap. I ended up using 2 coins that mic'd out to the same 1.3 edge thickness and set the head height so that it would slide over them without touching. Seems to have worked.
Good luck
*I also needed a strong flashlight and a magnifying glass to see what I was doing, but if you are less than half a century old they shouldn't be required.
GAC05
Quit buggin' me
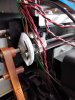
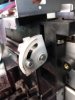
Mine are about the same as yours after I adjusted them. As long as the head is parallel to the platen and at about the 1.3mil gap it should be good.Looking at my two pictures either side.
The adjustment collars are a lot different height either side.
Has something moved?
SC
FatCat
Premium Subscriber
If your bearings are that worn, why not replace them? I did it once on my old 1604 and did it another few times on my 1624s. Not a terrible task, but certainly not a walk in the park either. I had replaced my whole carriage assembly and used some the old (but good) bearings from it. I recently found the size of those bearings is 4x12x4mm and bought a pack off Amazon (Xike was the manufacturer, though I am sure you can find others) and it was virtually the same.Well I tried to adjust the head height today and I cannot get anywhere near 1.3mm on low settings.
Probably set at about 0.8-0.9mm .
Is their away of lifting the head manually to a new datum point or is this due to my lower head bearings being worn?
Thanks
SC
heyskull
New Member
So is it possible to just buy Eight 4x12x4mm bearings and install them into the existing carriers?If your bearings are that worn, why not replace them? I did it once on my old 1604 and did it another few times on my 1624s. Not a terrible task, but certainly not a walk in the park either. I had replaced my whole carriage assembly and used some the old (but good) bearings from it. I recently found the size of those bearings is 4x12x4mm and bought a pack off Amazon (Xike was the manufacturer, though I am sure you can find others) and it was virtually the same.
I thought some of the lower ones are pressed or clipped in on a holder?
Thanks
SC
FatCat
Premium Subscriber
So in my experience, I have only replaced the stationary bearings which basically snap in and out and the bearings slide on and off their shafts. FWIW - these are the only bearings that have gone bad on me, and I've swapped 3-4 over different machines.So is it possible to just buy Eight 4x12x4mm bearings and install them into the existing carriers?
I thought some of the lower ones are pressed or clipped in on a holder?
Thanks
SC
The bearings on the "spring" clips top and bottom might be pressed on - I have one here I am looking at - but I also see a clip. So I would think even if they are pressed, you could throw them in the freezer after removing the clip and slide or tap the bearing off. Same goes for installation - freeze the bearing and should give you enough play to slide it on the shaft. Again, I haven't done a bearing on the spring clips yet - those seem to hold up better than the stationary bearings from my experience.
heyskull
New Member
I think it
Th
anks
SC
So what bearings wear? I thought it was the ones on the lower carriage?
Do you have any information on changing these?
Thanks
SC
I think it is the lower ones as the head height has dropped so much.So in my experience, I have only replaced the stationary bearings which basically snap in and out and the bearings slide on and off their shafts. FWIW - these are the only bearings that have gone bad on me, and I've swapped 3-4 over different machines.
The bearings on the "spring" clips top and bottom might be pressed on - I have one here I am looking at - but I also see a clip. So I would think even if they are pressed, you could throw them in the freezer after removing the clip and slide or tap the bearing off. Same goes for installation - freeze the bearing and should give you enough play to slide it on the shaft. Again, I haven't done a bearing on the spring clips yet - those seem to hold up better than the stationary bearings from my experience.
Th
anks
SC
So in my experience, I have only replaced the stationary bearings which basically snap in and out and the bearings slide on and off their shafts. FWIW - these are the only bearings that have gone bad on me, and I've swapped 3-4 over different machines.
The bearings on the "spring" clips top and bottom might be pressed on - I have one here I am looking at - but I also see a clip. So I would think even if they are pressed, you could throw them in the freezer after removing the clip and slide or tap the bearing off. Same goes for installation - freeze the bearing and should give you enough play to slide it on the shaft. Again, I haven't done a bearing on the spring clips yet - those seem to hold up better than the stationary bearings from my experience.
So what bearings wear? I thought it was the ones on the lower carriage?
Do you have any information on changing these?
Thanks
SC
FatCat
Premium Subscriber
I think it
I think it is the lower ones as the head height has dropped so much.
Th
anks
SC
So what bearings wear? I thought it was the ones on the lower carriage?
Do you have any information on changing these?
Thanks
SC
So, I can't be certain "why" your head has dropped. For me, I replaced bearings because it was causing a noise and/or was affecting the smoothness of the carriage going back and forth and causing EO74 Current errors. Once I replaced the bearings, all was fine. If you can slide your carriage back and fort and don't feel it is choppy or sticks/grabs in certain places then maybe your bearings are OK?
I was only ever aware of lowering/raising head height by moving the cams on the side of the head holder up or down. I would think if the whole carriage has slid down there is a bigger problem - maybe the tension springs have gotten worn and softer?
As far as bearing replacement, it's pretty straight forward. You have to disconnect the steel ribbon (just tape it to the gantry so it stays put) and if you are VERY careful you can just pinch the lower 2 spring tension arms with the bearings on them - and tilt the bottom away and off the bottom raceway and then lift it up and off the top portion. AGAIN BE VERY CAREFUL TO NOT HIT OR DAMAGE YOUR ENCODER STRIP. Once it's off, you'll need to have something to rest it on the platen so the head doesn't hit anything. Remember your ink lines, etc. are still attached at the top. (The first time I replaced a bearing I unassembled everything and realized I didn't need to the 2nd time I did it.) Just be patient, take your time and keep the head safe from getting hit/bumped.
heyskull
New Member
Sean
The bearings have become slightly noisier but their is no tight spots, errors or choppy/sticky areas as you move the carriage across.
I would of thought after 13 years or use their would be some sort of wear in them though.
If the tension springs had gone soft I would of thought that the carriage would return to its high setting.
The issue is when you move it to its low setting it is a lot closer to the platen then the 1.3-1.4mm it should be. I would of thought if the springs were weak this wouldnt move it down as much.
How would the whole carriage slide down?
Thanks for your help Sean
Cheers
SC
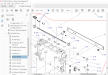
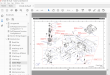
The whole carriage assembly will drop down if the bearings labelled C-7 on the attached screenshots fail, these are the 2 bearings that retain the height of the carriage on the rail.
Attachments
heyskull
New Member
So replacing just the top ones should be a lot easier than the bottom ones.The whole carriage assembly will drop down if the bearings labelled C-7 on the attached screenshots fail, these are the 2 bearings that retain the height of the carriage on the rail.
It shouldn't need as much dismantling.
Since we have gone into lockdown from today I will get some bearings ordered and install them next week.
SC
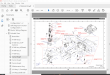
Also check the condition of the bearing on the Cursor Roller Arm Assembly, these 2 are the ones that press all the carriage bearings snug against the bearing raceways of the rail.
Attachments

Last edited: