-
I want to thank all the members that have upgraded your accounts. I truly appreciate your support of the site monetarily. Supporting the site keeps this site up and running as a lot of work daily goes on behind the scenes. Click to Support Signs101 ...
You are using an out of date browser. It may not display this or other websites correctly.
You should upgrade or use an alternative browser.
You should upgrade or use an alternative browser.
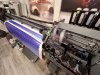
Help: 'Carriages Are Disconnected' - Roland SC 545 - broken cable - heads exposed and un-capped
- Thread starter 96XP
- Start date
-
- Tags
- cablebroken roland sc 545 snapped


Jim Hancock
Old School Technician
You need to soak and cap the heads until you get new parts. Close off the 6 cap lines with binder clips, fill the caps brimming full with cleaning solution and lock the print heads in place. Start up in service mode and go directly into the service menu and down to CAP&WIPER CTRL, where you can close the caps. Don't turn off the printer from the sub power, as it may go through a shutdown sequence and give you an error. Instead, power it off in the back and unplug it. Here are the part numbers you need... If you can't find the parts, message me, Roland has them in stock in California. That video should be just fine for replacing the parts.
Pulley - 21975154 - PULLEY,UD49.2S4(B4.6C6.6)
Cable - 21945144 - WIRE FJ-540
Pulley - 21975154 - PULLEY,UD49.2S4(B4.6C6.6)
Cable - 21945144 - WIRE FJ-540
Attachments

96XP
New Member
Many thanks, Jim. Had a spare wheel in storage and have assembled. Pulled the cable (which looks to be in good condition) and gave it and the gears a cleaning. Just getting ready to wind the cable onto spool.You need to soak and cap the heads until you get new parts. Close off the 6 cap lines with binder clips, fill the caps brimming full with cleaning solution and lock the print heads in place. Start up in service mode and go directly into the service menu and down to CAP&WIPER CTRL, where you can close the caps. Don't turn off the printer from the sub power, as it may go through a shutdown sequence and give you an error. Instead, power it off in the back and unplug it. Here are the part numbers you need... If you can't find the parts, message me, Roland has them in stock in California. That video should be just fine for replacing the parts.
Pulley - 21975154 - PULLEY,UD49.2S4(B4.6C6.6)
Cable - 21945144 - WIRE FJ-540
Am not clear however, on what process/status the printer will be in once all is set and ready to boot.
Will it know what to do, or is there some changes or sequences I will need to perform?
Jim Hancock
Old School Technician
Jim Hancock
Old School Technician
96XP
New Member
Took note and marked tensioner prior to removal - so put back in original position/tension.And this...
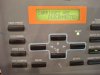
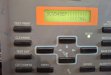
Have new issue, and my first guess is the ribbon cable has been pulled and plugged one time too many?
Bad finger on cable? If so, can it be trimmed back slightly instead of replacing?
Have attached what appears on-screen.
Any/all advice appreciated.
Attachments
96XP
New Member
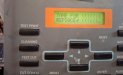
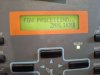
Text was unintelligible, though pushed a few buttons just the same.
Succeeded in getting the printer to come to life, and park the heads.
If I fill in the gaps, I can assume what the message is, however this will be impossible going into settings, etc...
So either the screen is bad, or more likely the cable?
Succeeded in getting the printer to come to life, and park the heads.
If I fill in the gaps, I can assume what the message is, however this will be impossible going into settings, etc...
So either the screen is bad, or more likely the cable?
Attachments

Jim Hancock
Old School Technician
Remove and check the panel cable. Make sure it is in straight. If the ends are damaged, yes, you can carefully trim them. Make sure it's a straight cut, as you want to bottom out the cable in the connector when you put it in, and the contactors still need to touch the fingers, so only cut off as much what you have to.
96XP
New Member
Up and running again.
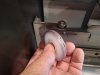
Here was the cause.:
In August of 2020, the last time I had a tec work on the printer - before relocating to a place far far away from any help, I had him install a new nylon wheel while doing service.
What didn't occur to either of us upon sight, was that the bearing had been pressed in from one side only - thus leaving opportunity for it to pop out some day - today, Aug 0f 2025.
I kept the original and inspected the integrity, to see that the bearing is sealed into that nylon wheel from both sides instead of just one, so no way of coming out on its own.
That said, I reinstalled the old, and will seek a backup.
Something else I'll bring up, is that the defective wheel always had a slight wobble when spinning, however the tec didn't see it as a big problem.
I believe that it may have lasted longer had it been installed reverse to the way it was, thus preventing the wheel from being able to come up and out, as only one side does prevent it.
Special thanks to Jim and netsol for offering assistance.
Godspeed