• I want to thank all the members that have upgraded your accounts. I truly appreciate your support of the site monetarily. Supporting the site keeps this site up and running as a lot of work daily goes on behind the scenes. Click to Support Signs101 ...

How to apply prints?

3Dsigns

New Member
Ok, when I get a printer up and running, I will need some method of applying prints. .I have an area in my 'clean space' workroom large enough to put a 4x9 table or maybe even a 5x10. What material would you recommend as a top? Is there a special tool/machine/jig whatever I could use to, say, apply a full print to a 4x8 sheet of Dibond or MaxMetal? Thanks
 

OhioSigns

New Member
You can use a normal roll to roll laminator to mount prints or you can get a flatbed laminator such as a RollsRoller, CWT, etc.
 

2B

Active Member
regardless of the table size, make sure it is PERFECTLY FLAT especially if you are planning on applying graphics by hand.

we use a sheet of 12mm PVC 60x120 for our table tops

the Big Squeegee or TimberMaxx are good options to start with.
 

SheBeau

New Member
Material that will STAY FLAT is very important, especially when used for years. But the best investment for that flat table is a self-healing mat. It protects the table surface and allows you to trim your prints in the same workspace. Speedpress makes a good one and there’s an optional grid available.
 

Attachments

  • matswithgrids.jpg
    matswithgrids.jpg
    18.8 KB · Views: 129

unclebun

Active Member
We make our work tables ourselves from lumber using 3/4" MDF for the top. Directly under them is a structure made from 2x6's to keep it rigid and flat. We use a light neutral gray or beige colored expanded PVC 3mm thick as the top surface, attached with banner tape. This is inexpensive enough that we can replace it as it gets cut up after a few years. We found that self-healing mats get cut up just as fast and cost way more. We use the MDF full size, which is larger than 4'x8', so you have to put the PVC on crossways.

To put prints on signs we use Big Squeegees in various sizes. The laminator works but is way more fussy and cumbersome.
 

Brandon708

New Member
I would recommend if you're starting out and do not have a 20k budget for a laminating table these suggestions.

5'x10' ( strongly recommended size so you have extra space on the table for trimming 54" rolls of material before mounting.)
3/4" MDF or Plywood top
5'x10' Rhino Cutting Matt
52" Big Squeegee
 
If you do have it in your budget for a laminating table, I would highly recommend one. Our RollsRoller 280/145 is easily one of the best investments we've ever made. It would have normally been around $14,000 new, but we got a deal on a demo unit and picked ours up for around $11,500. There is a pretty big learning curve and a lot of frustration involved in trying to mount 4'x8' prints manually. With the table there is almost zero learning curve. It's almost every bit as easy as it looks in their instructional videos and it replaces a laminator altogether so long as you're not trying to laminate anything longer than the table's length. Not that it can't be done, but it's not overly easy to work past the length of the table.

Use 3/4" particle board and make sure it's framed and supported well and use a big squeegee.

...and make sure you have a helper working the other end of the print...and make sure you use even pressure across the entire squeegee...and make sure you have a lot of patience and work slow and steady...and make sure you post heat the print to remove the inevitable tiny scuffs across the laminate surface...and etc...etc...etc...

Not saying you're wrong at all, Gino, but I will say that I don't miss the Big Squeegee days and I don't miss mounting large prints manually whatsoever. I'm glad it's become a thing of the past for us.
 
Last edited:

Gino

Premium Subscriber
Well, for the most part, it has for us, too. Having a flatbed has made short work of that, but we still use the laminator and the big squeegee. When you have a small size or one or two pieces, it beats getting everything up and running. Lay it out, tape a 4" piece on the end and one person can have a 4' x 4' done in about 2 minutes.... a 4' x 8' in about 3 minutes. It certainly helps with someone on the other side, but it can be done. If I can do it, then just about anybody could do it.
 

backwoodsgirl

New Member
I apply oracal 3951 laminated prints on 4x8 sheets without anything special just some masking tape and regular squeegee. Basically use the hinge method and after it's started I roll it up tight enough that I can hold it up with my left hand and squeegee with my right. I could use my cold laminator but it's really the same amount of effort either way. If I have a second person there to be the "catcher" then the laminator is a little easier and mistake-proof but I generally don't have anyone around when I need em.
 

ddarlak

Go Bills!
let me get this straight, you bought a printer and you have no clue as to how to do one of the most basic things associated with owning said printer?

this doesn't end well...
 

kcollinsdesign

Old member
Don't get too frustrated with some of our contributors. In many cases, they have spent tens of thousands of dollars on equipment and hundreds of hours to learn how to get the desired results.

To answer your question correctly, we would need a lot more information regarding your market and the scale of your output.

If you are a small (under $1 million year) general sign shop serving local community needs, all you probably need is a 4' x 8' 3/4" plywood table with a sheet of replaceable PVC on the top (I actually use 1/4" plate glass so I can cut on it too). The self-sealing mats are nice at first, but in my circumstances (low volume), just using an X-acto knife and a heavy ruler to cut and trim, they tend to get sliced up pretty fast. I use these tables for weeding, trimming, and cutting.

Consider your table height. In most cases you will want your work surface higher than a standard table top.

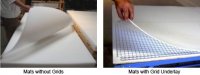
I drew a 1" grid on my MDO (under the glass) to help line things up when cutting. I also use the wet method and a felt squeegee (or at least a sleeve of some sort) to apply vinyl graphics onto substrates. Call me a coward, but I have been doing this since the beginning of time and have never had any problems.

For rigid substrates, I just set them on sawhorses and 2x4s.

If you are doing more production, you will want to look into a flatbed and direct printing.
 
Top