Can you show me how i get to the rear lower bearings?
Are the lower rear bearingassemblies only held in with one screw and the whole assembly comes off?
Can I remove and replace these easily?
SC
I replaced a few bearings on our old 1604 twice, (and it's the same on the 1624 machines) - the first time I bought the whole carriage assembly ($700 USD) and replaced it entirely. The second time I stole bearings from the old assembly and just swapped bearings. *I am pretty sure you can find those bearings somewhere, they remind me of RC car wheel bearings...but not sure what an exact match will be. If you want to try to avoid buying the whole carriage, here is what you can try;
You have to remove the carriage from the rail to access the bearings. The instructions from the maintenance manual will have you removing a lot of parts including unhooking the ink lines, etc - this isn't necessary if you can be VERY careful. *Remember your head is exposed and bumping it on something may cause problems with the nozzles, I believe I used some small blocks to hold the head up while I wasn't holding it to ensure the head didn't rest on anything.
To start, remove the black shroud cover from the carriage assembly so you can see everything. Then you need to remove the steel band from the carriage assembly on both sides of the carriage which is held on by screws. FIRST - removing the big plastic end cover on the printer (the far side cover with the round PF encoder is located) will give you access to the roller bearing the steel band rides on. There are adjustments screws there that allow you to tighten/loosen tension on the steel band. Make sure you back it off to where the steel band is pretty slack. Be careful with the steel band, it is sharp and can cut you! After removing each screw, use a piece of tape to tape the end of the steel band to the fence so it doesn't completely fall off.
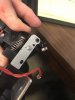
The lower 2 roller bearings are on spring/tension "fingers" that clamp to the back of the lower rail and also hold those bearings. Compressing both of these fingers (SEE PIC FOR REFERENCE) will allow you to tilt the carriage forward and lift it off the fence. Keep in mind, your ink lines and wiring is still attached thru the top of the carriage assembly, so you will have limited movement on how far it can go away from the fence. You should be able to spin the bearings with your fingers to figure out which one(s) are bad. (NOTE: The bearings that ride on the front of the rail are simply pressed or snapped in place on the back of the assembly. The lower tension bearings and the top inside bearings are held with star-clips. SEE PIC FOR REFERENCE) Once you get the bad bearing removed, you may be able to take it to a hobby store that has RC cars and find a matching bearing - or research online.
REASSEMBLY: Once you have the new bearings in, you simply compress the lower spring arms, drop the carriage back on the fence - BUT BE AWARE - you have to make sure your encoder strip fits in the small notch of the encoder sensor when you drop it back on. It is helpful to have a second person watch this, or you can simply unhook the encoder strip and hook it back up after you get the carriage seated. Re-attach both steel bands to the carriage and then tension the steel band with the adjustment screws on the end of the machine where you loosened them. It is important to get the steel band tight, but not over-tighten it. Then button everything up and you should be back in business.