We’ve got non woven dialed > Brand?Hi John, We gave up on heavyweight wallpapers as could never get them to print well on our 800w. We’ve got non woven dialed in now and we’re running in a sweet spot where all our WPs are perfect in length. With heavyweight substrates we always had length issues and the media appeared to buckle and distort too.
-
I want to thank all the members that have upgraded your accounts. I truly appreciate your support of the site monetarily. Supporting the site keeps this site up and running as a lot of work daily goes on behind the scenes. Click to Support Signs101 ...
You are using an out of date browser. It may not display this or other websites correctly.
You should upgrade or use an alternative browser.
You should upgrade or use an alternative browser.
need real world feedback of the HP W800
- Thread starter bigben
- Start date
We're running new test, now it gives us more headaches because the first panel is good, the second panel has a difference in length, between 0.3-0.5 or more, and the third panel is good. It's a miracle.... Please help with this issue, because we can't sell any wallpaper like this.Well you have a ****ton of output tension. Is that material really so rigid it needs that much?
Btw to keep the balance between input and output, you should have a little more input tension. I would put at least 15.
balstestrat
Problem Solver
I just don't think it's going to happen that you get them to 0.0. You have to buy a Colorado for that kind of work.We're running new test, now it gives us more headaches because the first panel is good, the second panel has a difference in length, between 0.3-0.5 or more, and the third panel is good. It's a miracle.... Please help with this issue, because we can't sell any wallpaper like this.
I think that 0.5mm per panel is acceptable. On the old machines it was worse, might have been 5.0mm difference which is not great.
Mike Perth
New Member
John, we’ve been there with HP, good luck with a solution. If you do find one please let us know.Thanks Mike, we'll consider this as we still have the same issues and it's even getting worse. The technician can't solve it. So we now go to higher level. Calling HP. But I think when they know the solution they already did an upgrade, so I am not so hopeful...
Sorry but I don't agree with you 0.5 acceptable? What about patterns? It's impossible to tell this to our customers.I just don't think it's going to happen that you get them to 0.0. You have to buy a Colorado for that kind of work.
I think that 0.5mm per panel is acceptable. On the old machines it was worse, might have been 5.0mm difference which is not great.
balstestrat
Problem Solver
Really? It's half a millimeter, how do you even see it from a wallpaper that's being watched from meters away?Sorry but I don't agree with you 0.5 acceptable? What about patterns? It's impossible to tell this to our customers.
Simon Peach
New Member
I'm looking for some advice regarding grainy prints. - Ours has completely fallen off a cliff.
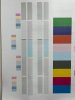
I have attached an image from site of a re-printed drop. + a sample image for our MD5 profile as well as the generic vinyl profile.
We've had success with both profiles in the past. - The substrate is MD5.
Printheads are all fine. - Any suggestions?
I have attached an image from site of a re-printed drop. + a sample image for our MD5 profile as well as the generic vinyl profile.
We've had success with both profiles in the past. - The substrate is MD5.
Printheads are all fine. - Any suggestions?
Attachments


balstestrat
Problem Solver
Biggest factors:I'm looking for some advice regarding grainy prints. - Ours has completely fallen off a cliff.
I have attached an image from site of a re-printed drop. + a sample image for our MD5 profile as well as the generic vinyl profile.
We've had success with both profiles in the past. - The substrate is MD5.
Printheads are all fine. - Any suggestions?
- Bad printhead alignment
- Substrate advance incorrect
- Printhead problems (wear, tear, blocked nozzle etc.)
I would first do a printhead alingment and 2nd is to check that the substrate moves properly.
Also clean or replace the OMAS lense. Manual advance calibration if nothing else helps.
Simon Peach
New Member
Will give those a go. - Thank you!Biggest factors:
- Bad printhead alignment
- Substrate advance incorrect
- Printhead problems (wear, tear, blocked nozzle etc.)
I would first do a printhead alingment and 2nd is to check that the substrate moves properly.
Also clean or replace the OMAS lense. Manual advance calibration if nothing else helps.
Re. substrates Advance, This would be in each profile, right?
balstestrat
Problem Solver
In this case it mostly means that the substrate really physically advances correctly.Will give those a go. - Thank you!
Re. substrates Advance, This would be in each profile, right?
- Roll is setup right way
- Take-up is setup right way
- OMAS works correctly
- No other problems on the way
etc. It's a wide topic.
Simon Peach
New Member
Appreciate your help. - Thank you.
Will get chipping away at the basics.
Will get chipping away at the basics.
Simon Peach
New Member
So have run printhead alignment.
OMAS was replaced by an engineer within the past 4 weeks.
Print tests are showing the nozzles ok.
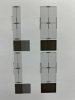
Below are two images from the head alignments.
The 4th image is from ramping the ink up to 140% - It's a significant improvement but will soon work its way through our ink.
OMAS was replaced by an engineer within the past 4 weeks.
Print tests are showing the nozzles ok.
Below are two images from the head alignments.
The 4th image is from ramping the ink up to 140% - It's a significant improvement but will soon work its way through our ink.
Attachments


balstestrat
Problem Solver
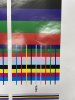
It can be clearly seen you have some issues there. Those boxes should be pretty sharp on the edges but you got a lot of spray there.So have run printhead alignment.
OMAS was replaced by an engineer within the past 4 weeks.
Print tests are showing the nozzles ok.
Below are two images from the head alignments.
The 4th image is from ramping the ink up to 140% - It's a significant improvement but will soon work its way through our ink.
Go to "optimize quality" -> "..." upper right -> Print printhead status plot.
Take a picture of every printhead and post it. Recommended standard SAV.
P Wagner
--
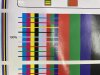
The images you posted were not printhead alignment plot. They are from the Ink Density and ICC Profile chart sets.So have run printhead alignment.
OMAS was replaced by an engineer within the past 4 weeks.
Print tests are showing the nozzles ok.
Below are two images from the head alignments.
The 4th image is from ramping the ink up to 140% - It's a significant improvement but will soon work its way through our ink.
With current firmware, I would recommend using the manual printhead alignment (versus the automatic alignment), to achieve optimal PH align results.
Simon Peach
New Member
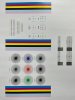
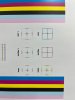
Thanks for the advice guys, attached are the actual tests on a generic SAV profile.
Attachments
balstestrat
Problem Solver
I think it looks like your alignment is off tiny bit. Maybe you should try that manual alignment next.
Just to be sure, no one has turned optimizer to 0 in the profile for some reason?
Just to be sure, no one has turned optimizer to 0 in the profile for some reason?
Simon Peach
New Member
Thanks will give the manual align a go.
I don’t think we can make any alterations to the generic profiles. - We have had issues in the past with optimiser, it was my first thought, the engineer seemed to be happy it was firing.
I might see if there’s a way to do a test draw on optimiser to be 100%
I don’t think we can make any alterations to the generic profiles. - We have had issues in the past with optimiser, it was my first thought, the engineer seemed to be happy it was firing.
I might see if there’s a way to do a test draw on optimiser to be 100%
Simon Peach
New Member
wibble
Last edited: