• I want to thank all the members that have upgraded your accounts. I truly appreciate your support of the site monetarily. Supporting the site keeps this site up and running as a lot of work daily goes on behind the scenes. Click to Support Signs101 ...

New HP Latex 700 and 800 series - with White ink

bigben

New Member
We mostly print spot white only. Either in 6 passes or 12 passes. So speed is similar to regular printing.

We also do white flood for second surface mounting. We print with a window perf pattern to install on the interior side and customers prefer it to using tape and it's less expensive than laminate a mounting film.

3 layers and 5 layers are pretty rare for us but we charge accordingly.
 

JBurton

Signtologist
, it took 23 hours to print... And 2 full things if white ink on our 700w
So if you started at 8am, ran out of ink around hopefully before 5pm, when someone was still on site to swap carts, then what? Pray it doesn't run out before 8am? This sounds like a print I would run.
 
We have a job that's about 60 ft in sandwich mode - so color white color, it took 23 hours to print... And 2 full things if white ink on our 700w

It looked great, but if we charged shop rate for those 23 hours the price either have been ridiculous for some 3" stickers. I was mostly amazed at how much white ink it took though
When printing CWC Sandwich mode, the white ink is a diffuser sandwiched in between two color layers.

I am guessing that you used the 160-percent white ink density CWC Sandwich mode. Many CWC jobs can be printed very acceptably using the 60-percent white ink density rather than the 160-percent white density. This speeds up the print speed by roughly 2x and reduces white ink consumption by more than half.
 

bigben

New Member
When printing CWC Sandwich mode, the white ink is a diffuser sandwiched in between two color layers.

I am guessing that you used the 160-percent white ink density CWC Sandwich mode. Many CWC jobs can be printed very acceptably using the 60-percent white ink density rather than the 160-percent white density. This speeds up the print speed by roughly 2x and reduces white ink consumption by more than half.
Yes, 60% can be used but if the print go on an outside window and you have text both side, the white is not opaque enough. But if the visual is the same on each side (no mirror), 60% is perfect.

Even printed on white vinyl, I've tested the 3 layers at 60% and I could see the colors through the white layer.
 

ikarasu

Active Member
So if you started at 8am, ran out of ink around hopefully before 5pm, when someone was still on site to swap carts, then what? Pray it doesn't run out before 8am? This sounds like a print I would run.
No. I didnt think it would take a whole cart of ink... so once I saw the printer wanted that many hours... I loaded it and hit print on Friday at 4 PM. Came in to only a partial roll printed on monday and no white ink.... had to order another 2 sets of ink... This all happened last friday, we're still not done the job! Its getting cut up tomorrow to see how many we need... I'm thinking its halfway done, but who knows... maybe itll go past 2 things of ink and we'll need the third.
 

ikarasu

Active Member
When printing CWC Sandwich mode, the white ink is a diffuser sandwiched in between two color layers.

I am guessing that you used the 160-percent white ink density CWC Sandwich mode. Many CWC jobs can be printed very acceptably using the 60-percent white ink density rather than the 160-percent white density. This speeds up the print speed by roughly 2x and reduces white ink consumption by more than half.
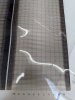
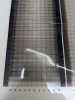
Probably, I just did the default onyx one. Good to know... I'll give it a test, but honestly it was pretty transparent with the mode it was on - It's a school bus decal - Black /blue ink on front, then flood blue on the back - We usually screenprint them... But figured we may as well make use out of our white ink and do a sandwich print, with the white being the blockout, but from the back of the decal with the blue ink, and white ink, you can still see the black ink through it. It's still acceptable... but Dropping the white ink to 1/3 as much might make it too noticeable... I'll give it a try when we're printing the other half of the roll though, just to see what a difference it makes!


Just for comparrison - We could have done it as a 2 color screen print.... Black ink, then opaque blue ink and it would have the same look, but be more opaque.... And we could have knocked the whole roll out in a 4 hour work day... That includes sheet cutting all the material, printing both colors on our press, then graphtecing it. So while you can walk away and forget it with the Latex... You're using a few hundred dollars more in ink compared to screenprinting.

Don't get me wrong, not knocking on it - This is our first white ink printer, and compared to samples I've seen on other brands it blows them all out of the water - It's great for spot white ink, and for stuff we cant screenprint... .its just a bit... slow, understandably considering its printing 3 layers at once. I just never thought I'd see a 22 hour print on a wide format printer, I thought it'd take a full workday... was a bit shocked to see the ETA when we hit print :roflmao:
 

JBurton

Signtologist
I loaded it and hit print on Friday at 4 PM
Ah, the tried and true method:
i-shoot-with-my-eyes-closed-too.jpg
 

DPICopy

New Member
I'm trying to print on a 5mil Clear Acetate material with a white spot undercoat. I've traditionally done this on our Arizona but it would be so nice if I could get it functioning on the 700W. When I printed a test on a Orafol clear adhesive vinyl (with liner) it came out beautiful. When I used the same profile on this 5mil clear acetate (no liner) there is a huge offset of the white and color on top.

Suggestions on how to approach fixing this or suggestions on a profile to start with? This was using Drytac SpotOn Clear Gloss - 600dpi 32p6c110_WUF 100. Just starting to use white on the 700w, it's such a severe offset in 'mostly' one direction I'm assuming it's not a choke issue.
Acetate3.jpg
Acetate1
Acetate2.jpg
Acetate2
Orafol1.jpg
Orafol -Great alignment
 

bigben

New Member
I'm trying to print on a 5mil Clear Acetate material with a white spot undercoat. I've traditionally done this on our Arizona but it would be so nice if I could get it functioning on the 700W. When I printed a test on a Orafol clear adhesive vinyl (with liner) it came out beautiful. When I used the same profile on this 5mil clear acetate (no liner) there is a huge offset of the white and color on top.

Suggestions on how to approach fixing this or suggestions on a profile to start with? This was using Drytac SpotOn Clear Gloss - 600dpi 32p6c110_WUF 100. Just starting to use white on the 700w, it's such a severe offset in 'mostly' one direction I'm assuming it's not a choke issue.
View attachment 169364 Acetate1
View attachment 169365 Acetate2
View attachment 169366 Orafol -Great alignment
I think your problem is the advance calibration due to the thickness of the material. Try to copy the profile and make an advance calibration. Maybe it will adjust it.
 

balstestrat

Problem Solver
I don't think it should be that much. Run the advance calibration so you can choose the right value. My guess it's something like -4
 

DPICopy

New Member
I don't think it should be that much. Run the advance calibration so you can choose the right value. My guess it's something like -4
Maybe I'm reading it wrong, but this looks like the thinnest lines are at 0 on both charts. Am I missing one that is specific to white ink?
 

Attachments

  • PXL_20240129_180245219.jpg
    PXL_20240129_180245219.jpg
    1.5 MB · Views: 54
  • PXL_20240129_180250356.jpg
    PXL_20240129_180250356.jpg
    1.6 MB · Views: 61

balstestrat

Problem Solver
No this is the right one. So it should be 0 or +1.

You could have other factors like slipping, loose core or maybe it changes after you put it on the take up.
 

balstestrat

Problem Solver
And oh yeah people. If your unit is older than 1 year from today, you should get your drive roller encoder replaced.
Any weird advance issues sort of like this, I can promise your encoder is scratched because it's seated in the wrong position.
 

DPICopy

New Member
And oh yeah people. If your unit is older than 1 year from today, you should get your drive roller encoder replaced.
Any weird advance issues sort of like this, I can promise your encoder is scratched because it's seated in the wrong position.
Do you know if that was something replaced in the warranty replaced 'Enhancement Kit V1'.? I think I saw them pull it along with the ink lines.
 

bigben

New Member
Do you know if that was something replaced in the warranty replaced 'Enhancement Kit V1'.? I think I saw them pull it along with the ink lines.
Yes, It's covered by HP even if the printer is out of warranty like in my case. I've received a box of parts about the size of a mini-fridge (I did not open it). I'm waiting for the tech to make the update. Everything is free of charge. Contact your dealer about this.
 

DPICopy

New Member
Yes, It's covered by HP even if the printer is out of warranty like in my case. I've received a box of parts about the size of a mini-fridge (I did not open it). I'm waiting for the tech to make the update. Everything is free of charge. Contact your dealer about this.
Yep. Mine was completed a couple weeks go. Looked like they replaced almost all of the internal components. You should be getting a second box as well, about 1/4" of the size of the pallet one.
 
Top